


◆
Check that voltage indicated on the rating label corresponds the mains
voltage in your home.
◆
To clean the unit, wipe with a cloth dampened with a dilute neutral detergent
or water, then wipe clean with a dry cloth.(except body)
◆
Before plugging in, ensure the “ON/0/ R” switch(On/Off/Reverse) is turned
to "O" position(Off).
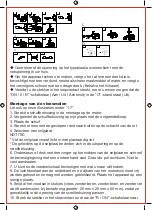
Assembly of the meat grinder
Please also observe our illustrations under “1-7”.
1.
Insert the
grinder
h
ead
into the mounting on the motor.
2.
Lock the
grinder head
into position with the
u
nlock button.
3.
Insert the
feed screw
.
4.
Insert the knife with the sharpened edge outwards onto the shaft of the scr
ew
.
5.
Select a cutting plate.
NOTE:
*Slightly grease the cutting plate beforehand with vegetable fat.
*The guides on the cutting plate are located in the recesses on the
feed
srew
housing.
6.
Support or press the centre of the cutting plate with one finger then screw the
fixing ring until tight with another hand. Rotate the catch clockwise. Do not over
tighten.
7.
You can now attach the food tray with whatever you want to grind.
8.
The air passage at the bottom and the side of the motor housing should be
kept free and not blocked. Locate the unit on a firm place.
9.
Cut all foods into pieces (Sinewless, boneless and fatless meat is
recommended, approximate size: 20 mm x 20 mm x 60 mm) so that they fit
easily into the
grinder
h
ead
opening.
10.
Plug in and turn the “
ON
/
R
” switch to "ON" position, then turn the
“ON/O/ Reverse” switch to "ON" position.
11.
After use switch the unit off and unplug it from the power supply.
Mounting of the K
u
bbe attachment
NOTE
Tubes of meat or dough paste can be made with the K
u
bbe attachment.
Please also observe our illustrations under “A and B”.
First proceed as described in “Assembling the meat grinder” item 1 to item 3(A).
1.
Position the 2-piece K
u
bbe attachment on the shaft of the
feed screw
.
NOTE
The guides on attachment (A) are located in recesses on the g
rinder head
.
2.
Rotate the catch clockwise.
3.
You can now
fill
the food tray with your meat or dough mixture.
See
below “Electrical connection”.


