


Cleaning and maintenance
◆
Always pull the power supply plug before cleaning and wait until the
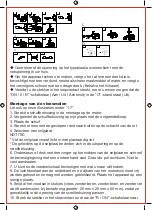
Assembly of the sausage attachment
Please also observe our illustrations under “C”.
1.
Position the sausage attachment on the
grinder
h
ead
.
2.
Rotate the catch clockwise.
3.
You can now
fill
the food tray with whatever you want to grind.
See below “Electrical connection/Application instructions”.
Electrical connection
Ensure that the function switch is set to “0”<off>.
Connect appliance to correctly installed and earthed socket 220-240V,50/60Hz.
The appliance is equipped with a forward and return function. If the
feed screw
should block, you can use the return function, in order to release it.
For your safety, the forward and return functions have been combined with two
switches.
Forward: Move the safety switch (4) to “ON” and the switch (3) to “ON”. The
appliance is in the “Forward” mode. Switching to the return mode is not possible.
Return: Move the safety switch (4) to “R”and the switch (3) to “R(Reverse)”. The
appliance is in the “Return” mode. Switching to the forward mode is not possible.
To switch off
the device
m
ove the safety switch (3) to “O” and pull the power
plug.
Application instructions
Making sausages
* You can use either natural or artificial intestines.
* If you have decided
to use
natural intestines, soak them beforehand for some
time in water.
* Make a knot at the end of the intestine.
* Push the intestine over the sausage attachment.
* The sausage mass is pressed through the sausage attachment and the
sausage intestine is filled.
* Make sure that the sausage intestine is filled “loosely”. Since otherwise the
intestine could burst because the sausage expands wh
ile
cooking or frying.
* After the first sausage has achieved the require
d
length, press the sausage
together at the end of the sausage attachment with your fingers.
* Until you have acquired routine, you can switch the appliance off after each
sausage section.
* Twist the sausage once or twice around its own axis.


