background image

TonerRefillKits.com 


RechargX™ RX139

Mon - Fri  8am - 5pm ET                     

© 1995-2014 ReChargX™, EmptyX, TonerRefillKits and TonerRefillKits.com, the TonerRefillKits logo, the 


2014.07.30

800.527.3712 or 352.343.7533                 

ReChargX™ and EmptyX logos are trademarks owned by TonerRefillkits, LLC. All rights reserved. 

Page 11 of 12

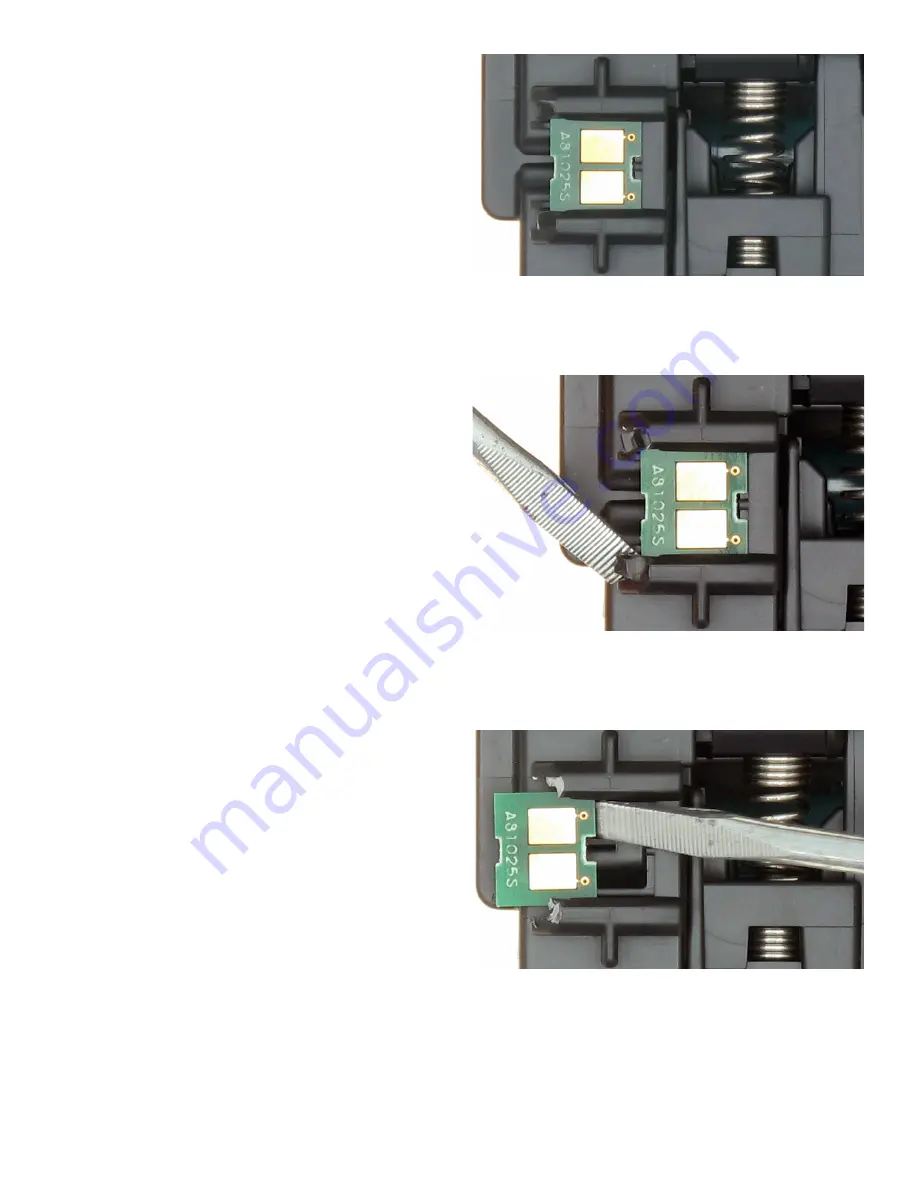
Step 25: Overview of the Reset Chip

Notice the location of the reset chip on the toner 

cartridge shown in figure 25.

Step 26: Remove the Plastic Tabs

The toner cartridge reset chip is held in place 

by two small plastic tabs.  These tabs must be 

removed before the cartridge reset chip can be 

removed, as shown in figure 26.

Gently pry up on each of the cartridge reset chip 

tabs to break them so the chip can be removed 

from the cartridge.

Step 27: Removing the Reset Chip

After the two tabs have been removed, push the 

chip out of the slot, as shown in figure 27.

Figure 25

: The cartridge reset chip

Figure 26

: Remove the cartridge chip tabs

Figure 27

: Remove the cartridge reset chip

Содержание ReChargX RX139

Страница 1: ...will be toward your chest and the reset chip on the left side figure 1 Step 2 Cover the Cartridge Drum Rotate the cartridge on your work surface so the toner cartridge drum will be toward the ceiling...

Страница 2: ...el back the label to expose a significant amount of cartridge surface fig 4 Step 5 Removing the Toner Cartridge Label before Refilling Part 2 Score the toner cartridge label using the edge of the flat...

Страница 3: ...king bit against the cartridge until it penetrates the cartridge housing Since the tool is quite hot excessive force is unnecessary figure 8 Note Once the copper tip of the hole making tool penetrates...

Страница 4: ...bag to begin emptying the toner hopper Carefully pour out as much of the toner as possible figure 10 Shaking the toner cartridge up and down is not recommend as it normally creates an unnecessary ton...

Страница 5: ...e plastic dispenser spout from the ReChargX RX139 Toner Refill Kit To make the adding of the toner to the toner hopper as easy and dust free as possible tilt the end of the cartridge with the hole in...

Страница 6: ...per hole to ensure the ReChargX leak proof seal will be applied firmly to the cartridge figure 12 Note Only use the toner grabber cloth on the exterior of the cartridge Do not use the cloth to clean a...

Страница 7: ...area will be located on the left side within the area shown by the yellow box Step 16 Plug in the Hole Making Tool Plug in the hole making tool included with the ReChargX Tool Kit Turn the sand timer...

Страница 8: ...rk with a minimal amount of pressure as shown in figure 18 Note Once the copper tip of the hole making tool slowly penetrates the top of the toner cartridge immediately withdraw the tool and unplug it...

Страница 9: ...is not recommend as it normally creates an unnecessary toner mess If the toner stops flowing stand the cartridge up and then re lower the hole over the paper gently tapping along the side of the cartr...

Страница 10: ...unit Step 22 Remove the ReChargX Seal from the Protective Backing Remove the ReChargX leak proof seal from the protective backing included in the ReChargX RX139 Toner Refill Kit figure 22 Step 23 App...

Страница 11: ...tridge shown in figure 25 Step 26 Remove the Plastic Tabs The toner cartridge reset chip is held in place by two small plastic tabs These tabs must be removed before the cartridge reset chip can be re...

Страница 12: ...fill Kit can be used on the top of the chip to hold it in place as shown in figure 29 DO NOT COVER THE BRASS CONTACTS Completion Congratulations You have successfully refilled your HP CB540A CB541A CB...

Отзывы: