

Adjust the angle of the pedestal arm by tightening the
rotation knob as needed.
!
Safety Precautions
Do not install Arkon products over an air bag cover or within the air
bag deployment zone. Arkon Resources, Inc. assumes no responsi-
bility of liability for injury or death as a result of car crashes and / or
air bag deployment.
Arkon is not responsible for any damages caused to your car, your
device, or yourself due to the installation or use of this pedestal mount.
The Mobile Mounting Specialists™
Consumer Hotline:
USA
(800) 841-0884
INT’L
(626) 254-9005
Monday - Friday 9 am - 5 pm, PST
Dashboard Mount Installation - Continued
Step 5.
TomTom Device Installation - Pedestal Attachment
TomTom Start & Ease Device Installation - Pedestal Attachment
Attach the device holder to the pedestal by inserting the
dual T-Tabs of the pedestal into the T-slots of the TomTom
adapter plate. Readjust angle knob if necessary.
Step 1.
Step 1.
www.arkon.com
Arcadia, CA 91006 USA
Designed in USA | Made in China
© Copyright 2010 Arkon Resources, Inc.
TomTom GO Series Plate Installation
Attach the adapter plate by sliding it up into the slot on the
back of the TomTom GO 520, 530, 630, 720, 730, 920, 920T,
and 930 models as shown below.
Step 1.
TomTom EasyPort Device Insertion
While holding the mounted adapter plate, gently insert
the device (not included, sold separately) into the adapter
plate until an audible click is heard. The device can then
be rotated into the desired viewing angle.
Step 1.
TT112
| Friction Dashboard Mount for TomTom® GPS - Continued
TomTom ONE, ONE XL, and ONE XL • S Plate Installation
Slide the adapter plate up into the grooves on the
back of the TomTom ONE, ONE XL, or ONE XL • S device.
Step 1.
While holding the mounted TomTom adapter plate, gently
insert the TomTom device (not included, sold separately)
into the adapter plate until an audible click is heard.
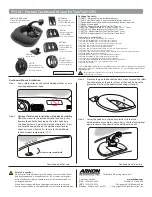
Angle Knob
Angle Knob


