background image

31

ENGLISH

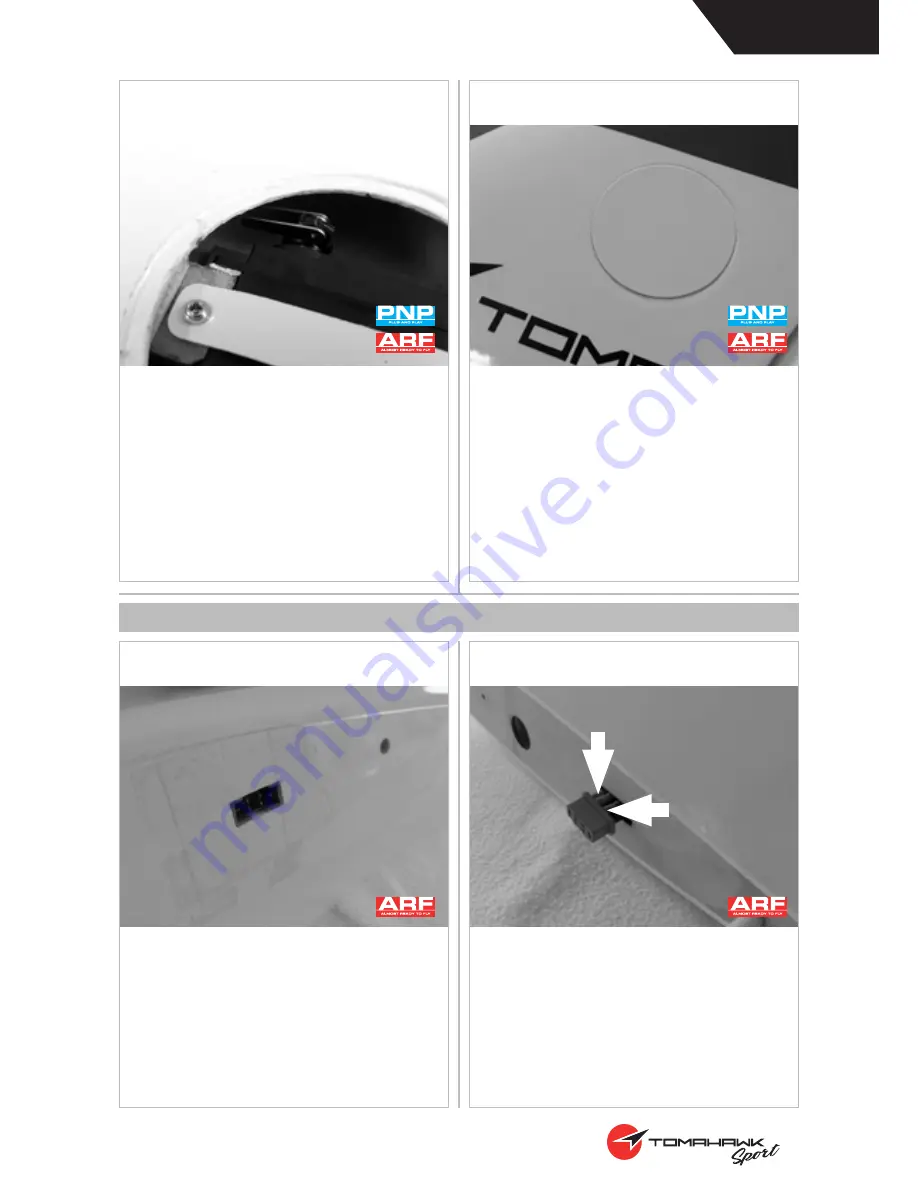
Attach the clevis to the servo horn.

43

Glue the cover with clear tape or UHU Por.

44

ASSEMBLY MPX-PLUGS AND MULTILOCK

Cover  the  area  around  the  MPX  connector 

with clear tape. 

45

Please sand the connector before you start 

gluing. Apply Epoxy on the markings and as

-

semble the wing on the fuselage while the 

epoxy cures. Please take care and allign the 

connectors thoroughly.

46

Содержание Cyclone

Страница 1: ...5 5 ALLROUNDER WITH TRUE PERFORMANCE CYCLONE ART 20800 ART 20810 INSTRUCTION MANUAL www tomahawk aviation com ...

Страница 2: ...ukt darf nicht mit anderem Abfall ent sorgt werden Stattdessen obliegt es dem Benut zer das Altgerät an einer designierten Receycling Sammelstelle für elektrische und elektronische Geräte abzugeben Die getrennte Sammlung und Wiederverwertung Ihres Altgeräts zum Zeit punkt der Entsorgung hilft Rohstoffe zu sparen und sicherzustellen dass bei seinem Receycling die menschliche Gesundheit und die Umwe...

Страница 3: ...und Ihre Umgebung hin Beachten Sie bitte auch die aktuelle Gesetzgebung zur Kennzeichnung der Modelle Gerne sind wir Ihnen bei der Lösung behilflich WirvonTomahawkAviationwünschenIhnennunvielSpaßbeiderFertigstellungIhresModellsundeinen erfolgreichen Einsatz Sollten Sie Fragen haben melden Sie sich jederzeit bei uns Wir stehen gerne mit Rat und Tat zur Seite Spannweite 5500 mm Länge 2250 mm Fluggew...

Страница 4: ...Rahmen mit eingebautem Servo in den Schacht kleben UHU Endfest 300 hat sich hier bewährt benötigt allerdings einige Stunden zum Aushärten 04 Mit einem Servotester das Servo auf Mitte stellen Geben Sie nun wenig Schraubensi cherung auf die Servoschraube und schrau ben Sie den Servohebel rechtwinklig auf Die nicht benötigte Seite abschneiden Schrau ben Sie das Servo in den Rahmen Schrau ben Sie eine...

Страница 5: ...as Querruder mit Klebenband in der Mittenposition fest und markieren Sie die Position des Ruderhorns 06 Schneiden Sie die Servoabdeckung aus Be nutzen Sie NICHT die Markierung sondern ermitteln sie selbst die optimale Größe durch Anhalten Die Markierung ist zu klein Kleben Sie die Abdeckung auf Bei Verwendung von Tesafilm kann Sie Rückstandsfrei wieder ab genommen werden wenn nötig Ansonsten kann ...

Страница 6: ...fahrenen Klappen das Gestänge nicht anstößt 12 Die nicht benötigte Seite des Servohorns abkneifen Das 2 Loch von außen auf etwa 1 6mm aufbohren 10 Bohren Sie im 45 Winkel ein 4mm Loch für das Ruderhorn 13 Da die Wölbklappen von oben angelekt wer den muss zunächst ein Kanal für das Ge stänge freigelegt werden Die kann mit einer Rundfeile geschehen 11 ...

Страница 7: ... sodass das Horn nach vorne Richtung Nasenleiste zeigt Justieren sie dann ggf das Gestänge in der Länge und hängen Sie es in das zweite Loch von außen in das Servohorn ein Servo mit dem Riegel festschrauben 17 Den Servoschacht sowie den Servorahmen an den Klebeflächen wieder gründlich an schleifen Ziehen Sie ein Kabel für das Quer ruderservo komplett durch das Flächenteil Außerdem ein Buchsenkabel...

Страница 8: ...8 DEUTSCH Löten Sie Multiplexstecker an die Servokabel 20 Servoschachtdeckel mit Tesa ankleben 18 Schneiden Sie die Hutzen aus und kleben Sie sie mit UHU Por an 19 ...

Страница 9: ...e mit jeweils etwa 50 60cm Länge an 21 Schrauben Sie das Höhenleitwerk an das hin tere Rumpfteil Benutzen Sie die Alu Unter legscheiben und achten Sie darauf dass es rechtwinklig zum Seitenleitwerk sitzt 24 Den Kabelbaum durch den Rumpf ziehen und den Multiplexstecker bündig in die Flä chenanformung kleben Den Stecker vorher anschleifen oder mit einem Bastelmesser einritzen 22 ...

Страница 10: ...markierten stellen aufliegen 27 Zum Zusammenkleben des Rumpfes liegt eine Lehre aus lasergeschnittenem Sperrholz bei Diese wie auf dem Bild zu sehen mit dünnem Sekundenkleber zusammenkleben 25 Richten Sie das Höhenleitwerk exakt parallel zum Steckungsstab aus und lassen Sie das Harz aushärten 28 Vor dem Zusammenfügen der Rumpfteile die Klebestellen gründlich mit Schleifpapier an schleifen 26 ...

Страница 11: ...1 5mm Bohrer vorbohren Anschließend das Servo einschrauben 32 Stecken Sie das Seiteruder an das Leitwerk und geben Sie von beiden Seiten einige Trop fen dünnflüssigen Sekundenkleber in den Spalt auf das Scharnier Lassen sie es ausrei chend lange trocknen 30 Minuten und ver wenden Sie keinen Aktivator Benutzen Sie keinesfalls mittel oder dickflüssigen Kleber da dieser nicht richtig in das Scharnier...

Страница 12: ...ür die Ruderhörner 35 Ein Ende der Bowdenzuglitze durch die Au genschraube ziehen und festquetschen 33 Bohren Sie ein 3mm Loch 36 Die Augenschraube von hinten durch den Rumpf fädeln und einen Gabelkopf aufdre hen In das äußerste Loch des Servos einhän gen 34 ...

Страница 13: ...r horn fädeln und mit einer Quetschhülse fi xieren Anschließend den Schrumpfschlauch rüberschieben und zusammenschrumpfen 39 Kleben Sie die Ruderhörner wie auf dem Bild zu sehen ein 37 Ziehen Sie ein Stück 3mm Schrumpfschlauch über die Bowdenzuglitze 38 ...

Страница 14: ...bis zur Abflachung in das Ruder ein 41 Legen Sie alles für den Einbau des Höhenru derservos bereit 39 Das Servo im Rahmen mit Lasche festschrau ben und den sicheren Sitz des Servos über prüfen 42 Das Servokabel auf etwa 5cm kürzen und ei nen kurzen Servohebel anfertigen 40 ...

Страница 15: ... Por aufkleben 44 MONTAGE VON SERVOSTECKERN UND MULTILOCK Kleben Sie den Rumpf um den MPX Stecker mit Tesa ab 45 MPX Stecker anschleifen oder einritzen Geben Sie anschließend Epoxidharz an die markierten Stellen hinter dem Stecker und montieren Sie die Fläche zum Aushärten des Harzes 46 ...

Страница 16: ... zur Fixierung verwendet werden Die übrigen Elektronikkompononenten werden nun eingebaut und der Sender programmiert Die Ausschläge sowie den Schwerpunkt entnehmen Sie bitte aus der Tabelle Diese Werte sind lediglich als Richtwerte zu verstehen die je nach persönlichem Empfinden angepasst werden können Wir empfehlen 3 Flugphasen wie in der Tabelle zu sehen Standard Thermik Speed sowie eine Butter ...

Страница 17: ...rgehenden Verlust der Steuerungskontrolle führen Betreiben Sie Ihr Modell stets auf offenen Ge länden weit ab von Autos Verkehr und Men schen Befolgen Sie die Anweisungen und Warnungen für dieses Produkt und jedwedes optionales Zubehörteil Ladegeräte wieder aufladbare Akkus etc stets sorgfältig Halten Sie sämtliche Chemikalien Kleintei le und elektrische Komponenten stets außer Reichweite von Kind...

Страница 18: ...spose this equipment by handing it over to a designated collection point for receycling special waste and electrical and electronic equipment The separation and receycling of your waste at the time of disposal will help to preserve natu ral resources and ensures that it is receycled in a manner that protects human health and the en vironment For more information about drop off points for receyclin...

Страница 19: ...ut them ensures that you can operate the model in the safest possible manner keeping risk away from you and other persons Also ensure that you comply with the latest legislation in terms of flight safety We at Tomahawk Aviation wish you all the best for building and especially operating your RC airplane In case you have any questions please contact us We are driven to offer the best possible suppo...

Страница 20: ...o in the wing We recommend Uhu Endfest 300 Please note that this glue takes several hours to cure 04 Center the servo with a servo tester Add th readlock to the servo screw and install the servohorn perpendicular Remove any arm that may interfere with the operation of the servo Install the servo in the servo mount Thread the nut and the clevis on the threa det rod The threadet rod should protrude ...

Страница 21: ...adio system Tighten the nut against the clevis and use some threadlock 08 Fix the aileron with tape to neutral and mark the position of the rudder horn 06 Use hobby scissors to trim the aileron servo cover Don t use the markings as these will not fit You have to measure the correct di mension The cover is attached to the wing using clear tape or thin CA 09 Make a slot for tue rudder horn and glue ...

Страница 22: ...cked when the flaps are full driven 12 Remove any arm that may interfere with the operation of the servo Enlarge the second hole to 1 6mm 10 Drill a hole in a 45 angle for the rudder horn You than the aileron 13 The flaps will be actuated through the top of the wing Use a round file to prepare a chan nel for the linkage 11 ...

Страница 23: ...rly to the flat area in the flap 14 Adjust the servo to the maximum throw with the servo horn facing to the leading edge of the wing Fix the servo in the mount using the plastic strip and self tapping screws 17 Sand the bottom of the wing and the servo mount thoroughly Pull the cable of the ai leron servo and a female servo connector through this part of the wing 15 ...

Страница 24: ...24 ENGLISH Solder a Multiplex connector to the servo cable 20 The cover is attached to the wing using clear tape 18 Use hobby scissors to trim the cover and glue it 19 ...

Страница 25: ...nesses with a lenght of 50 60cm 21 Install the elevator to the fuselage Use the aluminium washers and make sure that the elevator is perpendicular to the rudder 24 Route the cable harness through the fusela ge and glue it flush with the wing cheeks of the fuselage Please sand the connector be fore you start gluing 22 ...

Страница 26: ... the device The fu selage must have contact on the three points marked with arrows 27 For assistance to glue the fuselage you will find plywood parts Glue them as shown with thin CA 25 Adjust the elevator parallel to the wing joiner and let the expoxy cure 28 Sand all parts thoroughly that will have con tact with glue 26 ...

Страница 27: ...he rudder 29 Insert the servo Use a 1 5mm drill for the servo holes and tighten the servo screws 32 Attach the rudder to the fuselage and apply from both sides thin CA to the hinges Let the CA cure for 30 minutes and don t use activa tor Don t use medium or thick CA as this will not soak in the hinges 30 ...

Страница 28: ... the rud der horn 35 Route the cable end through the eye bolt and fasten it with the ferrule 33 Drill a 3mm hole 36 Route the eye bolt from the back of the fuse lage and turn it on a clevis Connect the clevis in the outermost hole of the servo 34 ...

Страница 29: ... the cable through the rudder horn and fix it with a ferrule Pull the heatshrink tube on the ferrule and shrink it 39 Glue the rudder horn as shown on the pic ture 37 Pull a piece of 3mm Heatshrink tube on the cable 38 ...

Страница 30: ... the servo horn in the center to the flat area in the rudder 41 Locate all parts for installing the elevator ser vo 39 Mount the servo in the frame and make sure it sits tighly without any movement 42 Prepare a servo horn with one hole 40 ...

Страница 31: ...r 44 ASSEMBLY MPX PLUGS AND MULTILOCK Cover the area around the MPX connector with clear tape 45 Please sand the connector before you start gluing Apply Epoxy on the markings and as semble the wing on the fuselage while the epoxy cures Please take care and allign the connectors thoroughly 46 ...

Страница 32: ...ory to use tape as well to secure all wing parts together and the wings to the fuselage The needed electronics are to be mounted and the transmitter programmed Find the control throws and the CG below in the table We are suggesting to use 3 flight modes Standard Speed Thermal as well as a Butterfly brake CENTER OF GRAVITY 110 bis 120 mm back from the leading edge of the wing and against the fusela...

Страница 33: ...in open spaces away from full size vehicles traffic and people Always carefully follow the directions and war nings for this and any optional support equip ment chargers rechargeable battery packs etc Always keep all chemicals small parts and anything electrical out of the reach of children Always avoid water exposure to all equipment not specifically designed and protected for this purpose Moistu...

Страница 34: ...34 NOTICE NOTIZEN ...

Страница 35: ...35 NOTICE NOTIZEN ...

Страница 36: ...2017 Tomahawk Aviation GmbH Auenland 8 25336 Klein Nordende Germany ...

Отзывы: