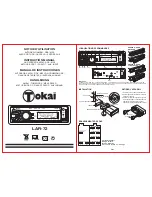


GB-3
GB-2
AUDIO LEVEL CONTROL (WHEN PUSHING ONE AFTER ANOTHER)
Press this button shortly one after another to show VOL/BAS/TRE/BAL/FAD control.
VOLUME - Press this button once, then rotate anti-clockwise to decrease, or clockwise to increase volume level.
BASS - Press this button once, then rotate anti-clockwise to decrease, or clockwise to increase bass level.
TREBLE - Press this button once, then rotate anti-clockwise to decrease, or clockwise to increase treble level.
BALANCE - Press this button once, then rotate anti-clockwise or clockwise to level balance of speaker left and right.
FADER - Press this button once, then rotate anti-clockwise or clockwise to level fader of speaker rear and front.
l
l
l
l
l
15. STATION PRESET BUTTON (1-6)
The PRESET BUTTONS on the unit are used to store station frequencies which you may wish to recall. Each preset button can store F1, F2,
F3, MW band station frequency. Pressing the button momentarily recalls the station frequency which was memorized. There are 6 preset
buttons, giving you capability of storing 18FM/6MW.
NOTE:
When the preset button to be memorized is kept pressed longer than 1 second, the receiving station frequency will be stored in the
button pressed. After this, the memorized station can be recalled by pressing the button once.
On USB / SD Mode
Preset 1 - press this button to locate the first track.
Preset 2 - press this button to scan the first 10 seconds of all the tracks on the USB device / SD Card.
Preset 5 - press this button to search -10 track.
Preset 6 - press this button to 10 track.
l
l
l
l
16. AUXILIARY INPUT
Press MODE button (8) until the “AUX” mode is shown
on display. The unit is ready to play files from the external
audio device through the auxiliary input directly on the
front panel.
AUDIO/SETTING SELECT (HOLD MORE THAN 2 SECONDS)
By pressing longer than 1 second, you can activate as unit setting selection in cyclical mode as following. The unit setting Scan be
changed by rotating the button clockwise or anti-clockwise.
EQ-OFF / FLAT / POP / ROCK / CLASS
CLOCK (rotate “VOL/SEL” button clockwise to set MINUTE and anti-clockwise to set HOUR.)
l
l
13/14. SEEK & MANUAL UP/DOWN TUNING / TRACK SEEK UP/DOWN CONTROL
On radio mode, by pressing shortly, it will tune to the next received station. By pressing longer than 1 second, you can activate the
manual tuning function. On USB/SD mode, press this button will locate the beginning of the track being played or will locate the
beginning of the next track. By pressing longer than 1 second, it will move fast forward or fast backward to a specific position.
6. MUTE CONTROL
Press this button to mute volume control and “MUT” will flash on the display. If you want to cancel the mute function, just press the
button again.
8. MODE SELECTION
Press this button to select Radio (TUNER), USB (USB), SD (SD CARD) or Auxiliary Input (AUX) mode.
a) By pressing shortly, you can enjoy RDS advantages on FM radio as following.
Program Service Name (PS) : When an RDS station is received, station's name will appear on the display.
Traffic Program (TP) : When station with traffic program is received, “TP” indicator will appear on the display.
Alternative Frequencies (AF) : The unit continuously checking the signal strength of alternative frequencies for the tuned radio station.
Every time that new alternative frequency is stronger than current station, it automatically switch over to the new frequency and new
frequency will be displayed for 1-2 second. When the button pressed short, AF switching mode is selected and the state of AF
switching mode will appear on the display as following:
-RDS indicator on : AF mode is on and RDS signal is received.
-RDS indicator off : AF mode is off.
-RDS indicator flashing : AF switching mode is selected but RDS signal is not received yet.
b) By pressing longer than 1 second, you can select FM STEREO or FM MONO reception.
9. RDS (RADIO DATA SYSTEM) CONTROL / STEREO/MONO CONTROL
“
”
“
”
l
l
l
10. TA (TRAFFIC ANNOUNCEMENT) CONTROL / LOUD CONTROL
a) By pressing shortly, you can select TA mode on or off. When TA mode is on, “TA” indicator will appear on the display and the radio is
able to receive traffic announcements on the same stations or stations with Traffic Program (TP). The TA mode can work as following:
If the volume setting is very low, volume level will be raised temporarily during traffic announcement and back to original volume level
at the end of traffic announcement.
If the radio is muted, it will be de-muted for the duration of the traffic announcement.
If the unit is on USB/SD mode, it will switch temporarily to radio mode to receive Traffic Announcement.
b) By pressing longer than 1 second, you can activate the loudness circuitry which compensates for loss of high and low frequencies
during low volume levels.
l
l
l
11. LOCAL/DISTANT CONTROL
By pressing this button, you can select “SEEK LOC” to prevent strong local stations from overlapping weaker stations or “SEEK DX” for
distance in normal operation.
12. VOLUME/SELECTION BUTTON (“VOL/SEL”)
Rotate the button anti-clockwise to decrease, or clockwise to increase volume level.
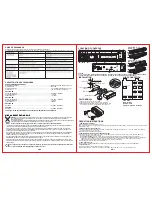
7. PANEL RELEASE BUTTON
This button is used to release the panel from the unit.
To detach the front panel, press the button so that the left side of the panel is released. Grasp the released side and pull it off of
the chassis (DRAWING A : TO REMOVE).
To re-attach the panel, insert the right side of the panel in place first and then press the left side of the panel until the chassis hold
the panel firmly (DRAWING B : FOR INSTALLING).
l
l
*
*
AUXILIARY INPUT
Compatible with
MP3 player
CD player
MP3 jukebox
MP3
INPUT
AUX
SD
19. RESET BUTTON
The RESET button is located on the front of main panel. It is recessed in order to prevent accidental engagement, and can be activated with
the tip of a ball-point pen or any similar pointed object. This reset circuitry is provided in order to protect the unit's microprocessor, and should
only be activated under the following conditions :
a) Initial installation after all wiring is completed.
b) Abnormal operation is encountered such as numerical indication on display is erratic.
c) Whenever the reset button is activated, all preset memory content will be erased and must be reprogrammed.
18. SD CARD SLOT
Press MODE button (8) until the “SD CARD” mode is shown on display. The unit is ready to play files from the SD card.
17. USB HOST
Press MODE button (8) until the “USB” mode is shown on
display. The unit is ready to play files from the USB device.
TECHNICAL SPECIFICATIONS
GENERAL CHARACTERISTICS
Supply Voltage .............................................................................................................................. 12V DC, Negative Ground
Current consumption
10A max.
Max. output power
45W x 4 (measured at DC 14.4V)
Unit Dimensions
178 (W) x 50 (H) x 100 (D) mm
.....................................................................................................................
.........................................................................................................................
............................................................................................................................
FM SECTION
Frequency range
MHz
........................................................................................................................... Less than 18 dB
frequency .................................................................................................................. 10.7 MHz
........................................................................................................................... 87.5
- 108 MHz
Usable sensitivity
Intermediate
AM SECTION
Frequency range
KHz
........................................................................................................................... Less than 38 dB
frequency .................................................................................................................. 450 KHz
........................................................................................................................... 522
- 1620 KHz
Usable sensitivity
Intermediate
Specifications and design are subject to change without notification.
SD SECTION
USB SECTION
System ........................................................................................................................................... MP3 Audio System
System ........................................................................................................................................... MP3 Audio System
TROUBLE SHOOTING
Before using the check list, please make all the connections first. If you still have questions after going through the check list,
please consult your local customer service representative.
END OF LIFE DISPOSAL
Warning !
This logo set on the product means that the recycling of this apparatus comes within the framework of the
Directive 2002/96/CE of January 27, 2003 concerning the Waste of Electrical and Electronic Equipment (WEEE).
This symbol means that used electrical and electronic products should not be mixed with general household waste.
There is a separate collection system for these products.
- The presence of dangerous substances in the electrical and electronic equipments can have potential consequences on the
environment and human health in the cycle of reprocessing this product.
- Therefore, at the end of its lifetime, this product shall not be disposed with other non-recycled waste. Used electrical and
electronic equipment must be treated separately and in accordance with legislation that requires proper treatment, recovery and
recycling of used electrical and electronic equipment.
- Local authorities and resellers have set special procedures for the purpose of collecting and recycling this product (please contact
your local authority for further details). You have the obligation to use the selective waste collection systems put in place by your
local authority.
- If your used electrical or electronic equipment has batteries or accumulators, please dispose of these separately beforehand
according to local requirements.
- By disposing of this product correctly you will help ensure that the waste undergoes the necessary treatment, recovery and
recycling and thus prevent potential negative effects on the environment and human health which could otherwise arise due to
inappropriate waste handling.
If you want to dispose of this equipment, please do not use the ordinary dust bin !
This unit complies with European Council Directive 2006 / 95 CE (Electromagnetic Compatibility & Low
Voltage Directives)