Tobii Pro Mobile Device Stand Скачать руководство пользователя страница 18

5.

Select the option “Eye Tracker is not attached to the monitor”. A setup wizard appears.

6.

Enter the parameters corresponding to your Mobile Device Stand configuration as listed in the table below.

7.

If you have altered the position of eye tracker, relative to the display area, to better suit your study design, modify any of
the measurements in the table accordingly.

a.

Measure the height, width and tilt angle of your display area, and enter the values in their respective fields, and click
Next.

b.

Measure the tilt angle of the eye tracker, the distance to the display, and the height difference between the eye
tracker and the display. Enter the values in their respective fields and click Next.

8.

Name your preset and click on "Finish" to save it and to send it to the eye tracker.

9.

Test your configuration by performing a calibration and verification test.

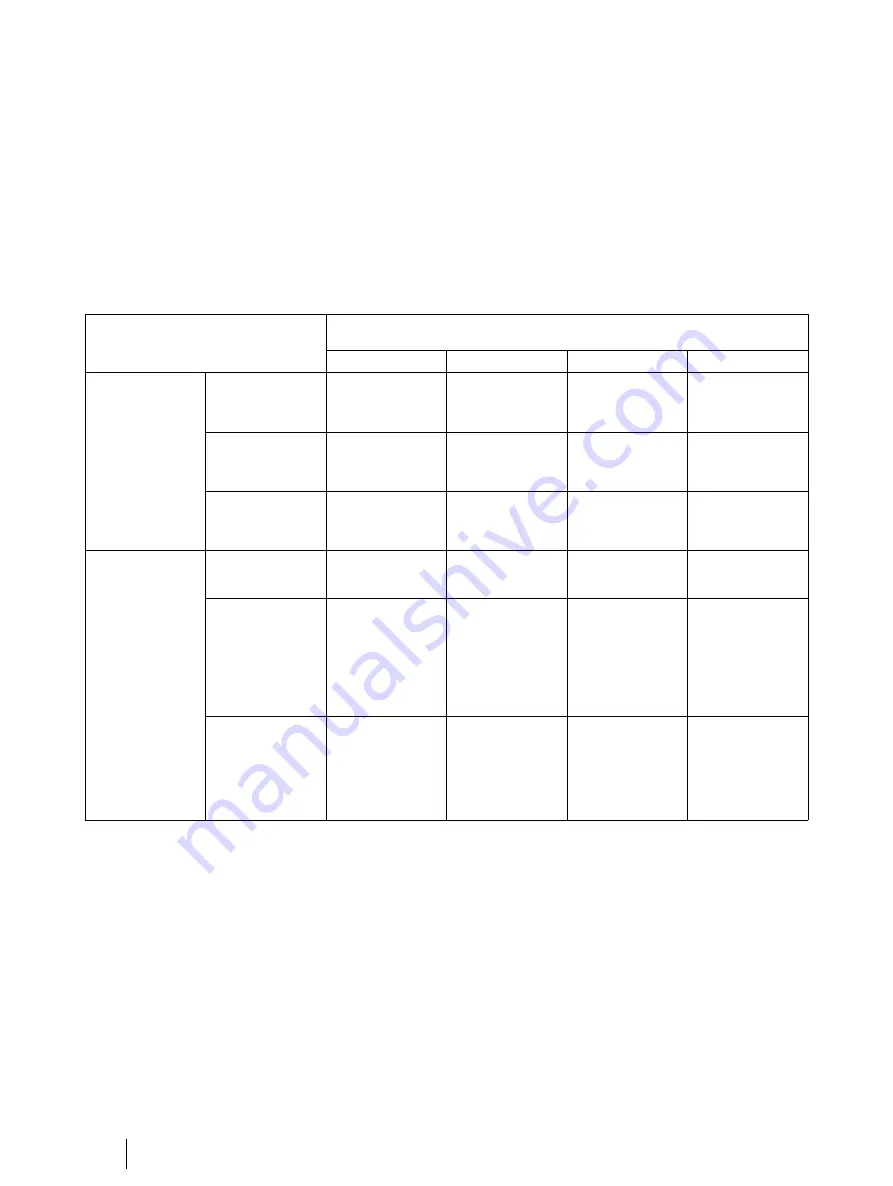
Mobile Device Stand configuration for Tobii Pro X2-30/X2-60/X3-120/
Nano

A1/A2

B1/B2

C1/C2

D1/D2

Display Area

Width

of the eye-tracked
surface

140 mm

140 mm

140 mm

140 mm

Height

of the eye-tracked
surface

140 mm

140 mm

140 mm

140 mm

Angle

of the mobile
device

0 Deg

0 Deg

0 Deg

0 Deg

Eye Tracker

Angle

of the eye tracker

-5.2 Deg

-5.2 Deg

-5.2 Deg

-5.2 Deg

Horizontal
difference

between the top
of the eye tracker
and the lower end
of the eye tracked
surface

–160 mm

–240 mm

–80 mm

–160 mm

Vertical difference

between the top
of the eye tracker
and the lower end
of the eye tracked
surface

57 mm

57 mm

57 mm

57 mm

If you had already created a preset and want to modify it:

1.

Go to step 4 above

2.

Instead of selecting "Create New", select the preset you wish to modify.

3.

Click on the cogwheel to the right of the "Preset" list. The parameters appear.

4.

Modify the parameters and save them.

4.1.4

Configuration parameters

All parameters are measured in relation to a reference point on the eye tracker hardware. That reference point varies depending
on what eye tracker model you are using. Check the user's manual of your eye tracker for details.

The wizard for when the Eye Tracker is not attached to the monitor has the following parameters.

Display area

— The correct display or stimuli size must always be added to the X Configuration Tool. The Active Dis-

play Area is represented by the area on which calibration is performed. For monitors, TV screens, and other displays,
measure the size of the visible active area on the screen where you see the actual image. For projected displays,

14

4 Configuring Eye Trackers from Tobii Pro with the Mobile Device
Stand

Tobii Pro Mobile Device Stand User’s manual v.1.0.8 - en-US

Содержание Mobile Device Stand

Страница 1: ...Tobii Pro Mobile Device Stand User s Manual...

Страница 2: ...claim to these trademarks While every precaution has been taken in the preparation of this document the publisher and the author assume no re sponsibility for errors or omissions or for damages result...

Страница 3: ...and 11 3 5 Mounting the Eye Tracker Extension 11 4 Configuring Eye Trackers from Tobii Pro with the Mobile Device Stand 13 4 1 Using Eye Tracker Manager to configure the eye tracker 13 4 1 1 Installin...

Страница 4: ......

Страница 5: ...Tobii Pro Mobile Device Stand can be damaged and may even cause injuries Should the device for any reason harm someone or damage something due to falling or other incident neither Tobii nor any of it...

Страница 6: ...plied travel case The stand includes an adjustable scene camera that points at and films the mo bile device to enable capturing of user actions and the user interface Eye tracking data will be superim...

Страница 7: ...8 cm 26 8 Stand construction Durable aluminium and steel components Weight including travel case 13 8 kg 30 4 lbs Color Black 2 3 Package Contents 2 3 1 What is Included The package for Pro Mobile Dev...

Страница 8: ...ded 2 4 2 Eyelashes Eyelashes can be obstructive when the participants eyes are less open especially if participants are wearing mascara In rare cases the eyelashes can completely block the view of th...

Страница 9: ...B2 C1 C2 D1 and D2 Any of these configurations can be opti mal for a specific testing scenario In the following instructions configuration A2 will be assembled In standard scenarios configurations A1...

Страница 10: ...Make sure it slides on as far as possible so that the stand sits tightly 3 Firmly tighten the clamp screws underneath the table top 4 Slide the long scene camera rod into place for setup A2 There are...

Страница 11: ...tand use pieces of Velcro all the way down to the table along the scene camera rod 8 Slide the guide bars into the holes on the side of the stand s main body and lock them into place by fastening the...

Страница 12: ...correct place Don t try to mount a Pro X2 30 or X2 60 eye tracker into place when the adapter bracket is in place and vice versa don t try to mount a Pro X3 120 or Pro Nano eye tracker into place wit...

Страница 13: ...of the putty large enough to cover the mobile device holder to make it softer it sticks better when soft 2 Firmly press the mounting putty on the holder and then gently press the device on top of the...

Страница 14: ...is mounted configurations B1 B2 D1 and D2 2 Place the calibration plate fixing rod in the hole located below the hand screws that hold the guide bars 3 Place the calibration plate on top of the mobile...

Страница 15: ...test participant or yourself as there is a risk of objects or fingers being squeezed be tween moving parts The scene camera holder can cause injuries if it strikes the head or other body parts 3 Tight...

Страница 16: ...the eye tracker ex tension Make sure the eye tracker is not turned upsidedown Push the eye tracker into the slot until it snaps into place You may need to manually adjust the eye tracker position to...

Страница 17: ...lication from the web links Windows 2 Follow the on screen instructions to complete the installation 4 1 2 Accessing the configuration tool 1 Open Eye Tracker Manager A list of the discovered eye trac...

Страница 18: ...Deg 5 2 Deg 5 2 Deg 5 2 Deg Horizontal difference between the top of the eye tracker and the lower end of the eye tracked surface 160 mm 240 mm 80 mm 160 mm Vertical difference between the top of the...

Страница 19: ...a scene camera based calibration and man aging your participants and recordings Before you start check that you have installed the Mobile Device Stand s scene camera that is Logitech HD Pro Webcam C9...

Страница 20: ...by performing a calibration before starting data collection for analysis Preferably use the pre made calibration plate that is included in accessories because the MDS presets in Eye Tracker Manager ar...

Страница 21: ...ariable 3 Enter the name of the first participant variable in the text field and press Enter 4 Add a new value for the participant variable by clicking the button A field appears a Enter the name of t...

Страница 22: ...est See Tobii Studio User Manual 3 Select the Design and Record tab 4 If not already connected connect the eye tracker to Tobii Studio See Tobii Studio User Manual 5 Drag and drop a Scene Camera stimu...

Страница 23: ...ested by Tobii but not supported as part of the Tobii Studio software package Before downloading and installing the Morgan M JPEG codec make sure your PC meets the system recommendations set by Tobii...

Страница 24: ...not recommended using the same camera type for both scene camera and user camera as this might cause conflicts in the software To record user sound 1 Make sure you have configured the scene camera 2...

Страница 25: ...ion with the Mobile Device Stand You must therefore instruct the participants which calibration dot to look at during the calibration procedure Procedure for calibrating a participant 1 Mount the cali...

Страница 26: ...hours 10 AM to 5 PM Japan standard time GMT 9 Tobii Pro Mobile Device Stand User s manual v 1 0 8 en US Tobii Pro AB Illustrations and specifications do not necessarily apply to products and services...

Отзывы: