background image

34

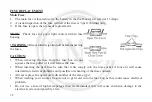
Stop the scooter on a level surface and turn the engine off. 

1. 

Put the scooter on its center stand and let the engine sit for a few 

2. 

minutes. 

Remove the oil dipstick, wipe it with a clean towel and replace it.  

3. 

Just rest the dipstick on the threads, do not screw it down into place 

when measuring the oil level.

Remove the dipstick again and observe the oil level.  It should be 

4. 

between hi and low-level marks on the dipstick. 

If  the  oil  level  is  near  the  low  mark,  please  add  enough  Opti-4 

5. 

lubricating oil to bring the level up near hi mark. 


CAUTION:

 If the scooter is being used under more severe conditions 

such as gravel roads or lots of stop & go traffic, then the oil should be 

changed more frequently than every 4000 km.

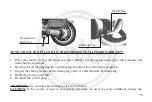
CHeCK THe TrANSMISSIoN oIl

Inspect the transmission oil after the first 300 km and then after every 4000 km or six months which ever 

comes first.

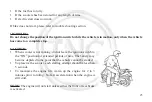
Dipstick

Oil Drain Plug

Содержание Low Boy 150cc LB150T-L

Страница 1: ...Revised 11 08 Owner s Manual Low Boy 150cc LB150T L ...

Страница 2: ...ATING YOUR VIN The serial numbers of the frame and engine are used for vehicle registration The frame VIN and label are located on the leg shield Then engine is located on the back of the engine Frame Engine ...

Страница 3: ...web site www tngscooters com We continuously keep a large inventory of parts and accessories in stock to support our TNG dealers service centers and ultimately TNG scooter owners Your local TNG dealer knows your scooter the best and always is interested in your satisfaction We advise your local TNG dealer make all repairs on your scooter You can find a complete list of dealers and service centers ...

Страница 4: ...en to avoid damage to the scooter NOTE A NOTE provides key information to make procedures easier to spot This Owner s Manual should be considered as a permanent part of the scooter as it contains important information for operation and maintenance of the scooter It should remain with the scooter at all times This Owner s Manual contains the most current product information at the time of approval ...

Страница 5: ...ATION Page 6 D SAFETY INSTRUCTIONS Page 7 E SPECIFICATIONS Page 13 F COMPONENT DESCRIPTIONS FUNCTIONS Page 14 G PRE RIDE CHECKLIST Page 21 H PROPER OPERATION Page 24 I SERVICE MAINTENANCE SCHEDULE Page 29 J WINTERIZING Page 39 K TROUBLESHOOTING Page 44 L FULL WARRANTY INFORMATION Appendix ...

Страница 6: ...ted in this warranty section For complete warranty information see the Warranty Appendix NOTE Your scooter performs best when run weekly Running the engine for a minimum of 20 30 minutes per week ensures that your battery remains fully charged and the fuel system doesn t foul NOTE ForthebestperformancefromyourTNGscooterhaveaTNGdealerperformallservicemaintenance Failure to follow the service mainte...

Страница 7: ...edgeable with all road signs WARNING Failure to follow any SAFETY INSTRUCTION could cause severe injury or even death to the scooter operator passenger or a bystander Protective Gear Riding a scooter leaves the rider exposed Therefore wearing appropriate protective gear can prevent or diminish injuries from accidents 1 An Approved Helmet The majority of serious scooter injuries and deaths are the ...

Страница 8: ...full attention to the road Goggles can protect your eyes in the same manner Never use eyeglasses or sunglasses in place of a face shield or goggles 3 Clothing Bright clothing should be worn by the driver so as to be easily seen by other motorists Jacket and pants should cover your arms and legs completely but not too loose to flap in the wind or catch on the levers or wheels which could result in ...

Страница 9: ...aintenance procedures described in this manual Test your brakes after operation in wet conditions If necessary apply the brakes several times to let friction dry out the linings Never attempt wheelies jumps and other stunts as these could cause damage to the scooter and loss of control Always keep both hands on the handlebars and feet on the floor board during operation Never consume alcohol or dr...

Страница 10: ...engers Loading WARNING This scooter is rated for 2 people total weight of the rider and the passenger must not exceed 330 lbs Do not exceed 17 5 lbs of cargo Attach the load securely since a loose load can catch in the wheel or rack causing skidding You should avoid carrying passengers or large loads until you have gained sufficient experience riding alone Extra weight changes handling stability b...

Страница 11: ...er as you approach a stop Maintain a larger cushion of space ahead and to the sides Wait for larger gaps when you want to cross enter or merge with traffic LOADS A scooter is not really designed to carry cargo However small loads can be carried safely if they are positioned and fastened properly The rear luggage rack can carry 11 lbs max The compartment under the seat can carry 6 5 lbs max No more...

Страница 12: ...o your eyes see doctor immediately or call American Association of Poison Control Centers at 1 800 222 1222 for assistance If you spill gasoline on your clothes change and wash the affected area immediately with soap Modification Any modifications to this scooter or removal of original equipment without approval from TNG Scooters may cause it to be unsafe for use and may trigger severe accident Mo...

Страница 13: ...conomical Speed 23 mph Battery Type 12V 7Ah Noise 80dB A Headlight Hi Lo Beam 12V 35W 20W x 2 Engine Type Air Cooled 4 Stroke Front Running Light 3W Cylinder Arrangement Single Cylinder Brake Tail Lights 21W 5W Displacement 150cc Turn Signal Light 10W Ignition Type CDI Turn Signal Indicators Dash 3W Transmission CVT Instrument Illumination 3W Front Brake Disc Fuses 15 Amps Rear Brake Drum Fuel Typ...

Страница 14: ...S 1 Battery 5 Handle Bars 9 Air box Filter 13 Ignition Switch 2 Muffler 6 Mirrors 10 Kick Starter 14 Center Stand 3 Under seat Storage 7 Turn Signals 11 Storage Hook 4 Seat 8 Headlight 12 Instrument Panel 1 2 3 4 5 7 6 12 13 9 11 8 10 14 ...

Страница 15: ...Horn Button 6 Fuel Gauge Warning Lights 2 Turn Signal Switch 7 Front Brake Lever 3 Rear Brake 8 Throttle 4 Hi Lo Beam Switch 9 Engine Stop Switch 5 Speedometer 10 Electric Starter Button 1 3 2 4 5 9 7 10 6 8 ...

Страница 16: ...opening seat When key is left in ON position and engine is off you will drain your battery Key Position Power to Electric Circuits Ignition Steering Storage Compartment Key Removable ON Yes On Unlocked Locked No Off No Off Unlocked Locked Yes Lock No Off Unlocked Unlocked No Clockwise seat lock N A N A N A Unlocked No Counter Clockwise seat lock N A N A N A Locked Yes ...

Страница 17: ...ument Panel 1 Speedometer 2 Odometer 3 Volt Meter 4 Gas Gauge Turn Signal Switch and Indicator To assign right turn push the switch to and the right turn indicator light flashes To assign left turn push the switch to and the left turn indicator light flashes To cancel turn signal push in the button on the switch White 1 2 3 4 ...

Страница 18: ...s accumulated distance in kilometers Gas Gauge see page 17 Indicates the fuel Level The needle moves towards E empty as the gas level is decreasing Throttle Control see page 15 Control speed by rotating the throttle Right Grip To accelerate speed rotate the throttle towards you To decelerate speed rotate the throttle away from you Electric Starter see page 15 Starts Engine using battery power NOTE...

Страница 19: ... stop the scooter from moving To apply rear brake pull the left brake lever gradually To apply the front brake pull the right lever towards throttle grip gradually Storage Compartment To unlock the under seat storage compartment see TABLE 1 1 page 16 under ignition switch Once the seat is unlocked raise the seat pad to access the storage compartment Press the seat pad down to lock it WARNING The s...

Страница 20: ...age Rack WARNING Luggage rack can carry 11 lbs max Do not exceed maximum 17 5 lbs for cargo Fuel Tank Cap see page 14 for location To remove the fuel tank cap slide the lock cover open insert the ignition key into the fuel tank cap lock and turn counterclockwise The fuel tank cap is released and can be removed To install the fuel tank cap insert the fuel tank cap to the tank turn the key clockwise...

Страница 21: ...astic parts Always use 90 octane or higher gasoline when refueling the scooter Do not use E85 or fuel containing more than 10 ethanol G PRE RIDE CHECKLIST 1 Check the fuel level Remove the gas cap by turning the cap counterclockwise Fill the tank up to the bottom of the filler tube Do not fill past that point Replace the gas cap and turn it clockwise until it is secure NOTE Always turn the engine ...

Страница 22: ...s well as the turn signal indicators on the instrument panel 4 Check the Tires Measure the pressure in each tire The correct pressures are Front 29 PSI Rear 33 PSI Visually inspect the tires for damage and wear Look for nails glass or stones what are cutting into the tire casing Look for partial or abnormal tread wear The middle of the tread should have Front Tire 1 5 mm minimum tread depth Rear T...

Страница 23: ... wheel begins to drag 7 Check the Brake Fluid Level See Page 31 8 Check the Spark Plug The spark plug will need to be checked if you find the scooter hard to start The gap should be between 0 023 0 032 inches The electrode should be a light brown color Incorrect gap can cause many problems for the scooter engine Make sure it is correct If the spark plug is fouled or damaged replace it with another...

Страница 24: ...s rated for two persons total weight with rider and passenger must not exceed 330 lbs 1 ENGINE STARTING PROCEDURE Normal Start Place scooter on the center stand Turn the ignition key to the ON position While holding brake lever firmly push the electric start Repeat 5 second intervals of starter motor activation and 5 second rest Do NOT twist throttle open to start NOTE It is recommended to always ...

Страница 25: ...a complete stop CAUTION When scooter is not running do not leave the ignition switch in the ON position for extended periods of time The battery may become depleted to the point that the vehicle cannot be started To preserve the scooter each starting attempt should be less than 5 seconds To maximize the engine life warm up the engine for 2 to 3 minutes prior to riding No fast acceleration when the...

Страница 26: ...s under the scooter 5 PULLING AWAY FROM THE CURB Sit with a leg on each side of the scooter adjust the rear view mirrors Put on your turn signal before pulling away from the curb Look over both shoulders for oncoming traffic be sure that it is safe to pull out into the traffic Release the rear brake and accelerate the scooter slowly to take off 6 USING THE BRAKES The brakes work best when the fron...

Страница 27: ...steer the scooter to the side of the road Gently apply the front brake using the right brake lever and at the same time gently applying the rear brake using the left brake lever Extend your left foot just before coming to a complete stop so as to keep the scooter upright when it stops Turn off the ignition key and dismount the scooter on the left side Use your right foot to extend the side stand o...

Страница 28: ... full throttle operation and avoid any condition that may result in engine overheating Always keep the speed below 40 mph Do not overload the scooter or carry a passenger during this period Change oil at 300 km use Opti 4 to maintain engine warranty CAUTION Have your TNG Scooter dealer check the vehicle if any engine trouble occurs during this period ...

Страница 29: ... Months Fuel Line I Fuel Filter R Air Filter I I I Spark Plug R Valves I R R Engine Oil R I R Oil Filter R R Carburetor R R Drive Belt REPLACE EVERY TWELVE MONTHS Transmission Oil I R Braking System I I Wheels I I Wheel Bearings I I Steering Bearings I I I Rear Shock Absorbers I I ...

Страница 30: ...mance from your TNG scooter have a TNG dealer perform all service maintenance Failure to follow the service maintenance schedule may void your warranty coverage RECOMMENDED If regular driving is in arid or coastal condition air filter and engine oil may need to be replaced more frequently TIRE PRESSURE TREAD Measure the pressure of each tire The correct pressures are Front 29 PSI Rear 33 PSI Visua...

Страница 31: ...exceed 30 mm See Fig 1 To firm up brake turn nut clockwise until you reach the acceptable level See Fig 2 Turn it counterclockwise to soften brake HYDRAULIC BRAKE FLUID LEVEL Front Brake Check the fluid level by looking at the reservoir See Fig 3 The fluid level must be between the two lines If it is below the lower line check the brake line and cylinder for a possible leak Check the brakes for ex...

Страница 32: ...re not to introduce any water or air into the brake system when changing the fluid Do not spill any brake fluid on any other scooter parts as the fluid can damage metal and paint Always replace the brake fluid with type DOT 3 brake fluid RECOMMENDATION An authorized TNG Dealer or Service Center should complete all brake fluid adjustments ...

Страница 33: ...other to turns Reattach the spark plug cover WARNING Do not change spark plug while engine is hot CAUTION Incorrect gap can cause problems to the scooter engine Make sure it is correct If the spark plug is fouled or damaged replace it with Autolight 4194 or like plug RECOMMENDATION Most spark plugs are self cleaning After replacing its best to ride the scooter for a minimum of 10 min CHECKING ENGI...

Страница 34: ...erve the oil level It should be 4 between hi and low level marks on the dipstick If the oil level is near the low mark please add enough Opti 4 5 lubricating oil to bring the level up near hi mark CAUTION If the scooter is being used under more severe conditions such as gravel roads or lots of stop go traffic then the oil should be changed more frequently than every 4000 km CHECK THE TRANSMISSION ...

Страница 35: ...ug and the oil drain plug and allow the oil to drain completely 2 Inspect the sealing washer on the drain plug and if it s OK reinstall the drain plug 3 Refill the gearbox until full 4 Reinstall the oil fill plug 5 WARNING Use caution when changing oil to avoid burns CAUTION If the scooter is used in excessively wet areas or used in severe conditions replace the Transmission Belt Cover Oil Fill Pl...

Страница 36: ...on Lift out the air filter screen and cartridge Clean the screen and cartridge with compressed air Reassemble the air filter components and back end of the scooter CAUTION If riding in an excessively dusty location the air filter should be inspected more often than the recommended When remounting the air cleaner cover components onto the scooter Be careful to fit all pieces into their correct plac...

Страница 37: ...month using a battery charger for a minimum of 6 hours Additionally it is important that your scooter be stored in a dry area and protected from extreme temperatures Battery Replacement The scooter battery is self sustained by electric current generated by the alternator within the scooter 1 It s a good idea to replace the battery every three years Always turn the ignition system off prior to repl...

Страница 38: ... removing the fuse from the fuse box do not squeeze the fuse puller or it will release the fuse When inserting the new fuse be sure that it fits snugly into the fuse socket A loose fit will cause intermittent electrical problems and possible overheating of the fuse contacts Always replace the open fuse with another of the same type When washing your scooter be sure not to get water into the fuse b...

Страница 39: ...e considered when preparing to put your TNG Scooter into storage The five areas of focus are Battery 1 Fuel System 2 Engine 3 Tires 4 Cover 5 1 BATTERY Maintaining the state of charge of your scooter battery during an extended period of storage is essential to insure the maximum service life of the battery If at all possible remove the battery from the vehicle Clean the battery and terminals using...

Страница 40: ... every month If stored in a warm area above 60 F recharge the battery every two weeks Before you connect your charger to the battery make sure that you know how your battery charger operates Some chargers will not stop charging when the battery reaches 100 while others will stop automatically Some automatic chargers will begin charging again when the battery level drops while others will not begin...

Страница 41: ...is can be accomplished A DRY FUEL SYSTEM This technique is suitable if you are going to store your bike in a heated location where condensation due to temperature fluctuations is not a problem This requires you to fully drain the entire fuel system including the fuel tank and carburetor Generally you will need to remove the float bowl of the carburetor and then blow all of the fuel out of the jets...

Страница 42: ... off the tires so that a flat spot or cracked sidewall does not develop With nearly all TNG Scooters when the bike is on the center stand the front wheel is on the ground while the rear wheel is slightly off the ground You may simply be able to lift he front wheel of the scooter off the ground and place something under the frame of the scooter and have both wheels off the ground Make sure that the...

Страница 43: ... rust and corrosion to the cylinder wall To reduce the chance of getting rust or corrosion perform the following steps Remove the spark plug Squirt about 2 ounces of 2 cycle oil into the cylinder This applies to both 2 and 4 cycle engines With the spark plug still out turn the engine over a few times Reinstall the spark plug 5 COVER TNG Scooters come standard with a nylon weather cover Placing the...

Страница 44: ...he Right Handle Bar If the Engine Doesn t Turn Over Charge or Replace the Battery ENGINE IS DIFFICULT TO START 1 Check for Type of Gasoline Use of E85 or Fuel Containing more than 10 Ethanol Replace with Non Ethanol Gasoline 2 Check for Fuel in Carburetor Out of Fuel Fill Fuel Tank Fuel Filter or Petcock Blocked Clean or Replace Fuel Switch or Petcock With Fuel Check Spark Plug ...

Страница 45: ...k Plug 4 Spark Plug No Spark Spark Plug Wet or Fouled Remove Plug Prime Kick the Start Pedal without Fuel Ignition Re install Spark Plug Intermittent Spark Plug Lead Replace Lead Spark Plug Dirty or Wrong Gap Replace Plug or Correct Gap Loose Spark Plug Tighten Spark Plug Spark Plug OK Check Carburetor ...

Страница 46: ...e Lubricating Oil Air Inlet System Blocked or Leaky Remove Blockage or Leak KNOCKING SOUND IN CYLINDER Causes Solutions 1 Engine Overheating Check Replace Lubricating Oil 2 Spark Plug Defective Replace the Spark Plug 3 Ignition Timing Too Early Adjust Ignition Timing 4 Carbon Build up In Cylinder Remove Carbon Build up In Exhaust Pipe Muffler Remove Carbon Build up ...

Страница 47: ...n Build up 4 Piston Cylinder Excessively Warn Replace Piston Cylinder 5 Ignition Timing Incorrect Adjust Timing 6 Clutch Slipped Adjust Clutch 7 Belt is Loose Replace Belt 8 Use of E85 or Fuel Containing more than 10 Ethanol Replace with Non Ethanol Gasoline BLACK OIL EXHAUST FROM EXHAUST PIPE Causes Solutions 1 Carburetor Not Atomizing Fuel Properly Check Adjust Carburetor 2 Air Cleaner Blocked C...

Страница 48: ... Speeds 6 Use of E85 or Fuel Containing more than 10 Ethanol Replace with Non Ethanol Gasoline FUEL DRAINING FROM CARBURETOR OVERFLOW TUBE Causes Solutions 1 Float Bowl Residue Clean the Float Bowl 2 Float Bowl Needle Valve Not Completely Closed Replace Needle Valve 3 Occasional Fuel Overflow Tap the Fuel Bowl Lightly PETCOCK FUEL FILTER LEAKS Causes Solutions 1 Fuel Switch Loose Tighten the Fuel ...

Страница 49: ...ted States Canada or Mexico who is authorized by CMSI to sell CMSI products Dealer must be signed up and be familiar with CMSI warranty policy WARRANTY VERIFICATION METHOD Owner and dealer sign Owner Registration Card at time of purchase This information is kept in CMSI s warranty system and can be requested thru an authorized dealer In the case of a transfer of ownership during the warranty perio...

Страница 50: ...d or replaced under warranty are warranted only during the balance of the applicable warranty period THE AUTHORIZED DEALER To give you complete warranty documentation when you pick up your vehicle To perform warranty repairs on any CMSI product that qualifies for such repairs The selling dealer shall sign the Acceptance Certificate and a Card of Delivery upon delivery of the vehicle The Card of De...

Страница 51: ... of the new scooter and use only that lubricant during the entire warranty period Following this manual for proper use and break in procedures An authorized CMSI dealer is your best source for scheduled maintenance on your vehicle If warranty repairs are needed your dealer may ask you for documentation which may consist of one or more of the following A Maintenance Record showing the odometer mile...

Страница 52: ... Labor Less than 170cc lesser of 30 months or 12 000 Km lesser of 30 months or 12 000 Km 170cc to 280cc lesser of 5 years or 18 000 Km lesser of 5 years or 18 000 Km 280cc and above lesser of 5 years or 30 000 Km lesser of 5 years or 30 000 Km Basic non engine Parts Labor 50cc and below 24 months 24 months 51cc and above 24 months 24 months Body Parts Parts Labor All models 12 months 1 month Batte...

Страница 53: ...or consequential expenses storage DURATION OF IMPLIED WARRANTIES Any Implied Warranties including the implied warranty of merchantability and fitness for a particular purpose are limited to the duration of this written warranty STATE LAWS MAY VARY The previously listed limitations or exclusions may not apply to a motor scooter because of state laws Some states may not allow limitations on how long...

Страница 54: ...due to a defect in material or factory workmanship Parts or accessories affected or damaged by Lack of required maintenance Owner abuse or misuse Accident and or collision Normal wear Neglect Improper installation Unsuitable use in an application for which the part was not designed The incorporation or use of unsuitable attachments or parts The unauthorized alteration of any part The incorporation...

Страница 55: ...ering chipping or rusting Plastic body parts and panels See Warranty Time Table USE FOR THE FOLLOWING ACTIVITIES SHALL VOID COVERAGE Racing Competition Rental or other commercial uses Towing another vehicle trailer or similar device Alteration to the engine or drive train Any operation or use outside of that described in this Owner s Manual Alteration of the odometer so that the actual mileage can...

Страница 56: ...Warranty Time Table TO QUALIFY FOR THIS WARRANTY The vehicle must originally have been purchased from a dealer within the United States Canada or Mexico who is authorized by CMSI to sell CMSI products Prior to delivery to the purchaser setup and pre delivery service must be performed by a dealer or service center who is authorized by CMSI to deliver it vehicles DISTRIBUTOR S LIMITED WARRANTY MOTOR...

Страница 57: ...ed Dealer for replacement use To qualify for this warranty The tire must have been purchased from an Authorized CMSI Dealer The tire was part of the original factory equipment The tire must have been used for its designed purpose THE OBLIGATION OF CMSI INC To replace any tire which is proven to be defective in material or factory workmanship under normal use until the tire center tread is worn to ...

Страница 58: ...SI Inc Dealer REPLACEMENT CHARGES UP TO 50 TREAD WEAR Tire No charge for a new direct replacement tire Labor No charge for mounting and balancing to the tire s original purchaser if the tire was factory or dealer installed You pay for mounting and balancing if the tire was not sold installed REPLACEMENT CHARGES AFTER 50 TREAD WEAR Tire 50 charge for a new direct replacement tire Labor 50 charge fo...

Страница 59: ...ted without inner tubes Tires which have been repaired Tires whose sidewalls have been modified by the addition or removal of material Tires with superficial weathering checking or cracking Tires used in racing or other competition DISTRIBUTOR S LIMITED WARRANTY REPLACEMENT PARTS WARRANTY TIME PERIOD See Warranty Coverage Table on page 4 of Warranty Section Coverage begins The date of purchase fro...

Страница 60: ...led by an Authorized CMSI Dealer Parts No charge Labor You pay for removal installation charges THIS REPLACEMENT PARTS WARRANTY DOES NOT COVER The following exclusions apply specifically to replacement parts in addition to the exclusions listed Tires Refer to Distributor s Limited Warranty Motorcycle Tires The motorcycle in which the part is installed The color match of painted components CMSI mak...

Страница 61: ...at a safety defect exists in a group of vehicles it may order a recall and remedy campaign For this reason it is very important for you to notify CMSI of any change of address or ownership NHTSA cannot become involved in individual problems between you your dealer or CMSI To contact NHTSA you may either call the Auto Safety Hotline toll free at 1 800 424 9393 or 202 366 0123 in Washington DC area ...

Страница 62: ... or 12 000 kilometers whichever comes first provided that there has been no abuse neglect or improper maintenance of your vehicle Your emission control system may include parts such as the carburetor the ignition system catalytic converter and engine computer if it is so equipped Also included may be hoses belts connector and other emission related assemblies Where a warrantable condition exists C...

Страница 63: ...warranty solely for the lack of receipts or for your failure to ensure the performance of all scheduled maintenance You are responsible for presenting your vehicle to the CMSI authorized dealer as soon as a problem exists The warranty repairs should be completed in a reasonable amount of time not to exceed 30 days As the vehicle owner you should be aware that CMSI may deny your warranty coverage i...

Страница 64: ...d and B Is free from defects in material and workmanship which cause such vehicle to fail to conform to applicable regulations of the United States Environmental Protection Agency and the California Air Resources Board for the periods specified above I Coverage Warranty defects shall be remedied during customary business hours at any authorized CMSI dealer located within the United States of Ameri...

Страница 65: ... conforming to CMSI specifications which adversely affect performance and or 5 Use in competitive racing or related events B Inspections replacement of parts and other services and adjustments for required maintenance C Any vehicle equipped with an odometer on which the odometer mileage reading has been changed so that actual mileage cannot be readily determined III Limited Liability A The liabili...

Страница 66: ...THE VEHICLE FOR ANY PURPOSE SOMESTATESDONOTALLOWTHEEXCLUSIONORLIMITATIONOFCONSEQUENTIAL DAMAGES SO THE ABOVE LIMITATIONS MAY NOT APPLY TO YOU B NO EXPRESS EMISSION CONTROL SYSTEM WARRANTY IS GIVEN BY CMSI EXCEPT AS SPECIFICALLY SET FORTH HEREIN ANY EMISSION CONTROL SYSTEM WARRANTY IMPLIED BY LAW INCLUDINGANYWARRANTY OF MERCHANTABILITY OR FITNESS FOR A PARTICULAR PURPOSE IS LIMITED TO THE EXPRESS E...

Страница 67: ...IMITED MOTORCYCLE WARRANTY VI ADDITIONAL INFORMATION Any replacement part that is equivalent in performance and durability may be used in the performance of any maintenance or repairs However CMSI is not liable for these parts The owner is responsible for the performance of all required maintenance Such maintenance may be performed at a service establishment or by any individual The warranty perio...

Страница 68: ...CMSI Inc Motorsports 8146 304th Ave SE P O B ox 969 Preston WA 98050 USA Phone 425 222 7738 Fax 425 222 7739 Inc Motorsports ...

Отзывы: