background image


172-65427MA-05  (JH7RH-P/JH7RHT-P)  29  Sep  2016 

11


Table of Tightening Torques 


Part Name 

Torque 

Distance Across Flats 

N

(lbf

ft) 

mm 

(in) 

Cover Plug (JH7RH-P/JH7RHT-P) 

100 

(73) 

26 

(1) 

Cover Nut 

700 

(510) 

46 

(1

13

/

16

Orifice Locknut 

250 

(185) 

32 

(1

1

/

4

Outlet Cover Nut 

200 

(150) 

30 

(1

3

/

16

NOTE: - Coat all threaded portions with anti-seize. 


      (1 N

 10 kg

cm) 

-

 If drawings or other special documentation were supplied for the 

product, any torque given there takes precedence over values shown 
here. 


Special Notes 

1.  After operation following disassembly and reassembly, it is recommended that 

the trap be let to sit for a day and then receive additional tightening. 

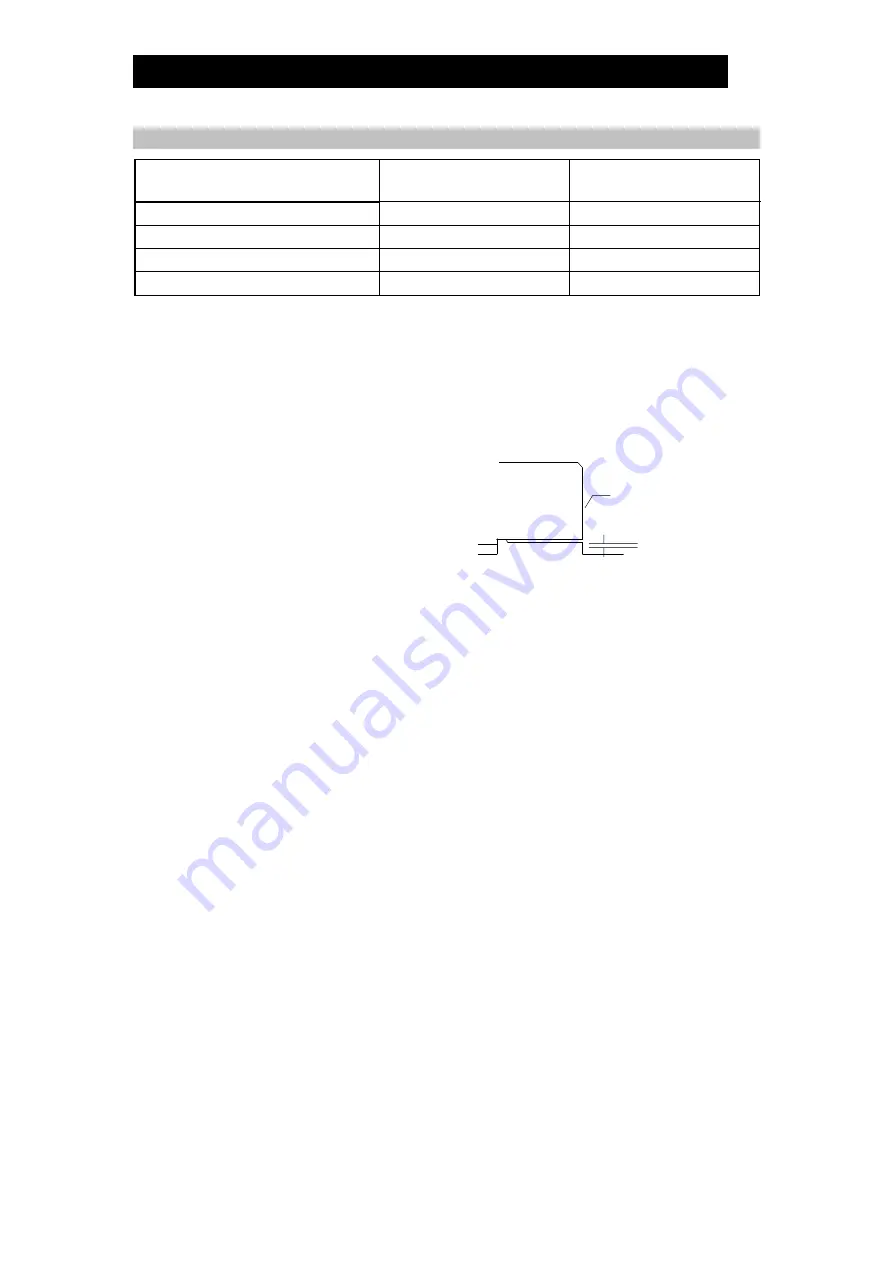
2. Using the tightening torques for the 

cover nuts and outlet cover nuts as a 
reference, tighten until the cover and 
outlet cover gaps are uniform. The gaps 
should be 1.5 mm (

1

/

16

 in) or less. 


Cover or Outlet Cover



1.5 mm (

1

/

16

in)

Body

Содержание JH7RH-P

Страница 1: ...ptember 2016 Free Float Steam Trap JH7RH P JH7RHT P Optional Models JH7RH W JH7RH F JH7RH V JH7RHT V Copyright 2016 by TLV CO LTD All rights reserved ISO 9001 ISO 14001 Manufacturer Kakogawa Japan is approved by LRQA LTD to ISO 9001 14001 ...

Страница 2: ...ly discharge the inflowing condensate that is continuously generated inside the equipment thus preventing the accumulation of condensate and thereby improving the heat transfer efficiency of the equipment In particular JH7RHT P JH7RHT V option possess the highest heat resistance of the TLV steam trap product range and are of a specification that is suitable for use on thermal power plant steam mai...

Страница 3: ...t of death or serious injury Indicates that there is a potential threat of death or serious injury Indicates that there is a possibility of injury or equipment product damage NEVER apply direct heat to the float The float may explode due to increased internal pressure causing accidents leading to serious injury or damage to property and equipment Install properly and DO NOT use this product outsid...

Страница 4: ... recommended components when repairing the product and NEVER attempt to modify the product in any way Failure to observe these precautions may result in damage to the product and burns or other injury due to malfunction or the discharge of fluids Use only under conditions in which no freeze up will occur Freezing may damage the product leading to fluid discharge which may cause burns or other inju...

Страница 5: ...ure has a check valve TLV CK been installed 5 Is a bypass valve installed 6 Is the inlet pipe as short as possible with as few bends as possible and installed so the liquid will flow naturally down into the trap 7 Has the piping work been done correctly as shown in the figures below Requirement Correct Incorrect Install catchpot with the proper diameter Diameter is too small Make sure the flow of ...

Страница 6: ...ischarge of Large Quantities of Condensate Increases in the condensate inflow rate cause the condensate level in the trap to rise The float consequently rises and enlarges the opening of the orifice A allowing more condensate to be discharged In this manner continuous condensate discharge occurs while the opening size of the orifice varies depending on the condensate flow rate 3 Closed Position Wh...

Страница 7: ...N Refer to the product nameplate for detailed specifications Maximum allowable pressure PMA and maximum allowable temperature TMA are PRESSURE SHELL DESIGN CONDITIONS NOT OPERATING CONDITIONS Valve No is displayed for products with options This item is omitted from the nameplate when there are no options Configuration Model Maximum Allowable Temperature TMA Maximum Allowable Pressure Maximum Opera...

Страница 8: ...allation inspection maintenance repairs disassembly adjustment and valve opening closing should be carried out only by trained maintenance personnel 1 Before installation be sure to remove all protective seals 2 Before installing the product open the inlet valve and blow out the piping to remove any piping scraps dirt and oil Close the inlet valve after blowdown 3 Install the product so the arrow ...

Страница 9: ...lting in faulty or low quality products or losses due to steam leakage Normal Condensate is discharged continuously together with flash steam and the sound of flow can be heard If there is very little condensate there is almost no sound of flow Blocked Discharge Impossible No condensate is discharged The trap is quiet and makes no noise and the surface temperature of the trap is low Blowing Live s...

Страница 10: ...g procedures to remove components Use the same procedures in reverse to reassemble Installation inspection maintenance repairs disassembly adjustment and valve opening closing should be carried out only by trained maintenance personnel Detaching Reattaching the Cover Part During Disassembly During Reassembly Cover Nut Remove with a socket wrench Consult the table of tightening torques and tighten ...

Страница 11: ...tighten to the proper torque see NOTE below Orifice Pull out from inside the trap body Fix with the orifice locknut see NOTE below Orifice Gasket Remove being careful not to scratch the orifice Replace with a new gasket clean the sealing surface on the orifice see NOTE below NOTE Special points pertaining to orifice and orifice gasket reassembly Follow the steps below when inserting the orifice in...

Страница 12: ...m If drawings or other special documentation were supplied for the product any torque given there takes precedence over values shown here Special Notes 1 After operation following disassembly and reassembly it is recommended that the trap be let to sit for a day and then receive additional tightening 2 Using the tightening torques for the cover nuts and outlet cover nuts as a reference tighten unt...

Страница 13: ...loded View Cover Plug Cover Plug Gasket Cover Nut Cover Cover Gasket Screen Screen Holder Float Cover Bolt Orifice Locknut Outlet Cover Gasket Outlet Cover Nut Snap Ring Screen Holder Retainer Orifice Orifice Gasket Outlet Cover Outlet Cover Bolt Body ...

Страница 14: ...seize affixes the gasket tightly to the plug holder Check to make sure the gasket is not caught in the recesses of the threads 5 Hold the plug holder upside down to make sure that the anti seize makes the gasket stick to the plug holder even when the plug holder is held upside down 6 Screw the plug holder by hand into the product body while making sure that the gasket remains tightly affixed to th...

Страница 15: ...et Compare specifications and actual operating conditions Steam locking has occurred Perform a bypass blowdown or close the trap inlet valve and allow the trap to cool Air binding has occurred Perform a bypass blowdown or consider switching to a product with a built in air vent or air vent valve Steam is discharged or leaks from the outlet blowing steam leakage Clogged orifice opening or rust and ...

Страница 16: ... improper installation use handling etc by other than TLV CO LTD authorized service representatives 2 Malfunctions due to dirt scale rust etc 3 Malfunctions due to improper disassembly and reassembly or inadequate inspection and maintenance by other than TLV CO LTD authorized service representatives 4 Malfunctions due to disasters or forces of nature 5 Accidents or malfunctions due to any other ca...

Страница 17: ...ver if low temperature condensate in the piping blocks the trap inlet passage displacement inside the piping of steam by condensate is obstructed and condensate can no longer flow into the trap steam locking Traps only function in the presence of condensate inflow A pressure balancing line prevents the occurrence of steam locking Install the pressure balancing line in the following manner Example ...

Страница 18: ...o determine the condition of the fluid discharged General guidelines Cloudy water droplets and mist spraying out indicating that air and condensate are being discharged Clear indicating that steam is being discharged the valve port may now be closed The air vent valve stem cannot be removed from the air vent valve body Attempting to remove the valve stem by pulling it upward may damage it and caus...

Страница 19: ...htly after operation Disassembly Reassembly of Air Vent Valve Air Vent Valve Unit Remove with a wrench Consult the table of tightening torques and tighten to the proper torque Air Vent Valve Gasket Remove the gasket and clean the sealing surface Replace with a new gasket coat surfaces with anti seize Table of Tightening Torques Part Name Torque Distance Across Flats N m lbf ft mm in Air Vent Valve...

Отзывы: