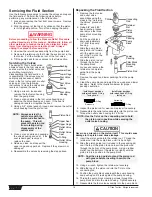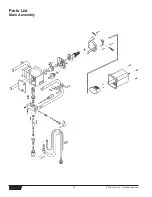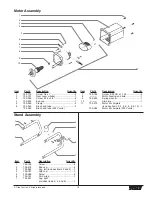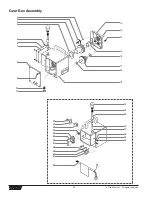
Replacing the Motor Starter
Before proceeding, follow the Pressure Relief Procedure
outlined previously in this manual. Additionally, follow all
other warnings to reduce the risk of an injection injury,
injury from moving parts or electric shock. Always unplug
the sprayer before servicing!
1. Remove the cover plate and the insulator plate on the
pump housing by removing the corresponding four
screws.
2. Disconnect all the wires from the motor starter.
3. Loosen and remove the two motor starter mounting
screws and washers. Remove the motor starter.
4. Position the new motor starter in the pump housing.
5. Secure the new motor starter with the two motor starter
mounting screws and washers.
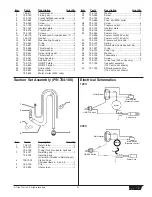
6. Connect the wires to the new motor starter. Refer to the
electrical schematic in the “Parts List” section of this
manual.
7. Place the insulator plate and the cover plate on the pump
housing and secure in position using the corresponding
four screws.
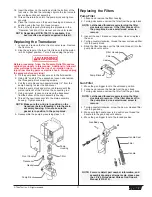
Replacing the Pressure Switch
1. Remove the cover plate and the insulator plate on the
pump housing by removing the corresponding four
screws.
2. Disconnect all the two wires from the pressure switch.
3. Loosen and remove the two pressure switch bracket
mounting screws. Remove the pressure switch and
bracket from the pump housing.
4. Loosen and remove the two pressure switch mounting
screws. Remove the pressure switch from the bracket.
5. Position the new pressure switch on the bracket. Secure
the pressure switch with the two pressure switch mounting
screws.
6. Reassemble the pump by reversing steps 1–3. Refer to
the electrical schematic in the “Parts List” section of this
manual for proper wiring of the pressure switch.
NOTE: After installation, the pressure may need to
calibrated by an authorized Titan service
center.
Motor Starter
Pressure Switch
Bracket
NOTE: Always use heat sink material on the back of
the motor starter.
WARNING
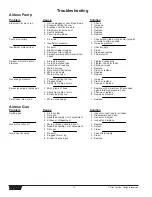
Replacing the Switch Stem
1. Remove the cover plate
and the insulator plate on
the pump housing by
removing the
corresponding four screws.
2. Using a 90º snap ring
pliers, remove the snap
ring from the pressure
control knob on the inside
of the pump housing.
3. Unscrew the pressure
control knob from the
pump housing.
4. Remove the spring and the
switch stem by pulling
them through the top of the
pump housing.
5. Insert the new switch stem
and spring through the top of the pump housing.
6. Reassemble the pump by reversing steps 1–3.
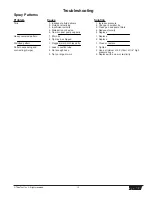
Replacing the PRIME/SPRAY Valve
1. Push the groove pin out of the valve handle.
2. Remove the valve handle and the cam base.
3. Using a wrench, loosen and remove the valve housing
assembly.
4. Make sure the gasket is in place and thread the new valve
housing assembly into the pump block. Tighten securely
with wrench.
5. Place the cam base over the valve retainer. Lubricate the
cam base with grease and line up the cam with the pump
block.
6. Line up the hole on the valve stem with the hole in the
valve handle.
7. Insert the groove pin into the valve handle and through
the valve stem to secure the valve handle in position.
Gasket
Valve Retainer
Valve Stem
Pump Block
Valve Housing
Cam Base
Valve
Handle
Groove Pin
Pressure
Control
Knob
Spring
Snap Ring
Switch
Stem
Transducer
© Titan Tool Inc. All rights reserved.
9


