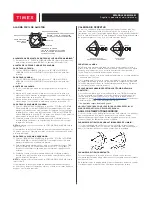
Timex W217 NA Скачать руководство пользователя страница 4

3

TACHYMETER RING

The tachymeter feature can be used to measure speed in miles per hour 

(MPH), nautical miles per hour (knots) or kilometers per hour (KPH) using the 

sweep second hand and the scale on the wall above the watch face. You 

need to know the actual  distance you are covering in miles or km.
Start the chronograph with the second hand at zero (the twelve o’clock 

position). Within the first minute, the second hand will point to the rate for a 

one-mile (or one kilometer) course: if it takes 45 seconds, the hand will point 

to 80 at that position – 80 MPH or 80 KPH.
If within the first minute, a distance greater than one mile or kilometer is cov-

ered, multiply the tachymeter number by the distance to get the actual rate: 

if you went 1.2 miles in 45 seconds, multiply the 80 by 1.2 – 96 MPH.
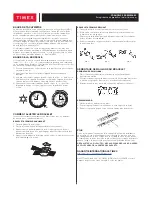
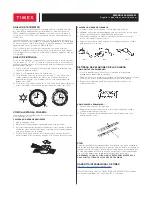
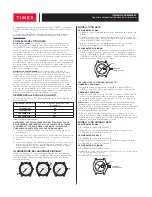
COMPASS RING

If your watch is equipped with a movable ring around the dial marked 

at the  letters “N”, “E”, “W”, “S” (for the four compass  directions) or com-

pass degrees, you can use this feature to find an approximate compass 

 directional  reading.
1) Lay the watch on a flat surface, or hold it so that the face is  parallel to the

ground.

2) Locate the sun and point the hour hand at the sun.
3) In the A.M., rotate the ring until the “S” (south) marker is halfway between

the hour hand and 12:00 (after the hour hand or within the shortest dis-

tance between the hour hand and 12:00).

4) In the P.M., rotate the ring until “S” is before the hour hand and halfway

between the hour hand and 12:00.

12 1

2

3

4

5

6

7

8

9

10

11

N

S

W

E

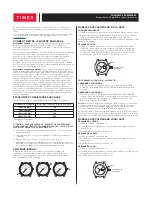
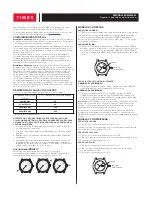
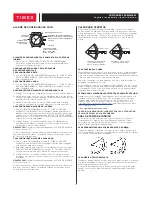
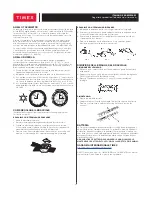
HOW TO ADJUST BRACELET

(Variations of the following bracelet sections apply to all watch models).

SLIDING CLASP BRACELET

1. Open locking plate.
2. Move clasp to desired bracelet length.
3. Exert pressure while holding locking plate and slide clasp back and forth

until it engages in grooves on underside of bracelet.

4. Press locking plate down until it snaps closed. Clasp can be damaged if

excessive force is used.

FOLDOVER CLASP BRACELET

1. Find spring bar that  connects bracelet to clasp.
2. Using a pointed tool, push in spring bar and gently twist bracelet to

disengage.

3. Determine wrist size, then insert spring bar in correct bottom hole.
4. Push down on spring bar, align with top hole and release to lock in place.

FIG. 1

FIG. 2

FIG. 3

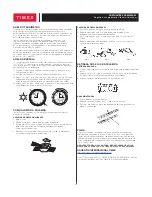
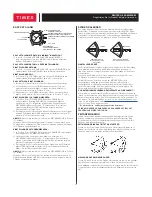
BRACELET LINK REMOVAL

REMOVING LINKS:

1. Place bracelet upright and insert pointed tool in opening of link.
2. Push pin forcefully in direction of arrow until link is detached (pins are

designed to be difficult to remove).

3. Repeat until desired number of links are removed.

RE-ASSEMBLY:

1. Rejoin bracelet parts.
2. Push pin back into link in opposite direction of arrow.
3. Press pin down securely into bracelet until it is flush.

BATTERY

Timex strongly recommends that a retailer or jeweler replace battery. Battery 

type is on watch back. If present, push/short internal reset switch after replac-

ing battery. Battery life  estimates are based on certain assumptions regarding 

usage; battery life may vary depending on actual usage.

DO NOT DISPOSE OF BATTERY IN FIRE. DO NOT RECHARGE. KEEP 

LOOSE BATTERIES AWAY FROM CHILDREN.

TIMEX INTERNATIONAL WARRANTY

http://www.timex.com/productWarranty.html

©2017 Timex Group USA, Inc. TIMEX, INDIGLO and QUICKDATE are 

registered trademarks of Timex Group B.V. and its subsidiaries.

ENGLISH  990-095926-02

Register your product at www.timex.com

REVISED 2.5.2018

Содержание W217 NA

Страница 1: ...seu produto no site www timex com Registrare il prodotto all indirizzo www timex com Registrieren Sie Ihr Produkt bei www timex com Registreer uw product bij www timex com www timex com www timex com...

Страница 2: ...resistant only as long as lens push buttons and case remain intact 2 Watch is not a diver watch and should not be used for diving 3 Rinse watch with fresh water after exposure to salt water 4 Shock re...

Страница 3: ...s deactivated when the ALARM CROWN is in the D position If the alarm is not deactivated it will automatically stop ringing after 20 beeps and flashes OR stop vibrating and will resume again in one hou...

Страница 4: ...sections apply to all watch models SLIDING CLASP BRACELET 1 Open locking plate 2 Move clasp to desired bracelet length 3 Exert pressure while holding locking plate and slide clasp back and forth unti...

Страница 5: ...re n est pas con ue pour la plong e Ne pas l utiliser dans ces conditions 3 Rincer l eau douce apr s tout contact avec l eau de mer 4 La r sistance aux chocs est indiqu e sur la face de la montre ou l...

Страница 6: ...D Si l alarme n est pas d sactiv e elle cesse de sonner automatiquement apr s 20 bips sonores et clignotements OU cesse de vibrer et se r p te 1 heure plus tard la minute indiqu e CALENDRIER PERP TUEL...

Страница 7: ...COULISSANT 1 Ouvrir la plaquette de blocage 2 Glisser le fermoir jusqu la longueur de bracelet souhait e 3 Appuyer tout en tenant la plaquette de blocage et glisser le fermoir d avant en arri re jusq...

Страница 8: ...deber a usarse para ello 3 Enjuaga el reloj con agua dulce despu s de haber estado expuesto al agua salada 4 La resistencia a los golpes estar indicada en la esfera del reloj o en la parte posterior...

Страница 9: ...la alarma se desactiva cuando la CORONA DE LA ALARMA est en la posici n D Si la alarma no se desactiva dejar de sonar autom ticamente despu s de 20 pitidos y destellos O dejar de vibrar y volver a com...

Страница 10: ...pa de cierre y desliza el broche hacia atr s y hacia delante hasta que se acople en las ranuras situadas en la parte de abajo de la pulsera 4 Presiona hacia abajo la chapa de cierre hasta que encaje a...

Страница 11: ...roa e a caixa permanecerem intactos 2 Este n o um rel gio de mergulho e por isso n o deve ser usado para essa atividade 3 Enx gue o rel gio com gua doce logo ap s entrar em contato com gua salgada 4 A...

Страница 12: ...alarme ser desativado quando a COROA DE ALARME estiver na posi o D Se n o for desativado o alarme parar automaticamente de emitir um som depois de 20 bipes e flashes OU parar de vibrar recome ando de...

Страница 13: ...vela at o comprimento desejado da pulseira 3 Exer a press o ao mesmo tempo que segura o fecho e deslize a fivela para frente e para tr s at se engatar nas ranhuras situadas no lado inferior da pulseir...

Страница 14: ...e dopo l esposizione all acqua marina 4 La resistenza agli urti viene indicata sul quadrante o sul retro della cassa dell orologio Gli orologi sono concepiti in modo da superare il test ISO di resiste...

Страница 15: ...ttivata NOTA la sveglia disattivata quando la CORONA DI SVEGLIA si trova nella posizione D Se la sveglia non viene disattivata smette automaticamente di suonare dopo 20 segnali acustici e lampeggiamen...

Страница 16: ...il fermaglio alla lunghezza desiderata per il bracciale 3 Tenendo la piastrina di chiusura esercitare pressione su di essa e far scorrere avanti e indietro il fermaglio finch non si innesta nelle sca...

Страница 17: ...igkeit ist auf Zifferblatt oder Geh user ckseite angegeben Die Uhren entsprechen den ISO Anforderungen f r Sto festigkeit Es sollte jedoch darauf geachtet werden das Glas nicht zu besch digen INDIGLO...

Страница 18: ...D befindet Wenn der Wecker nicht deaktiviert ist verstummt er automatisch nach 20 Signalt nen und Blinken ODER h rt auf zu vibrieren und beginnt wieder in 1 Stunde zur definierten Minute EWIGER KALEND...

Страница 19: ...elten f r alle Uhrenmodelle ARMBAND MIT GLEITSCHLIESSE 1 Verschlussplatte ffnen 2 Schlie e auf die gew nschte Armbandl nge einstellen 3 Verschlussplatte festhalten und Schlie e hin und her bewegen bis...

Страница 20: ...t water af nadat het aan zout water is blootgesteld 4 De schokvastheid wordt op de wijzerplaat of de achterkant van de kast aangegeven De horloges zijn zodanig ontworpen dat ze aan de ISO test voor sc...

Страница 21: ...atisch na 20 pieptonen en flitsen OF stopt het met trillen en gaat over n uur weer op de aangegeven minuut af EEUWIGE KALENDER Uw horloge met eeuwige kalender houdt nauwkeurig bij hoeveel dagen er in...

Страница 22: ...t borgplaatje vasthoudt en de sluiting heen en weer schuift totdat hij in de groeven aan de onderkant van de armband grijpt 4 Druk het borgplaatje naar beneden totdat het dicht klikt De sluiting kan b...

Страница 23: ...mex com TIMEX Timex www timex com 1 24 24 24 O p s i a 30 98 60 50 164 86 100 328 160 200 656 284 200 1 2 3 4 ISO INDIGLO INDIGLO 1 2 A M P M 1 24 C B A QUICKDATE 3 1 2 1 31 10 PM 2 AM 1 C 2 3 A 1 B 2...

Страница 24: ...EPING INDIGLO INDIGLO INDIGLO 1 A INDIGLO 1 B 1 C 1 2 12 E 3 F 12 1 D E 12 2 D 20 1 D 2 F 3 D 20 I I WED 14 I I WED 14 12 TIMEX Timex http www timex com productWarranty html Timex Start Stop 20 990 09...

Страница 25: ...H N E W S 1 2 3 S 12 00 12 00 4 S 12 00 12 1 2 3 4 5 6 7 8 9 10 11 N S W E 1 2 3 4 1 2 3 4 1 2 3 1 2 3 1 2 3 Timex reset TIMEX http www timex com productWarranty html 2017 Timex Group USA Inc TIMEX IN...

Страница 26: ...om TIMEX Timex www timex com 1 24 24 O p s i a 30m 98ft 60 50m 164ft 86 100m 328ft 160 200m 656ft 284 200 1 2 3 4 ISO INDIGLO INDIGLO 1 2 A M P M 1 24 C B A QUICKDATE 3 1 2 1 31 10 PM 2 AM 1 C 2 3 A 1...

Страница 27: ...LO INDIGLO INDIGLO 1 A INDIGLO 1 B 1 C 1 2 2 12 2 E 3 1 F 12 1 D E 12 2 12 D 20 12 1 D 2 F 3 3 1 D 20 1 I I WED 14 I I WED 14 12 TIMEX TIMEX http www timex com productWarranty html TIMEX 12 20 990 095...

Страница 28: ...80 1 2 96 MPH N E W S 1 2 3 S 12 00 12 00 4 S 12 00 12 1 2 3 4 5 6 7 8 9 10 11 N S W E 1 2 3 4 1 2 3 4 1 2 3 1 2 3 1 2 3 Timex TIMEX http www timex com productWarranty html 2017 Timex Group USA Inc TI...

Страница 29: ...imex com TIMEX Timex www timex com O p s i a 30 98 60 50 164 86 100 328 160 200 656 284 200 1 2 3 4 MOC INDIGLO INDIGLO 1 2 AM PM 1 24 C B A QUICKDATE 3 1 2 1 31 e 22 00 10 PM 2 00 2 AM 1 C 2 3 A 1 2...

Страница 30: ...INDIGLO INDIGLO INDIGO 1 INDIGLO 1 1 1 2 12 E 3 F 12 1 D 12 2 12 D 20 12 1 D 2 F 3 D 20 I I WED 14 I I WED 14 12 TIMEX Timex http www timex com productWarranty html Timex Start Stop 20 990 095926 02...

Страница 31: ...W S 1 2 3 S 12 00 12 00 4 S 12 12 1 2 3 4 5 6 7 8 9 10 11 N S W E 1 2 3 4 1 2 3 4 1 2 3 1 2 3 1 2 3 Timex TIMEX http www timex com productWarranty html 2017 Timex Group USA Inc TIMEX INDIGLO QUICKDAT...

Отзывы: