Page 13
Installing Impression Rail
™
Express
Open Mid-Rail Stair Panels
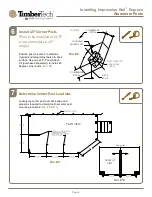
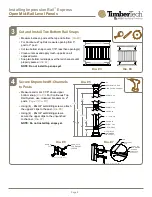
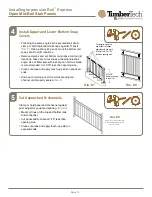
Dia. #7
4
Install Upper and Lower Bottom Snap
Covers
• Following the same angle as the secured stair panel,
clamp or hold top/bottom rail snaps against 3" posts
(Dia. 7)
. Using a sharp #2 pencil, mark the bottom rail
snaps at all four (4) locations.
• Remove clamps and cut bottom rail snaps at all four (4)
locations. Take care to cut snaps at appropriate stair
angle. Use of Miter saw with a sharp non-ferrous blade
is recommended. Cut 1/16" less than opening size.
• Clean cut areas and apply touch-up paint on exposed
ends.
• Snap each rail snap over the corresponding rail
channel until properly seated
(Dia. 8)
.
34” to 38”
from stair nosing
to top of rail
Temporarily clamp top
and bottom rail snaps
against posts and mark
for miter cuts. Cut 1/16”
less than opening size.
Dia. #8
5
Cut Unpunched H-channels
Clamp or hold panel and H-channel against
post, adjust for equal end spacing.
(Dia. #9)
• Mark cut lines on the top and bottom rails
and H-channel.
• Cut panel and H-channel 1/16″ less than
opening size.
• Clean cut areas and apply touch-up paint on
exposed ends.
Dia. #9
Temporarily clamp unpunched
H-channel against posts and
mark for cutting.

