background image

E-DOC-CTC-20090619-0001 v1.0

17

2

 Thomson Gateway Basics

2.1.2

WPS Button LED

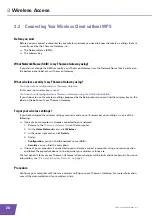
WPS button

The Wi-Fi Protected Setup (WPS) button allows you to add new wireless clients to your network. 

For more information, see 

“3.1 Connecting Your Wireless Client via WPS” on page 24

.

WPS Button LED

Colour

State

Description

Green

Solid On

Client successfully registered via WPS

Orange

Blinking

WPS registration ongoing

Red

Blinking Error 

occurred

Содержание TG782

Страница 1: ...Setup and User Guide THOMSON TG782 Wireless Multi User VoIP ADSL2 Gateway...

Страница 2: ......

Страница 3: ...THOMSON TG782 Setup and User Guide...

Страница 4: ...the Wi Fi Alliance UPnP is a certification mark of the UPnP Implementers Corporation DLNA is a registered trademark DLNA disc logo is a service mark and DLNA Certified is a trademark of the Digital Li...

Страница 5: ...ay GUI 19 2 3 Backing Up Restoring your Configuration 22 3 Wireless Access 23 3 1 Connecting Your Wireless Client via WPS 24 3 2 Connecting Your Wireless Client without WPS 26 3 3 Securing Your Wirele...

Страница 6: ...th UPnP 59 7 1 2 Managing your Internet connection with UPnP 60 7 1 3 Configuring UPnP on the Thomson Gateway 61 7 1 4 Installing UPnP on Windows XP 62 7 2 Assigning a service HTTP FTP to a Computer 6...

Страница 7: ...Introduction on page 7 Sample text indicates an important content related word Example To enter the network you must authenticate yourself Sample text indicates a GUI element commands on menus and bu...

Страница 8: ...E DOC CTC 20090619 0001 v1 0 2 About this Setup and User Guide...

Страница 9: ...lowing features Broadband Internet connection The first chapter describes how to connect your Thomson Gateway to the Internet Wired and wireless access to your local network devices For more informati...

Страница 10: ...from the telephone line before it reaches your phone otherwise you might hear a noise in the background when using your phone Filters and splitters To split the DSL signal from the telephone line you...

Страница 11: ...If you want to connect one or more computer using a wired connection make sure those computers are equipped with an Ethernet Network Interface Card NIC Internet connection You may need the following...

Страница 12: ...t up your Thomson Gateway Guided Installation The Setup wizard included on the Setup CD will guide you through all configuration aspects of your Thomson Gateway This is the recommended way to install...

Страница 13: ...tarting the wizard To start the wizard 1 Insert the Setup CD into your computer s CD or DVD ROM drive 2 If your computer runs Microsoft Windows The CD should autostart If the CD does not autostart see...

Страница 14: ...ou are connected to the Internet Visit thomson net to visit the online support sections In case of problems If you encounter problems during this installation please refer to 9 1 Setup Troubleshooting...

Страница 15: ...plug the other end of the cable into the Modem ADSL out put of your splitter Not using a splitter plug the other end of the cable directly in the wall outlet For more information about splitters see F...

Страница 16: ...ur Thomson Gateway If this window does not appear browse to http dsldevice lan or to the IP address of your Thomson Gateway by default 192 168 1 254 and click Thomson Gateway on the menu on the left h...

Страница 17: ...you that the Thomson Gateway has already been configured select No and click Next to continue Manual Installation Setting up a wireless connections For more information on how to setup a wireless con...

Страница 18: ...ddress automatically This is the default setting Ethernet cable In your package you will find a cable with yellow connectors This is the Ethernet cable Procedure Proceed as follows 1 Connect one end o...

Страница 19: ...C CTC 20090619 0001 v1 0 13 2 Thomson Gateway Basics 2 Thomson Gateway Basics In this chapter Topic Page Thomson Gateway LED Behaviour 14 Thomson Gateway GUI 19 Backing Up Restoring your Configuration...

Страница 20: ...E DOC CTC 20090619 0001 v1 0 14 2 Thomson Gateway Basics 2 1 Thomson Gateway LED Behaviour Content This chapter describes the behaviour of Status LEDs WPS Button LED Ethernet LEDs...

Страница 21: ...tion Orange Blinking Bootloader active during upgrade Off Power off Colour State Description Green Solid on Ethernet connection no activity Blinking Ethernet activity Off No Ethernet connection Colour...

Страница 22: ...ce up Blinking VoIP activity Off VoIP service down Colour State Description Green Solid on DSL line synchronised Blinking Pending DSL line synchronisation Off No DSL line Colour State Description Gree...

Страница 23: ...up WPS button allows you to add new wireless clients to your network For more information see 3 1 Connecting Your Wireless Client via WPS on page 24 WPS Button LED Colour State Description Green Solid...

Страница 24: ...way Basics 2 1 3 Ethernet LEDs Ethernet LED A LED may be provided per Ethernet port to indicate link integrity or activity LED Status Description Off No connection on this port Solid on Ethernet link...

Страница 25: ...lows 1 Open your web browser 2 Browse to http dsldevice lan or to the IP address of your Thomson Gateway by default 192 168 1 254 3 If you have protected your Thomson Gateway with a user name and pass...

Страница 26: ...on the Thomson Gateway Broadband Connection Allows you to view configure your broadband connections Toolbox Allows you to configure the network services and Internet security settings of your Thomson...

Страница 27: ...area is used to display Error messages indicated by a red traffic light Warnings indicated by an orange traffic light Information indicated by a green traffic light Content pane The content pane disp...

Страница 28: ...Restore Configuration 4 Under Backup current configuration click Backup Configuration Now 5 The Thomson Gateway prompts you to save your backup file 6 Save your file to a location of your choice Warni...

Страница 29: ...the documentation of your computer if you are not sure if your computer is equipped with a wireless client Configuring your wireless clients Before you can start surfing the internet with a wireless...

Страница 30: ...omson Gateway must use WPA 2 PSK encryption default encryption or no encryption WPS with WEP encryption is not possible Procedure Proceed as follows 1 Shortly press the WPS button on the Thomson Gatew...

Страница 31: ...ould not find your wireless client Make sure that the WPS button LED is blinking orange when you start WPS on your wireless client Troubleshooting If you are having trouble connecting your wireless cl...

Страница 32: ...the wireless key on the label on the bottom of your Thomson Gateway Forgot your wireless settings If you have changed the wireless settings manually and you can t remember your settings try one of th...

Страница 33: ...for wireless connections Like WPA PSK it uses a user defined key but WEP has been proven to have some security issues We strongly recommend you to use WPA PSK instead Which encryption type should I u...

Страница 34: ...able WPA2 WPA2 is the most secure version but not all wireless clients already support it Before you select this version make sure all of your wireless clients support it WPA WPA2 If not all of your w...

Страница 35: ...ireless encryption on page 27 1 Select Use WEP Encryption 2 In the WEP Key Length list click the desired key length a higher key length offers higher security 3 In the Encryption key box type a Networ...

Страница 36: ...E DOC CTC 20090619 0001 v1 0 30 3 Wireless Access...

Страница 37: ...ct to your Internet Gateway Install VoIP software on your computer and make your phone calls via your computer The THOMSON solution With the Thomson Gateway you can make both VoIP and traditional tele...

Страница 38: ...your traditional phone s or fax to the green Phone port s on the Thomson Gateway s back panel 2 Connect your Thomson Gateway to the traditional network For more information see 4 1 1 Connection to the...

Страница 39: ...a PSTN port on its back panel then the Thomson Gateway has an integrated filter Both DSL and PSTN are coming in via the DSL port so no extra connections are needed Has a PSTN port on its back panel y...

Страница 40: ...he instructions below Requirements Your Internet connection must be up and running before you can configure Internet telephony Configuring the VoIP settings Proceed as follows 1 Enter the proxy and re...

Страница 41: ...ed as follows to verify the voice connection 1 Make sure the Thomson Gateway is turned on 2 Check whether your phone is properly attached to the Thomson Gateway 3 Make sure the Internet telephony serv...

Страница 42: ...E DOC CTC 20090619 0001 v1 0 36 4 Telephony 5 Click Add 6 Enter another URI your user name and password 7 Choose the phone port for which you want to use this telephone number 8 Click Apply...

Страница 43: ...per contact is optional except for the last and first name and can be updated or completed at any time Using the Address book The contact details of a contact in your Address book allow you to direct...

Страница 44: ...Must be supported by your service provider For more information see 4 3 1 Services supported by Your Service Provider on page 39 2 Must be activated on your Thomson Gateway For more information see 4...

Страница 45: ...he Toolbox menu click Telephony 3 In the Navigation bar click Configure 4 In the Pick a task list click View Telephony Services 5 Under Telephony Services you can see the services that are supported b...

Страница 46: ...ick View Telephony Services 5 In the Telephony Services table you can find the activation and deactivation codes Using the codes To de activate one of the services just dial the corresponding code on...

Страница 47: ...an use the following functions To Press Illustration Put an active call on hold and enable a call set up the dial tone is generated R 2 Terminate the call on hold R 0 Terminate an active call and swit...

Страница 48: ...an active call and an incoming call R 2 B A You active B A You active incoming You press R 1 B A You active B A You active incoming You press R 0 B A You on hold active B A You active on hold You pre...

Страница 49: ...619 0001 v1 0 43 4 Telephony Call Transfer If the Call Transfer service is activated you can use the following functions To Press Illustration Transfer a call R 4 B A You active B A You on hold active...

Страница 50: ...2 On the Toolbox menu click Telephony 3 The Telephony page appears On this page you can see an overview of your last calls 4 To view more detailed statistics click View telephony statistics and logs...

Страница 51: ...other devices connected to the Thomson Gateway The Thomson Gateway switches to low power mode This results in a considerable drop in the overall power consumption of the Thomson Gateway THOMSON power...

Страница 52: ...time for example you are going on holiday you might consider to turn off the Thomson Gateway This way no energy will be consumed at all Be aware that if you turn off the Thomson Gateway all services p...

Страница 53: ...eway 2 If you want to Share your files with other devices on the network for example a computer proceed with 6 1 Using the Network File Server on page 48 Share your media with UPnP AV media clients fo...

Страница 54: ...e 4 Under Network File Server Windows Networking click Server Enabled It is also recommended to complete in following fields Server Name You will use this name to access the Thomson Gateway If you lea...

Страница 55: ...eway are listed as folders If the storage device has multiple partitions an index number will be added at the end for example Disk_a1 and Disk_a2 If the partition is a managed partition the Media and...

Страница 56: ...rver name where server name is the Server Name you assigned to your USB storage device So in our example we will type smb Thomson 4 The SMB Mount window appears Select the shared folder you want to mo...

Страница 57: ...w the media files provided by your UPnP AV media server Setting up the UPnP AV server Proceed as follows 1 Browse to the Thomson Gateway GUI 2 On the Tools menu click Content Sharing 3 In the Navigati...

Страница 58: ...Thomson Gateway GUI with a password 1 Browse to the Thomson Gateway GUI 2 On the Toolbox menu click User Management 3 In the Pick a task list click Change my password 4 Leave the Old Password box emp...

Страница 59: ...the Thomson Gateway network you can also access the FTP server using its local address 192 168 1 253 Additional configuration Because most service providers use dynamic IP addresses the IP address of...

Страница 60: ...ee 6 1 Using the Network File Server UPnP AV Media Server For more information see 6 2 Using the UPnP AV Media Server Shared folder The Shared folder is a folder to share files both on the local netwo...

Страница 61: ...ant to configure as Managed Partition 5 Click Apply Result The Thomson Gateway creates following folders Media Use this folder to share your media files with others users on your network You can store...

Страница 62: ...device from the Thomson Gateway you may loose your data To avoid this you must first unmount your USB storage device Unmounting your USB storage device Proceed as follows 1 Browse to the Thomson Gate...

Страница 63: ...l take a closer look at following features Feature availability Depending on the configuration offered by your service provider some features may not be available on your Thomson Gateway For more info...

Страница 64: ...r more information see 7 1 1 Accessing Your Thomson Gateway with UPnP on page 59 You can connect disconnect without having to open the Thomson Gateway GUI For more information see 7 1 2 Managing your...

Страница 65: ...menu click Network 2 The Network window appears 3 Right click your Thomson Gateway displayed as THOMSON TGXXX and click View device web page 4 The Thomson Gateway GUI appears Windows XP If you compute...

Страница 66: ...Not connected to the Internet click Enable to connect to the Internet Windows XP Proceed as follows 1 On the Windows Start menu click Settings Control Panel 2 The Control Panel window appears Click N...

Страница 67: ...lick Apply Extended Security If Extended Security is enabled only limited UPnP operation between the host and the Thomson Gateway is allowed A local host is not allowed to connect disconnect the Thoms...

Страница 68: ...move Programs 3 The Add or Remove Programs window appears Click Add Remove Windows Components 4 The Windows Components Wizard appears In the Components list select Networking Services and click Detail...

Страница 69: ...2 Select Settings Control Panel Add or Remove Programs 3 In the Add or Remove Programs window click Add Remove Windows Components 4 The Windows Components Wizard appears Select Networking Services in...

Страница 70: ...has to decide to which computer he has to send this message If the incoming message is a response to an outgoing message originating from one of your computers the Thomson Gateway sends the incoming m...

Страница 71: ...ific game or application it has to forward these messages to a specific computer Proceed as follows to do so 1 Browse to the Thomson Gateway GUI 2 On the Toolbox menu click Game Application Sharing 3...

Страница 72: ...e provider For example www dyndns org www no ip com www dtdns com Procedure Proceed as follows 1 Browse to the Thomson Gateway GUI 2 On the Toolbox menu click Dynamic DNS 3 On the Navigation bar click...

Страница 73: ...E DOC CTC 20090619 0001 v1 0 67 8 Internet Security 8 Internet Security Overview The Thomson Gateway offers you various options to secure your network Topic Page Firewall 68 Parental Control 69...

Страница 74: ...to adjusted the firewall to your needs The Firewall is disabled by default Changing the security level Proceed as follows 1 Browse to the Thomson Gateway GUI 2 On the Toolbox menu click Firewall 3 The...

Страница 75: ...ased on their content category for example pornography instead of their URL This way you only need to select the appropriate categories and the content category server takes care of the rest This cont...

Страница 76: ...1 6 If you want to make exceptions for specific web sites add the necessary rules in the address based filter For more information see 8 2 2 Adding Rules for the Address Based Filter on page 72 Option...

Страница 77: ...xt to the content level If needed you can change the Name Description and Configuration of the content level 4 Click Apply after you have made your changes Creating your own content level Proceed as f...

Страница 78: ...a specific web site Proceed as follows 1 Browse to the Thomson Gateway GUI 2 On the Toolbox menu click Parental Control 3 Make sure the Use Address Based Filter check box is selected 4 Type the URL o...

Страница 79: ...e mycompany com internetpolicy htm in the Redirect box 7 Click Add Redirect all web sites Proceed as follows 1 Browse to the Thomson Gateway GUI 2 On the Toolbox menu click Parental Control 3 Make sur...

Страница 80: ...E DOC CTC 20090619 0001 v1 0 74 8 Internet Security...

Страница 81: ...g configuring or using your Thomson Gateway If the suggestions do not resolve the problem look at the support pages on www thomson net or contact your service provider Topics This chapter describes th...

Страница 82: ...k the CD icon 2 Double click Menu Your Thomson Gateway has not been found If you see this error during setup make sure that The Thomson Gateway is turned on and fully initialized Your computer has a v...

Страница 83: ...vice Provider The Internet LED does not light up Make sure that your user name and password are correct Proceed as follows 1 Browse to the Thomson Gateway GUI 2 On the Broadband menu click Internet Se...

Страница 84: ...Troubleshooting Ethernet LED does not light up Make sure that The Ethernet cable is securely connected to the Ethernet port on your Thomson Gateway and your computer You are using the correct cable t...

Страница 85: ...f the signal is low try to place the Thomson Gateway or to direct the Thomson Gateway s antenna s for optimal performance Use WPA 2 PSK as encryption For more information see 3 3 Securing Your Wireles...

Страница 86: ...d port number are configured correctly The Power Broadband DSL and Voice LEDs are on Calling over the traditional telephone network PSTN If you have problems calling via the traditional telephone netw...

Страница 87: ...re associated as described in 3 Wireless Access on page 23 Methods You can choose between Resetting the Thomson Gateway via the Thomson Gateway GUI Reset the Thomson Gateway via the Reset button Reset...

Страница 88: ...the Thomson Gateway is turned on 2 Push the Reset button until the Power LED lights red this will take about 7 seconds 3 Release the Reset button 4 The Thomson Gateway restarts Your system administrat...

Страница 89: ......

Страница 90: ...THOMSON Telecom Belgium Prins Boudewijnlaan 47 2650 Edegem Belgium www thomson net THOMSON 2010 All rights reserved E DOC CTC 20090619 0001 v1 0...

Отзывы: