background image

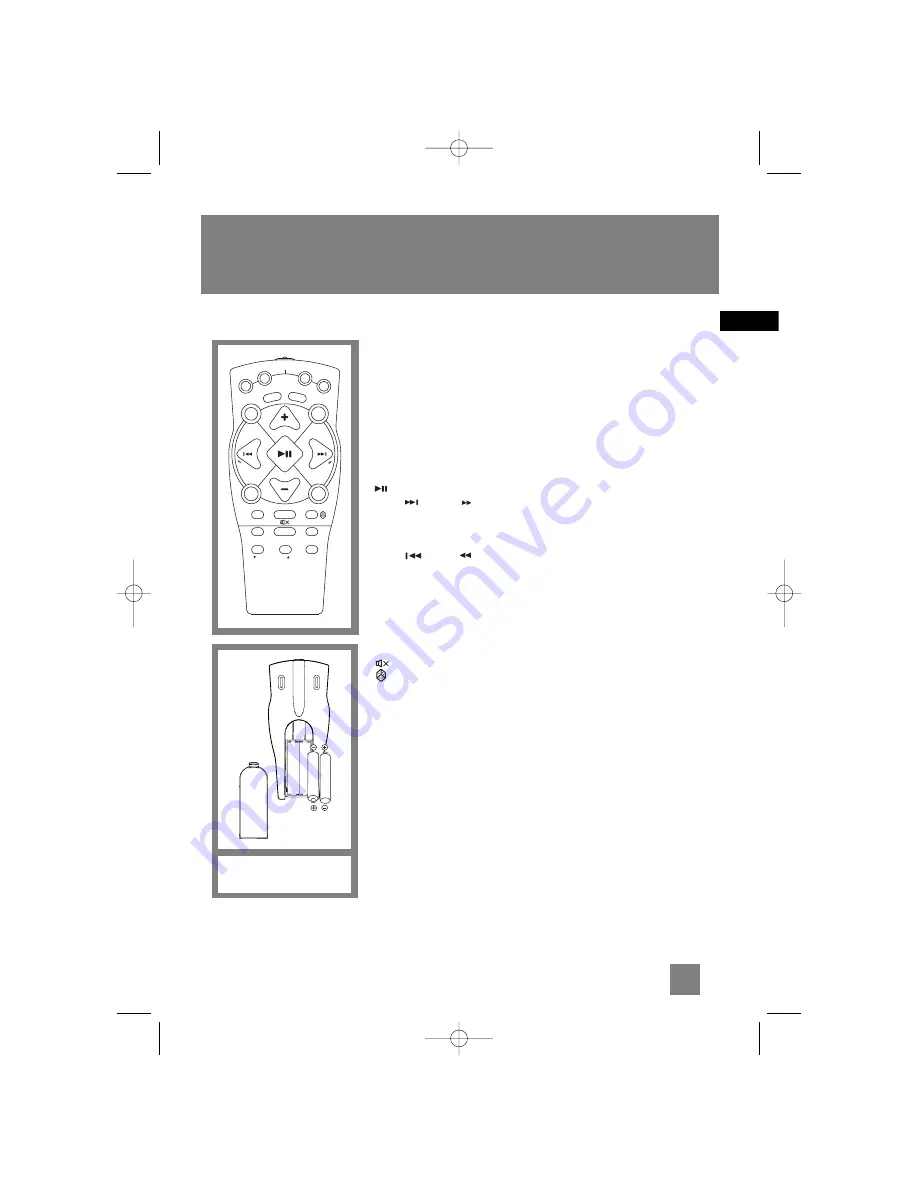
Remote Control 

ON•ECO

— Press and hold in STANDBY mode to enter ECO (power

saving, without clock display) mode.

CD 

— Selects CD player.

TUNER 

— Selects radio tuner.

TAPE

— Selects tape player.

AUX

— Selects external input.

EQ 

— Selects equalizer presets.

B.BOOST

— Turns on or off Bass Boost.

DIMMER / DEMO / CD INFO 

— Turns the feature demonstration on

or off; adjusts display brightness; selects among displaying disc details.

VOL+ or VOL- 

— Increases / decreases volume.

PLAY/PAUSE

— Plays and Pauses the CD or tape.

NEXT        / FWD       

— In CD mode - Increments CD track and 

setting options; searches forward through CD; 
In Tuner mode - tunes up radio frequency;
In Tape mode - fast forwards tape. 

PREV          /REV        

— In CD mode - Decrements CD track and 

setting options; searches  backward through CD; 
In Tuner mode - tunes down radio frequency;
In Tape mode - rewinds tape.

RECORD

— Starts tape recording.

STOP 

— Stops CD and tape playback.

REPEAT•RDS

— Repeats a track, CD, or all CDs. When the radio is

active, displays RDS information. 

MUTE

— Mutes volume.

/PTY 

— Turns on/off random listening, selects search  by 

program type in tune mode.

FM ST. 

— Toggles between FM stereo and mono. 

DISC SKIP 

— Skips to next CD.

INTRO•CT 

— Turns INTRO mode on or off to play the first 10 seconds

of each track, shows RDS time.

PRESET UP/DOWN

— Selects next/ previous preset station.

SLEEP 

— Press to select the time interval in minutes before the unit

turns off. 

Installing Batteries

The remote control must be inserted with 2 “AAA” or  “R3” or “UM
4” batteries prior to use. Follow the steps below to ensure correct
installation.
1.  Open the battery compartment door (located at the back of the 

remote control) by sliding the cover out.

2.  Before inserting the batteries, observe the polarities (that is, 

+ and -) of the battery then relate the polarities to the engraved 
diagram inside the battery compartment.  Now insert the batteries.

3.  After installation of the batteries, place the lit to cover the 

batteries.  Lightly push it closed with a snap. 

4

EN

General Controls

CD

TUNER

TAPE

SOURCE

AUX

E Q

B.BOOST

VOL

VOL

REV

PREV

FWD

NEX

T

REPEAT•RDS

ON•ECO

DISC SKIP

FM ST.

DN•PRESET•UP

SLEEP

INTRO•CT  

PTY

RECORD

STOP

DEMO/DIMMER

CD INFO

Battery Size:

“AAA” or “UM-4” or “R03”

MS2200 EN  11/17/03  1:59 PM  Page 9

Содержание MS2200

Страница 1: ...THOMSON 46 quai Alphonse Le Gallo 92648 Boulogne Cedex FRANCE 55851320 www thomson net MS2200 EN 11 17 03 1 59 PM Page 2 ...

Страница 2: ... U L T A N E O U S P L A Y A N D L O A D S Y S T E M 5 DISC CHANGER ON R L ECO O PEN CLOSE B BOOS T ECO IR SENSO R CD INFO CASSETTE DECK PLAYBA CK RECOR D RDS D I G I TA L L O G I C D E C K PUSH MS2200 It is important to read this instruction book prior to using your new product for the first time u s e r m a n u a l MS2200 EN 11 17 03 1 59 PM Page 3 ...

Страница 3: ...with the colored markings identifying the terminals in your plug proceed as follows BLUE wire to the terminal coded N Neutral or colored black BROWN wire to the terminal coded L Live or colored red DO NOT make any connection to the terminal in the plug which is marked by the letter E or by the earth symbol or colored green or green and yellow A fused plug must be fitted with a 3A fuse approved by ...

Страница 4: ...IGN ALERTING YOU OF I M P O R T A N T I N S T R U C T I O N S A C C O M PA N Y I N G T H E P R O D U C T T H E L I G H T N I N G FLASH AND ARROW HEAD WITHIN THE TRIANGLE IS A WA R N I N G S I G N ALERTING YOU OF D A N G E R O U S VOLTAGE INSIDE THE PRODUCT CAUTION TO REDUCE THE RISK OF ELECTRIC SHOCK DO NOT REMOVE COVER O R B A C K N O U S E R SERVICEABLE PARTS IN SIDE REFER SERVICING TO QUALIFIED...

Страница 5: ...ayback 7 Sampling Tracks 8 Repeat 8 Setting Up a CD Program 8 Playing a Program List 8 Displaying the Program List 8 Deleting Program List 8 Radio 9 Selecting Tuner Band 9 Tuning to a Station 9 Using Presets 9 Auto Preset Programming FM only 9 Manually Setting Presets 9 Suppressing Stereo Signal 9 Tuning to an RDS Station 10 Displaying RDS Station Information 10 Searching by Program Type PTY 10 Ta...

Страница 6: ...he left speaker L on the back of the unit and the black wire on the left speaker to the black terminal for left speaker L Follow the same procedure to connect the right R speaker Installation To ensure sufficient ventilation keep the spacings shown below free from other surfaces 2 EN Getting Started DIGITAL TUNING PRESET EQ RECORD PROG SET SOURCE CLOCK TUNE PRESET TIMER BAND DIMMER DEMO AUTO PROG ...

Страница 7: ...forward through the CD goes to the next CD track or setting option fast forwards tape PLAY PAUSE Plays or pauses CD and tape operation TUNE PRESET Stops CD track Sets tune or preset mode PROG SET Enters program mode for CD and Tuner Applies new settings for Clock and Timer modes BAND AUTO PROG Changes among tuner bands Enters auto preset program in FM mode B BOOST Turns BASS BOOST on or off RECORD...

Страница 8: ... on off random listening selects search by program type in tune mode FM ST Toggles between FM stereo and mono DISC SKIP Skips to next CD INTRO CT Turns INTRO mode on or off to play the first 10 seconds of each track shows RDS time PRESET UP DOWN Selects next previous preset station SLEEP Press to select the time interval in minutes before the unit turns off Installing Batteries The remote control ...

Страница 9: ...t steps 2 3 for timer off time setting 5 Press TIMER to select source Press DIGITAL TUNING or to select TUNER TAPE or CD 6 Press TIMER to set volume Press VOLUME CONTROL up or down to set desired volume level 7 Press PROG SET to save settings or STOP to quit setting Activating the Timer Press and release TIMER to turn on off the timer The timer is active when the clock icon is lit Adjusting the Di...

Страница 10: ...tomatically de activated when the unit is turned off Sound Features Preset Equalizer Curves Press PRESET EQ on the main unit or EQ on the remote to toggle among FLAT ROCK POP JAZZ CLASS and CUSTOM The display shows the selection briefly Creating Custom Curve 1 Press PRESET EQ to select CUSTOM mode 2 While CUSTOM is displayed press DIGITAL TUNING or to cycle among displayed bass and treble range le...

Страница 11: ...p to the previous or next track on the disc Searching Through a CD Press and hold SKIP BACKWARD or SKIP FORWARD to search through a CD while it is playing Random Playback Press PTY to turn on off the playing of tracks in random order Remote Only 7 EN CD Player CD R RW Notes on CD R RW Disc Do not affix any type of labels to either side recordable or labeled side of a CD R RW disc as this may resul...

Страница 12: ...ssign the selected track to the program number After 3 seconds you are prompted for the next track in the program list In CD program mode PROG icon will be lit Playing a Program List While in PROGRAM mode press PLAY PAUSE Displaying the Program List 1 While the CD player is stopped press PROG SET to enter PROGRAM mode 2 Press PROG SET repeatedly to list each track assignment in the program list De...

Страница 13: ...et channels A maximum of 32 stations can be stored Beware of your preset channels being erased accidentally because the scanning and storing process is automatic upon pressing the button You can stop the automatic scan by pressing any button but the erased sta tions cannot be recovered Manually Setting Presets 1 Press the TUNE PRESET button to enter TUNE mode 2 Press SKIP BACKWARD or SKIP FORWARD ...

Страница 14: ... the selected type of program You can search for stations using one of the following program types NEWS news AFFAIR news and documentaries INFO weather medical SPORT sports EDUCATE education DRAMA series and plays CULTURE religion SCIENCE science and technology VARIED miscellaneous POP M pop music ROCK M rock music MOR M middle of the road music LIGHTM light music CLASSIC classical music OTHERM un...

Страница 15: ... Tune to the station to be recorded 4 Press RECORD to begin recording 5 Press STOP to end recording From CD 1 Insert a tape into the tape deck 2 Press SOURCE repeatedly to select CD 3 Insert the disc s to be recorded 4 Select the track CD or program to be recorded 5 Press RECORD to begin recording 6 CD begins to play 7 Press STOP to end recording From an Auxiliary Input 1 Insert the cassette into ...

Страница 16: ...y another CD Inspect the tape heads clean it if necessary Problem System will not turn on No sound Poor radio reception CD does not play Distorted or noisy tape recordings Problem CD sound skips CD button will not respond or does not change discs when you press DISC SKIP Remote control does not work Solution Clean the disc Check disc for warping scratches or other damage Check if something is caus...

Страница 17: ...touch the signal surfaces Hold CDs by the edges or by one edge and the hole Do not affix labels or adhesive tapes to the label surfaces Do not scratch or damage the label CDs rotate at high speeds inside the player Do not use damaged cracked or warped CDs Cleaning CDs Dirty CDs can cause poor sound quality Always keep CDs clean by wiping them gently with a soft cloth from the inner edge toward the...

Страница 18: ... not use your remote control for more than one month Discard leaky batteries immediately as leaking batteries may cause skin burns or other personal injuries Dispose of batteries in the proper manner according to provincial and local regulations Any battery may leak electrolyte under the following circumstances if mixed with a different battery type if inserted incorrectly if all batteries are not...

Отзывы: