6
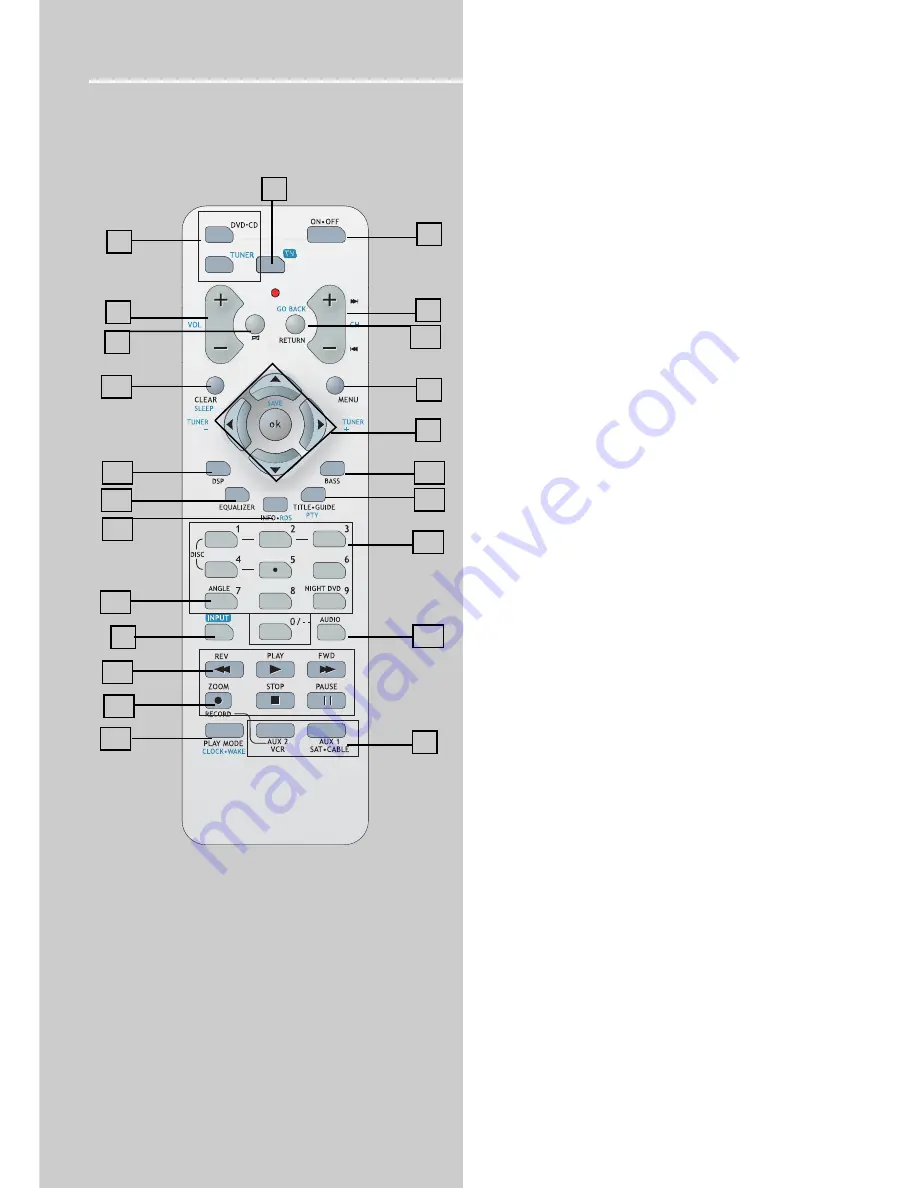
Function Overview
Remote Control
Please be sure you have inserted the batteries into the
remote control (see relevant section on page 3.) You can test
it by pressing any button.
1. ON-OFF
• To turn on or turn off the receiver and other auxiliary components.
2. Source Buttons
• To turn on and select various audio / video sources.
3. CH+, CH- (Channel Buttons)
• To select programmed stations in TUNER mode.
• To skip to the next / previous chapter, track or image in DVD, CD , mp3
and JPEG mode.
4. VOL+, VOL- (Volume Buttons)
• To adjust the volume level.
5. MUTE
• To mute / un-mute all audio outputs.
6. INPUT
• Press to select VCR or TV input.
7. Adjustment Buttons
• When the display shows the general setup page, press the arrow buttons
to select the option you want to change, and press the up and down
buttons to make changes, then press OK to finalize your choice.
8. Number Buttons
• In Tuner mode, press to select a preset station.
• In DVD/CD mode, enable pull down menu by INFO•RDS key (Button 15),
then press the OK key to select field to be adjusted. Press the Number
Buttons to direct input the settings (e.g. CD track)
9. MENU
• In Tuner mode:
- Press TUNER to select band.
- Press to store desired frequency in memory. The flashing word PROG will
appear on display. Input your desired channel number while the word is still
flashing and the frequency will be stored.
• In DVD mode, press for menu setup for DVD title.
10. Operation Buttons
• Press TUNER on the remote to enter tuner mode. In TUNER mode, you can
press TUNER to select band, and press
TUNER +
or
TUNER -
buttons to tune
down or up the radio frequency.
• In CD/DVD mode
- press the PLAY button to start playback.
- press the STOP button to stop playback.
- press the PAUSE button to pause playback.
- press the REVERSE/FORWARD buttons to search backward/foward through
the disc.
• In DVD mode
- press the
PAUSE
button to pause playback and then press
REV
or
FWD
buttons to make a backward and forward slow motion playback. A number
of speeds can be selected by toggling
REVERSE
or
FORWARD
buttons.
Reverse slow motion will be available at the same step as Forward play for
DVD only. Only 3 different speeds are available in VCD/SVCD forward play.
11. RETURN
• Press to go back to previous menu or exit setup menu completely
12. AUDIO
• Press to select the audio channel you like. (e.g. Stereo / Mono Left /
Mono Right)
• In SVCD mode, press to toggle 4 different audio channels (if
available).
• In Tuner mode, press this button to switch from ST to MONO mode and
vice-versa.
• In DVD mode, press to select different audio channel (if available).
13. ANGLE (DVD only)
• Press to select different screen display angles.
14. ZOOM
(VCD/SVCD/DVD/JPEG file)
• During VCD/SVCD/DVD/JPEG files playback, press
ZOOM
key and then
press UP/DOWN/LEFT/RIGHT to pan the image.
15. INFO-RDS
• In DVD/CD mode, press to display playback information.
• In TUNER mode, press to display RDS information.
16.TITLE-GUIDE
• Press to go to the title menu at DVD mode.
17. DSP
• Press to change the surround sound settings. The display will toggle
among Dolby Digital, DTS and Stereo.
18. PLAYMODE
• Press to enter repeat mode selection.
19. EQUALIZER
• Press to toggle between BASS, TREBLE and speaker’s level setting, then
press
LEFT/RIGHT
to change the setting.
20. BASS
• To adjust BASS / TREBLE, press this button once to choose either bass or
treble, then press LEFT/RIGHT to adjust level. (Bass/ treble adjustment is not
allowed for DTS source)
21. CLEAR / SLEEP
• Press once to enter or quit SLEEP mode.
22. TV
• Press to enable the remote to control a RCA TV.
• Press DVD, TUNER, AUX1 or AUX2 buttons to return to the appropiate
mode.
1
3
9
8
2
4
6
2
5
7
20
16
12
21
17
19
15
10
18
11
13
14
22
Содержание DPL909VD
Страница 2: ...u s e r m a n u a l DPL909VD ...


