background image

7

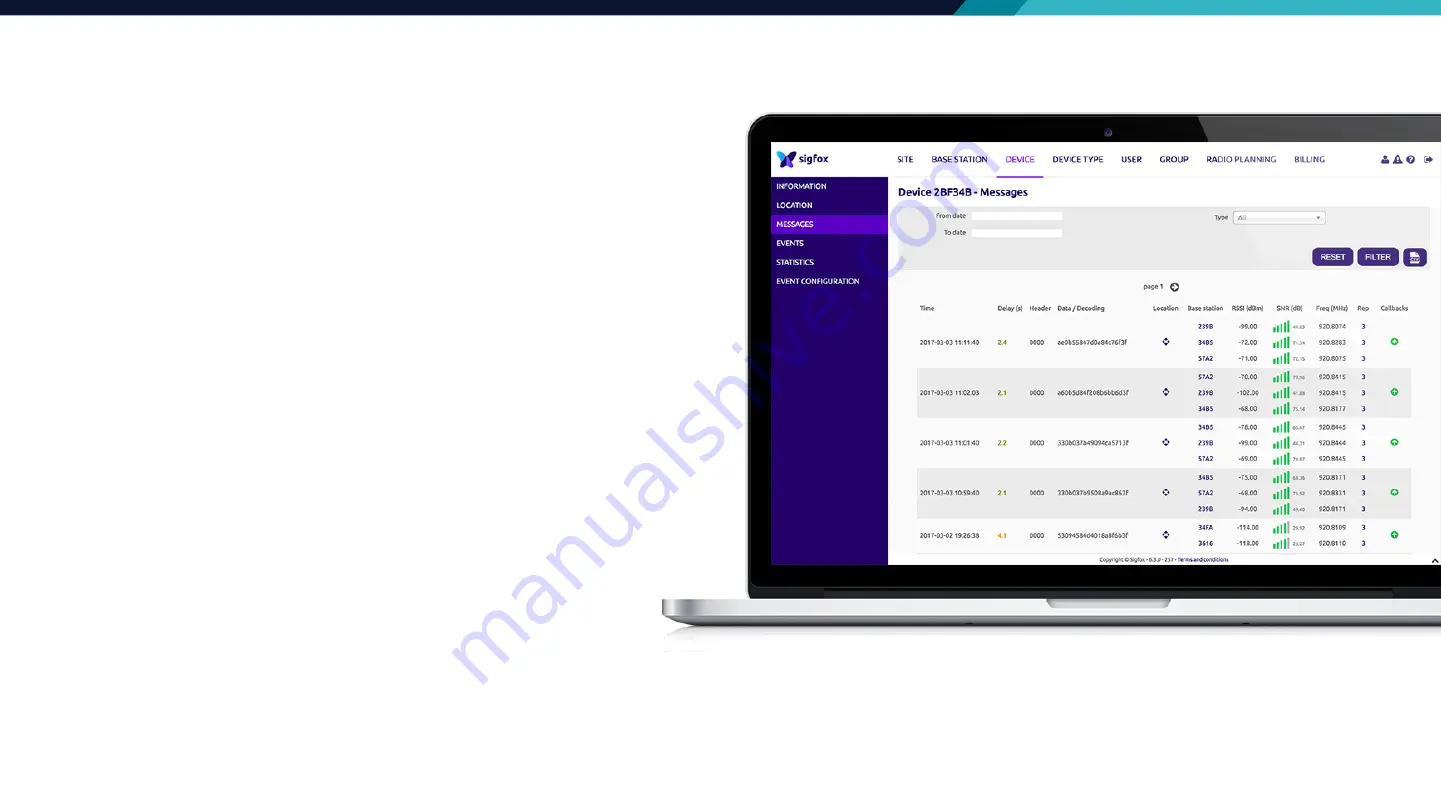
STEP 1: Go to https://backend.sigfox.com/auth/login.

STEP 2: Log in with your account. (You should have an 
account on Sigfox backend after registering your device)

STEP 3: Click on Device tab on the top menu.

STEP 4: Enter your device ID and press enter.

STEP 5: Click on the device ID.

STEP 6: Click on the MESSAGES tab on the left side bar.

You may also want to set up a CALL BACK for your device. 
Please choose your platform and follow the instructions at http://www.thinxtra.com/xkit/.

RUN THE DEMO APPLICATION

How To See Message On Backend

Содержание sigfox Xkit

Страница 1: ...XKIT INSTRUCTION INSTALLATION GUIDE June 2017 www thinxtra com xkit ...

Страница 2: ...BSCRIBE XKIT RUN THE DEMO APPLICATION XKIT COMPONENTS HARDWARE ELEMENTS Arduino Board x1 Battery Holder x1 Xkit x1 Jumper x7 USB Cable x1 Antenna x1 IMPORTANT for MAC OSX 10 12 Users Download a dedicated driver for CH340G CH34G and CH34X chipset github com Thinxtra ch340g ch34g ch34x mac os x driver ...

Страница 3: ...onfigure the jumpers on the Xkit i Put jumpers on P8 P10 pins 1 2 and 3 4 and P4 ii Plug the Xkit to a USB port i Put jumpers on J17 pins 1 2 J15 pins 2 3 P4 P14 pins 1 2 and 3 4 and P9 pins 1 2 and 3 4 ii Plug the Xkit to Arduino iii Plug the Arduino board to PC with USB cable supplied HARDWARE CONFIGURATIONS Power From USB Port Power From Arduino ...

Страница 4: ... 1 2 and 3 4 ii Plug the Xkit to Arduino iii Connect the battery holder to BATT marking please be aware of the polarity and signs HARDWARE CONFIGURATIONS Power From a 9v Battery IMPORTANT NOTE Do not put any jumper on J15 pins 2 3 while powering from a 9V battery or you will damage the board ...

Страница 5: ...HARDWARE CONFIGURATIONS Power from STM Nucleo Board i Put Jumpers on P7 1 2 J17 1 2 P4 P14 1 2 3 4 P9 1 2 3 4 ii Plug the Xkit to the STM Nucleo Board ...

Страница 6: ...EP 1 Go to https backend sigfox com activate STEP 2 Choose Thinxtra logo STEP 3 Choose your country STEP 4 Enter device information Sigfox ID and PAC can be found on the package STEP 5 Fill in account details STEP 6 Click Subscribe button ...

Страница 7: ...e pressure value and the acceleration every 10 minutes The same message will also be sent if a magnet is close to the reed switch or the button on Xkit is pressed RUN THE DEMO APPLICATION How To Run DEMO App Explain Function Of DEMO App LSB Integer 2 bytes Integer 2 bytes Integer 2 bytes Signed Integer 2 bytes Signed Integer 2 bytes Signed Integer 2 bytes Received frame on the backend Actual measu...

Страница 8: ... 3 Click on Device tab on the top menu STEP 4 Enter your device ID and press enter STEP 5 Click on the device ID STEP 6 Click on the MESSAGES tab on the left side bar You may also want to set up a CALL BACK for your device Please choose your platform and follow the instructions at http www thinxtra com xkit RUN THE DEMO APPLICATION How To See Message On Backend ...

Страница 9: ...st into a two bytes integer To retrieve the original values the received values from the Sigfox backend need to be rescaled as follows Temperature is divided by 100 Pressure is multiplied by 3 Output voltage of the photovoltaic is divided by 1000 Acceleration in each dimension is divided by 250 RUN THE DEMO APPLICATION How To Understand Received Messages On Sigfox Backend ...

Страница 10: ...devicemaker thinxtra com linkedin com company thinxtra facebook com thinxtra twitter com thinxtra Thinxtra Pty Ltd ABN 79 606 156 325 Australia New Zealand Hong Kong www thinxtra com xkit ...

Отзывы: