background image

Marine Toilet Installation

Tecma Compass High ECO Owner’s & Installation Manual

12

www.thetfordmarine.com

COMPASS High ECO                                                              Owner’s and installation Manual


Always use ABYC-RECOMMENDED CIRCUIT BREAKER/FUSE AND WIRE GAUGE.


Always be sure unit’s ELECTRICAL POWER is TURNED OFF and that SEACOCKS are CLOSED or in the “OFF” position before beginning work.


If Toilet is connected to any through-hull fittings, ALWAYS CLOSE or TURN OFF ALL SEACOCKS when BOAT IS UNATTENDED – even if only for a minimal time.


For units using fresh water that are (at any time) connected to shore side municipal water supply systems, SHORE SIDE SYSTEM must be DISCONNECTED IF 

BOAT IS LEFT UNATTENDED – even if only for a minimal time.


If unit is connected to any through-hull fittings, ALL flexible tubing connected directly or indirectly between toilet and ANY through-hull fitting must be of marine 

quality and must be connected to each fitting with TWO (2) STAINLESS STEEL WORM DRIVE HOSE CLAMPS. These HOSE CLAMPS must be INSPECTED 

FREQUENTLY TO ENSURE TIGHTNESS, thereby preventing leaks.


If unit is connected to any through-hull fittings, PROPERLY INSTALLED SEACOCKS MUST BE INSTALLED to these lines. All seacocks (or secondary valves fitted in 

connecting, intermediate tubing) MUST BE FULL-BORE VALVES and READILY ACCESSIBLE to all toilet users. Use lever-actuated, full-bore, marine quality seacocks 

and valves. Screw-down gate valves are not recommended.


IF WATER DOES NOT FLOW INTO TOILET DURING THE FIRST TWO OR THREE FLUSH CYCLES, it has been improperly installed or has malfunctioned. 

Discontinue use of toilet until installation has been corrected or repairs are made. Please review this manual’s Installation section or refer to the Troubleshooting 

section.


Use ONLY STAINLESS STEEL mounting hardware. DO NOT INSTALL WITHOUT PLASTIC MOUNTING HOLE INSERTS IN PLACE. Failure to properly mount toilet 

may result in toilet becoming loose or damaged.


Only human waste and toilet paper should be put into the toilet. Never flush FOREIGN MATERIALS (e.g., paper towels, pre-moistened wipes, condoms, feminine 

hygiene products, dental floss, household garbage, etc.).

Warning! 

Read and understand the warnings listed in this document before you install, operate, or service this system. If you do not obey these 

warnings, there is a risk of property loss, injury, or electrocution. Do not make any changes to this unit as this could result in property damage, injury, or 

electrocution.

Tecma accepts no responsibility or liability for damage to equipment, injury, or death that may result from the system’s im-

proper installation, service, or operation.

Tecma recommends that plumbing and electrical work be performed by a licensed tradesperson. Local permit and code com-

pliance is required. 

Warning! 

Danger of Electric Shock, Fire and Flooding. Failure to heed these warnings can result in loss of property, injury and death.

Warning! 

- Do not leave children unattended to use the toilet. Do not put body parts inside the toilet. 

Discharge Hoses

This toilet is designed to discharge waste into a 1.5” ID marine-grade sanitation hose/pipe.

IMPORTANT: 

Use only marine-quality reinforced hoses for installation. Rigid PVC pipe may also be used for the discharge line. If using flexible 

hoses, avoid sharp bends that may cause the hose to kink and restrict flow, and secure the hoses to prevent abrasion. Always inspect the final installation for 

leaks.

HAZARD WARNING

Contact with moving part
ALWAYS 

disconnect power to the toilet before servicing. There is a serious injury risk by placing hands/fingers in the bowl discharge because of the 

high-speed macerating impeller located directly below the bowl discharge. NEVER attempt to dislodge an obstruction in the pump by placing your hands/

fingers in harm’s way while it is running.

Содержание Tecma Compass High ECO

Страница 1: ...nual 18 Owner Manual 19 FRANCAIS Information g n rale 22 Manuel d installation 28 Manuel de l utilisateur 29 ESPA OL Informaci n general 32 Manual de instalaci n 38 Manual de uso 39 DEUTSCH Allgemeine...

Страница 2: ...rori nel montaggio della toilet potrebbero nel tempo provocare movimenti impropri della ceramica con eventuali danni a cose o persone La toilet stata disegnata per disporre solamente di rifiuti organi...

Страница 3: ...dimensioni della base in porcellana possono variare leggermente Tutti i circuiti devono essere conformi agli standardABYC ISO Il diametro dei cavi deve essere quello indicato nella tabella di calibro...

Страница 4: ...Le parti mostrate di seguito sono fornite nel kit di Thetford Marine 1x K7 1x K6 Fig D Incluso in tutti i Kit ECO Elettrovalvola Acqua Dolce e Kit ECO Acqua di mare Incluso in tutti i Kit ECO Acqua d...

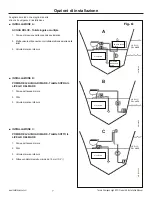
Страница 5: ...parete Pompa idrica Thetford Marine Installazione acqua di mare Installazione pompa acqua di mare E Valvola di scarico inferiore verticale F Filtro Installazione acqua di mare K3 K1 K4 K5 K6 K8 4 A Lu...

Страница 6: ...tto Deve essere installato un sifone di ventilazione di diametro giusto se SOTTO QUALSIASI CIRCOSTANZAo CONDIZIONE compreso situazioni di sbanda mento di carico o di stivaggio La Toilet connessa a eve...

Страница 7: ...ARE LIVELLO DEL MARE LIVELLO DEL MARE Serbatoio dell acqua dolce Al serbatoio Al serbatoio Al serbatoio ART00200 B Scegliere il metodo che meglio si adatta alle vostre esigenze di installazione INSTAL...

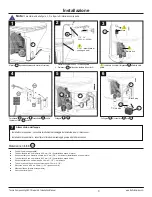
Страница 8: ...3 7 m pianificare di conseguenza Posizionare i connettori far passare K3 all interno della parete Nero Blu bianco K3 Collegare K3 a F K3 F Collegare F al connettore NP poi a J Mettere 1 in posizione...

Страница 9: ...te fare gli aggiustamenti necessari Inserire in maniera permanente il K4 e il K5 Verifica del funzionamento della Toilette Attenzione Sigillare con silicone o lattice sigillante Non usare sigillante a...

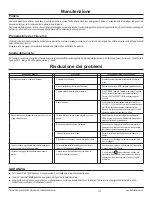
Страница 10: ...icare la presenza di pieghe nella linea di alimentazione Non c energia nella pompa dell acqua Controllare che l interruttore fusibile non sia scattato Assicurarsi che tutti i connettori elettrici sian...

Страница 11: ...a fornire servizi di base per aiutare in caso di errato funzionamento della toilet Se le azio ni di cui sopra non risolvono il problema potrebbe essere necessario portare l unit in un centro assistenz...

Страница 12: ...STALL WITHOUT PLASTIC MOUNTING HOLE INSERTS IN PLACE Failure to properly mount toilet may result in toilet becoming loose or damaged Only human waste and toilet paper should be put into the toilet Nev...

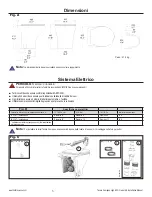
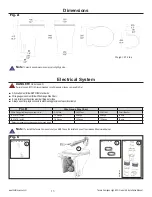
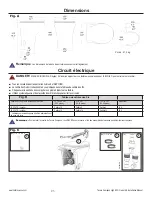
Страница 13: ...r and ground wires Note Ceramic base dimensions may vary slightly in size All circuits must followABYC ISO standards Wire gauge sizes must follow Wire Gauge Size Chart Every toilet must have its own c...

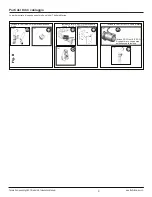
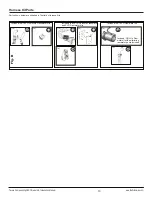
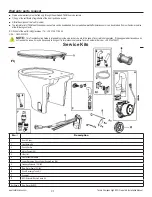
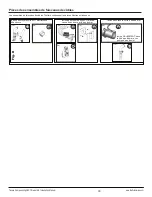
Страница 14: ...Parts 1x K1 1x K2 Parts shown below are supplied in Thetford s Harness Kits 1x K7 1x K6 Fig D Included in all ECO Solenoid Freshwater and ECO Raw water kits Included in all ECO Raw water kit Included...

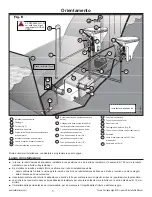
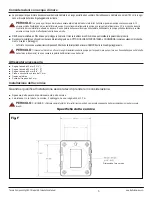
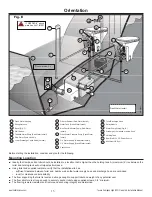
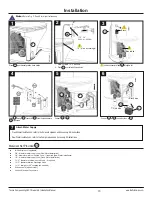
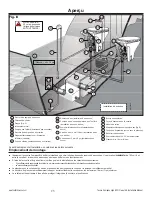
Страница 15: ...C Bezel Fig F D Wall Switch Thetford Water Pump Raw Water Install Raw Water Pump Hook Up E Lower Discharge Check Valve Vertical K3 K1 K4 K5 K6 K8 4 Mounting Location Ideally the Compass Eco toilet sho...

Страница 16: ...an in line strainer may void product warranty AVented Loop of proper diameter MUST be installed if UNDERANY CIRCUMSTANCE or CONDITION including heel trim or load Toilet is connected to a through the...

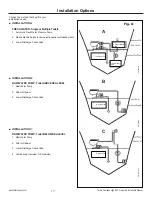
Страница 17: ...A ART00199 To other toilets valves SEA LEVEL Fresh Water Tank To Holding Tank ART00200 SEA LEVEL To Holding Tank B Choose the method that best fits your installation needs INSTALLATION A FRESH WATER S...

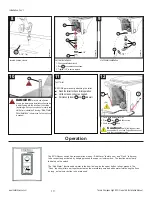
Страница 18: ...hole drill screw holes 12 plan accordingly Position connectors feed K3 through wall Black Blue white K3 Connect K3 to F K3 F Connect F to NP connector then to J Place 1 in permanent position trace out...

Страница 19: ...rrect as needed Permanently insert K4 and K5 into wall Test Toilet Caution Seal with silicone or latex base sealant Do not use Polysulfide base seal ants that can damage plastic 2x 2 1 8 10 11 12 Vert...

Страница 20: ...connected to fresh water supply Check for kinks in the supply line No power to water pump Check that fuse circuit breaker has not tripped Ensure all electrical connectors to water pump are fully mate...

Страница 21: ...aid in the case of incorrect toilet operation If the suggested actions above do not resolve the issue it may be necessary to bring unit in for professional service Tecma Customer Service 39 0744 7090...

Страница 22: ...N ACIER INOXYDABLE VIS SANS FIN Le SERRAGE de ces COLLIERS doit tre FR QUEMMENT V RIFI afin de pr venir les fuites Si l unit est reli e un raccord traversant la coque DES ROBINETS DE PRISE D EAU DOIVE...

Страница 23: ...mensions de la base de porcelaine peuvent varier l g rement Tous les circuits doivent respecter les normes de l ABYC ISO Le calibre des fils doit correspondre ceux indiqu s dans le Tableau de calibre...

Страница 24: ...de faisceaux de c bles Thetford contiennent les pi ces illustr es ci dessous 1x K1 1x K2 1x K7 1x K6 Fig D 1x K4 Inclus dans tous les kits ECO electro vanne d eau douce et d eau de mer Inclus dans to...

Страница 25: ...il y a suffisamment d espace entre la cuvette et le mur pour que les tuyaux d arriv e d eau et d vacuation ne soient pas tordus un acc s suffisant pour l entretien Le plancher sous la cuvette est de n...

Страница 26: ...tion du diam tre appropri DOIT tre install e si EN TOUTE CIRCONSTANCE ou dans TOUTE SITUATION y compris la g te ou la charge La cuvette est reli e un raccord traversant la coque et que le rebord de la...

Страница 27: ...binets NIVEAU DE LA MER R servoir d eau douce Vers le r servoir d eaux us es ART00200 NIVEAU DE LA MER Vers le r servoir d eaux us es B INSTALLATION A EAU DOUCE Une ou plusieurs cuvettes 1 Pompe refou...

Страница 28: ...ir Bleu Blanc K3 Connectez t K3 to F K3 F Remarque Reportez vous aux figures C D et E pour toutes les r f rences de pi ces Connectez F au connecteur non fourni NP puis J Placez 1 dans sa position perm...

Страница 29: ...sez pas de calfeutrants base de polysulfide car ils attaquent le plastique 1 Calfeutrez le long de l int rieur de la ligne trac e 2 Placez 1 ins rez 2 dans le plancher fixez 3 Calfeutrez autour de la...

Страница 30: ...e de l embout La cuvette se vide d eau apr s la chasse L eau est siphonn e hors de la cuvette car le tuyau d vacuation est tir vers le bas Le tuyau d vacuation E de la pompe mac ration est tir vers le...

Страница 31: ...vous offrir une aide de base en cas de fonctionnent incorrect de la cuvette Si les actions propos es ci dessus ne corrigent pas le probl me il peut tre n cessaire de rapporter l appareil pour recouri...

Страница 32: ...CCESORIOS PL STICOS DE LOS ORIFICIOS DE MONTAJE El inodoro podr a aflojarse o da arse si se instala de manera incorrecta S lo se deben echar desechos humanos y papeles higi nicos en el inodoro No desc...

Страница 33: ...siones de la base de porcelana podr an variar ligeramente Todos los circuitos deben cumplir con las normas deABYC ISO Los calibres de los cables deben ser los indicados en la tabla de calibre de los c...

Страница 34: ...n se incluyen en los juegos de arn s de Thetford 1x K3 1x K4 1x K5 1x K1 1x K2 1x K7 1x K6 Fig D Incluido en los kits ECO electrov lvula de agua dulce y de agua de mar Incluido en el kit ECO de agua...

Страница 35: ...inodoro y la pared debe ser tal que no se tuerzan las mangueras de suministro de agua y de descarga de desechos Espacio para el acceso al mantenimiento El piso donde se va a instalar el inodoro debe e...

Страница 36: ...ER instalar una v lvula antisif n del di metro adecuado si EN CUALQUIER CIRCUNSTANCIA o CONDICI N incluidas situaciones de escora carga o arrumaje El inodoro est conectado a un adaptador pasacasco y e...

Страница 37: ...DEL MAR Tanque de agua dulce Hacia el tanque de retenci n ART00200 NIVEL DEL MAR Hacia el tanque de retenci n B INSTALACI N A AGUA DULCE Inodoros individuales o m ltiples 1 Bomba de presi n autom tic...

Страница 38: ...aciones de agua bruta v anse las instrucciones del juego de arn s de solenoide y accesorios de la bomba Conectar el suministro de agua Cable negro F NP J 3 7 m planear de acuerdo con ello Negro Azul B...

Страница 39: ...ro porque pueden da ar los materiales pl sticos 1 Aplicar un compuesto de calafateo alrededor de la l nea trazada 2 Colocar 1 insertar 2 en el piso afianzar 3 Aplicar un compuesto de calafateo alreded...

Страница 40: ...rena y queda sin agua despu s de la descarga El agua est fluyendo sifoneando fuera de la taza debido a que la manguera de descarga est halada hacia abajo La manguera de descarga E de la bomba macera d...

Страница 41: ...a b sica en caso de funcionamiento incorrecto del inodoro Si las acciones sugeridas no resuelven el problema quiz s sea necesario enviar la unidad para que reciba servicio profesional Servicio al clie...

Страница 42: ...llierte Sekund rventile M SSEN ALS VENTILE MIT VOLLEM DURCHGANG AUSGELEGT und allen Benutzern der Toilette ZUG NGLICH sein Stets hebelbet tigte seewasserfeste Seeventile mit vollem Durchgang verwenden...

Страница 43: ...r mit Dichtung verwenden um Korrosion zu vermeiden GEFAHR BRANDGEFAHR Die gem ABYC ISO empfohlenen Sicherungsautomaten oder Sicherungen verwenden um Br nde zu vermeiden Adernquerschnitt Auswahltabelle...

Страница 44: ...ten Teile sind in den Thetford Kabelbaumkits enthalten 1x K3 1x K4 1x K5 1x K1 1x K2 1x K7 1x K6 Abb D In allen ECO Magnetventil Frischwas ser und ECO Seewasser Anschlusskits enthalten In allen ECO Se...

Страница 45: ...erpumpenverdrahtung Abb B P Ablaufleitung ber oder unter dem Boden Q F kalientank R 12 VDC Spannungsquelle des Boots Schiffs S Mindestst rke des Bodens 1 9 cm D E F G H I J K Einbauort Die Compass Eco...

Страница 46: ...ser Anweisung kann die Produktgarantie nichtig machen Ein bel ftbares Schwanenhalsventil mit ordnungsgem em Durchmesser MUSS UNTERALLEN UMST NDEN oder BEDINGUNGEN einschlie lich Kr ngung oder Last ins...

Страница 47: ...INIE ART00200 WASSER LINIE B INSTALLATION A FRISCHWASSER Einzelne oder mehrere Toiletten 1 Automatische Frischwasserdruckpumpe 2 Seewasserfestes durch die Toilette elektronisch geregeltes E Magnetvent...

Страница 48: ...t positionieren Umriss anzeichnen Rotes Kabel Schwarzes Kabel F NP J 3 7 m lang unbedingt ber cksichtigen Schwarz Blau wei K3 K3 F ART00212 1 1 1 2 3 4 5 6 7 4 4 cm 5 1 cm K4 Steckverbinder entspreche...

Страница 49: ...h silicone or latex base sealant Do not use Polysulfide base seal ants that can damage plastic 2x 2 1 1 Silikonmasse an der Innenseite von Umrisslinie auftragen 2 1 positionieren 2 in den Boden einset...

Страница 50: ...ach dem Sp len leer Wasser wird aufgrund eines heruntergezogenen Ablaufschlauchs aus dem Becken gesaugt Siphon wirkung Ablaufschlauch E von der Zerkleinerungspumpe wird heruntergezogen Den Ablaufschla...

Страница 51: ...alls die Toilette nicht richtig funktioniert Wenn das Problem durch die vorgeschlagenen Abhilfema nahmen nicht beseitigt werden kann muss das System ggf von einem professionellen Service gepr ft werde...

Отзывы: