background image

T9901008-1-1  UK (v9) 


Page | 9  


Mount the Ecopower remote control in a convenient position directly to the wall or onto a switch box. 
 

9.1 Wall 

mounting 


Step 1


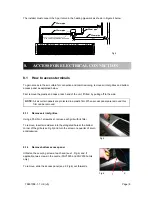
Using a screwdriver undo the screw on the top of the remote control 
case and pull the back case away (see Fig 7). 


Step 2 

Feed one end of the RJ control cable through the back case, secure it, 
then screw the back case to the wall using suitable fixings (not 
supplied). 


Step 3 

Connect the RJ plug to the RJ socket on the PCB in the remote control. 


Step 4


Refit the front case. 


9.2  Switch box mounting 


Step 1


Using a screwdriver undo the screw on the top of the remote control case and pull the back 
case away (see Fig 7). 


Step 2 

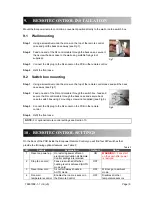
Feed one end of the RJ control cable through the switch box, feed and 
secure the RJ control cable through the back case and secure back 
case to switch box using 2 mounting screws (not supplied) (see Fig 8). 


Step 3 

Connect the RJ plug to the RJ socket on the PCB in the remote 
control. 


Step 4


Refit the front case. 


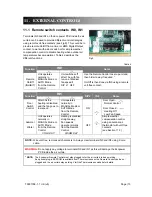
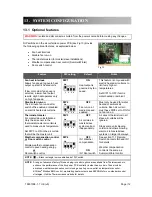
On the back of the PCB inside the Ecopower Remote Control you will find four DIP switches that 
provide the following optional features, see Table 3: 


DIP 

Feature 

Explanation 

Default 

Notes 

Reset on power-up 

On restoring power after an 
electrical interruption all Remote 
Control settings are retained 

ON 

WARNING!

 – Fans start 

on their own after power 
is restored 

Stop fan on cold 

Fans are switched off when 
heating level is achieved (AUTO 
mode only) 

OFF  

Never blow cold 

Air curtain always heats in 
AUTO mode 

OFF 

Will not go to ambient 
mode 

4 Room 

air 

temperature control 

Enables the room air sensor in 
the Remote Control 

OFF 

Disables all other 
temperature sensors 

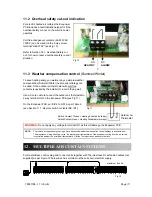
9. 

REMOTE CONTROL INSTALLATION 

10.  REMOTE CONTROL SETTINGS 

NOTE: 

For optional remote control settings see Section 10. 

Fig 7 

Fig 8 

Table 3

Содержание HX1000A

Страница 1: ...T9901008 1 1 UK v9 Page 1 AIR CURTAIN PHV SURFACE MOUNTED RANGE INSTALLATION OPERATION AND MAINTENANCE INSTRUCTIONS English...

Страница 2: ...IGURATION 12 14 FAN SPEED SELECTION 13 15 REMOTE CONTROL OPERATION 13 16 COMMISSIONING THE SYSTEM 15 17 SIGN OFF 15 18 FAULT CONDITIONS 16 19 SERVICE MAINTENANCE 17 20 WARRANTY 18 APPENDIX 1 Dimension...

Страница 3: ...ng installed see Section 3 Specifications Models operating on a 3 phase electrical supply see Section 3 Specifications require a neutral connection 3N A 25mm size cable gland or conduit connector of I...

Страница 4: ...ide a building and located horizontally over a doorway They must not be installed on the outside of a building or built into a cabinet or recessed in any way Please complete the following details for...

Страница 5: ...re supplied loose to be fitted during installation Supplied with 6m RJ Control Cable Outdoor Air Thermostat Optional supplied by Installer Wall Brackets and M6 Fixing Bolts 3 port control valve for wa...

Страница 6: ...ckets to the rear face of the unit as shown in Fig 2 using the M6 fixing bolts supplied Step 2 Drill fixing points in the wall referring to Appendix 1 for correct positioning Step 3 Screw in the top w...

Страница 7: ...imum heat output of the air curtain are given in Table 2 below Air Curtain Water Flow Rate l min at 82 71 C Water Pressure Drop kPa PHV1000W 2 row 12kW 15 6 5 0 PHV1500W 2 row 18kW 23 4 9 5 PHV2000W 2...

Страница 8: ...e 8 1 1 Remove air inlet grilles Using a Pozi No 1 screwdriver remove each grill with its filter To remove insert screwdriver into the elongated hole at the bottom corner of the grille see Fig 5 and t...

Страница 9: ...e and secure back case to switch box using 2 mounting screws not supplied see Fig 8 Step 3 Connect the RJ plug to the RJ socket on the PCB in the remote control Step 4 Refit the front case On the back...

Страница 10: ...itch Control After 30s the heating is disabled and the fan goes to low speed Unit operates normally in MANUAL Mode or AUTO Mode from the Remote Control ON Door Open Normal Control Door Closed Heating...

Страница 11: ...to 2 way terminal IN1 on the Ecopower PCB see Fig 11 On the Ecopower PCB set DIP 4 to OFF as per Table 4 see Section 11 1 Remote switch contacts IN0 IN1 For master slave control plug and connect unit...

Страница 12: ...r curtain is used to measure air temperature Set DIP 3 to ON in the air curtain that will be the master unit DIP 3 OFF Air curtains in master slave systems all act independently Air sensor thermistors...

Страница 13: ...ith average acoustic characteristics as defined in CIBSE Guide B5 reverberation time 0 7s at 1kHz and a room size equivalent to 8 air changes per hour ac h Care needs to be taken when selecting air cu...

Страница 14: ...ct heating level from zero to half heat to full heat by stepping up or down with the heating level controls The heating level scale shows the level selected Automatic mode Heat output is controlled au...

Страница 15: ...curtain must be given supervision and instruction by the person responsible for their safety concerning the safe use of the unit and to understand any hazards involved Children and those with reduced...

Страница 16: ...and after 30 seconds the LEDs on the remote control will stop flashing and the status LED on the Ecopower PCB in the air curtain will flash green 18 2 Fuses In the event of an electrical fault intern...

Страница 17: ...Check within the unit to ensure all electrical connections and crimped terminals are tight and that all cables are in good condition Refit air inlet grilles after servicing Reconnect electrical supply...

Страница 18: ...has been taken in compiling these instructions to ensure they are correct Thermoscreens Ltd disclaims all liability for damage resulting from any inaccuracies and or deficiencies in this documentatio...

Страница 19: ...AIR IN AIR OUT 377 A B D C Remote control connection interface Entry point for electrical supply and controls Rp in BSP LPHW connections G G mm 255 B C D E F G 1746 2296 800 1400 1896 948 198 173 200...

Страница 20: ...eed Med speed Low speed 0V Fan 2 Fan 1 J17 ECO Power CVR1008 9 10 9 8 7 6 5 4 3 2 1 L3 N L2 L1 J10 J16 J12 J5 J6 J11 R 0 10V J14 Th EEPROM F2 F1 J9 Alarm Healthy Black rectangle is moveable head of DI...

Страница 21: ...Black rectangle is moveable head of DIP switch A1 A2 13NO 14NO 1 2 3 4 5 6 CONTACTOR 230V AC Coil Brown Black Grey TERMINAL BLOCK L1 L2 L3 N E L1 L2 L3 N E 400V 3ph 50Hz Brown Brown Blue Blue Summer W...

Страница 22: ...BLOCK L1 L2 L3 N E L1 L2 L3 N E 400V 3ph 50Hz Brown Brown Blue Blue 85 C Auto Thermal Trip x2 Summer Winter or Door Contact First Stage Heating bottom elements Second Stage Heating top elements Black...

Страница 23: ...J16 J12 J5 J6 J11 R 0 10V J14 Th EEPROM F2 F1 J9 Black rectangle is moveable head of DIP switch Grey Orange White Blue Green Yellow Brown 3 PORT VALVE 1 2 3 4 E Black White Summer Winter or Door Conta...

Страница 24: ...emote Control Switch 8 7 6 5 4 3 2 1 1 2 3 4 0 I F1 5A White Black Blue Medium speed High speed Red Red Blue Black Fan Motor 1 0 1 2 3 4 1 White COMMON Black High Blue Red Low Yellow Capacitor 7 5 F R...

Страница 25: ...ed Relevant EC Council the Machinery Directive 2006 42 EC Directives the Low Voltage Directive 2006 95 EC the Electromagnetic Compatibility Directive 2004 108 EC the Energy related Products Directive...

Отзывы: