background image


Page 8 


Installation, use and maintenance guide 


Pellet Air 11 Stove body 

1.4 GENERAL GUIDELINES 

Caution:  the  appliance  must  be  connected  to  a  system  provided  with  a  PE  conductor  (in  compliance  with  the 
specifications of 73/23/EEC, 93/98/EEC, concerning low voltage equipment). 
Before installing the appliance check the efficiency of the earth circuit of the power supply system. 

Caution: the power supply line must have a section which is suitable for the power of the equipment. The cable section must in any 
case be no less than 1.5 mm². The appliance requires powering with a voltage of 220-240 V and 50 Hz. Voltage variations greater 
than  10% of  the  nominal value can cause  irregular  operation or damage  the electrical  device.  Position the  appliance so  that the 
electric power plug is easily accessible. Ensure that a suitable differential switch is installed upstream from the equipment. 
Your appliance has obtained the CE marking and has been made to run for 1 hour to check that it functions correctly. 
The product must not be used by children, by persons with physical or mental impairments, by persons who are not familiar with the 
instructions for use and maintenance of the product (the instructions are found in this booklet). 
CAUTION:  before  each  start  up  make  sure  that  the  brazier  and  the  ash  pan  are  clean  and  positioned  correctly,  check  that  the 
firebox door is closed . 
CAUTION: the door must always remain shut tight when the stove is operating. It is strictly forbidden to open the door while the 
appliance is in operation. While the appliance is in operation the smoke exhaust pipes and the appliance itself can reach extremely 
high temperatures:  do not  touch  them! Do  not  expose  your  body  to  hot  air for long  periods of time,  do not  overheat the  room in 
which the appliance is installed: this type of behaviour could result in dangerous conditions for objects, animals and/or persons. Do 
not expose plants or animals directly to the hot air flow as this could have noxious effects on them. It is strictly prohibited to use any 
type of fuel (liquid, solid...) to light up the appliance: lighting must occur automatically as intended and described  in this installation, 
use and maintenance booklet; consequently, it is also strictly forbidden to feed pellets (or any other material) into the brazier. Do not 
place non-heat resistant or inflammable or combustible objects in the vicinity of the appliance: keep them at a suitable distance. Do 
not place wet clothing to dry on the appliance. When  using a clothes horse, keep at a suitable distance. It is strictly prohibited to 
disconnect the appliance from the electrical power mains while it is in operation. 
 

Caution: do not wet the appliance and do not touch the electrical parts with wet hands. Never vacuum hot ash: this 
could damage the vacuum device.  All the cleaning operations described in this manual must be carried out when the 
appliance is cold. 


Caution! Warning for Swiss users 
Refer to the local cantonal regulations imposed by the Fire Department (Mandatory signalling and safety distances ) 
and the Note concerning installation of stoves issued by the Association of Cantonal Fire Agencies (VKF - AEAI). 


1.5 TRANSPORTATION AND STORAGE 

TRANSPORTATION AND HANDLING 
The appliance must always be in a vertical position when handled and exclusively by means of trolleys. Take special care to protect 
the  electric  panel,  the  glass,  and  all  the  fragile  parts  from  mechanical  impact  which  could  damage  them  and  their  correct 
functioning. 
STORAGE 
The appliance must be stored in a humid-free environment and sheltered from the weather; avoid placing the appliance directly on 
the ground. The Company denies all responsibility for damage caused to wood floors or floors made from any other material. 
It is inadvisable to store the appliance for long periods of time. 


Содержание PELLET AIR 11

Страница 1: ......

Страница 2: ...THE MONTREUX CASING 12 4 10 CONNECTING THE APPLIANCE TO THE FLUE OUTLET 13 4 11 HANDLE 15 5 DESCRIPTION OF THE CONTROLS 15 5 1 DESCRIPTION OF THE CONTROL PANEL 15 5 2 DESCRIPTION OF THE POWER PANEL 17 5 3 DATE SETTING THE DATE AND TIME 17 5 4 CHRONO ON OFF PROGRAMMING 17 5 5 LEVEL OPERATING LEVEL SETTING 20 5 6 THERMOCOMFORT ACTIVATING THE CONNECTION WITH THE HANDHELD RADIO CONTROL OPTIONAL 20 5 7...

Страница 3: ...OF THE ROOMS 35 10 1 FOREWORD 35 10 2 ROOM VENTILATION 35 10 3 SMOKE OUTLET 35 10 3 1 CHIMNEY TYPES 35 10 3 2 FLUE OUTLET FLUE SYSTEM COMPONENTS 36 10 3 3 CONTROLS PRIOR TO INSTALLING THE APPLIANCE 37 11 ALARMS 38 12 ELECTRICAL WIRING 39 13 INFORMATION FOR THE SKILLED TECHNICIAN 40 13 1 MAIN COMPONENTS AND THEIR OPERATION 40 13 2 REQUIREMENTS NECESSARY FOR CORRECT INSTALLATION AND OPERATION 40 13 ...

Страница 4: ...seguenti Direttive 2004 108 CE Direttiva EMC 2006 95 CE Direttiva Bassa Tensione 2011 65 EU Direttiva RoHS 2 is in accordance with the following Directives 2004 108 EC Directive EMC Directive 2006 95 EC Directive Low Voltage Directive 2011 65 EU Directive RoHS 2 e che sono state applicate tutte le norme e o specifiche tecniche di seguito indicate and that all the following standards have been appl...

Страница 5: ...ldamento domestico senza acqua alimentato a pellet di legno Residential space heating appliance without water fired by wood pellets 4 Nome denominazione commerciale registrata o marchio registrato e indirizzo del fabbricante ai sensi dell articolo 11 paragrafo 5 Name registered trade name or registered trade mark and contact address of the manufacturer as required pursuant Article 11 5 THERMOROSSI...

Страница 6: ...sima di esercizio Maximum operating pressure bar Temperatura fumi a potenza termica nominale Flue gas temperature at nominal heat output T 170 C Resistenza meccanica per sopportare un camino una canna fumaria Mechanical resistance to carry a chimney flue NPD No Performance Determined Potenza termica nominale Nominal heat output 11 42 kW Potenza termica resa in ambiente Room heating output 11 42 kW...

Страница 7: ... or on any of the accessories supplied with it that are not specifically authorised by Thermorossi S p A will automatically void the warranty and the manufacturer s responsibility pursuant to D P R 224 of 24 05 1988 art 6 b Keep this manual in a safe place that is easily accessible to all users If the appliance is sold or transferred to another user ensure that the guide is handed over with it If ...

Страница 8: ...type of behaviour could result in dangerous conditions for objects animals and or persons Do not expose plants or animals directly to the hot air flow as this could have noxious effects on them It is strictly prohibited to use any type of fuel liquid solid to light up the appliance lighting must occur automatically as intended and described in this installation use and maintenance booklet conseque...

Страница 9: ...iciency at rated power 86 63 86 63 Efficiency at reduced power 90 03 90 03 CO concentration with 13 O2 at rated power mg m3 83 6 83 6 CO concentration with 13 O2 at reduced power mg m3 329 4 329 4 Power supply voltage and frequency 230V 50Hz 230V 50Hz Max electrical consumption 1 17A 270W 1 17A 270W Min electrical consumption 0 34A 70W 0 34A 70W Room heating capacity cubic metres 210 210 All the d...

Страница 10: ...warranty 3 3 THE FEEDBOX The feedbox is situated in the top part of the appliance The load capacity specified in the technical data can vary according to the specific weight of the pellets Take special care when loading the tank of the screw feeder at its base Take care when topping up with fuel as the loading area can get very hot Only pellets that comply with the specifications listed above must...

Страница 11: ...y for the installation which includes the design plans and the following documents a Report containing the type of materials utilised b Project as defined in Article 5 of Ministerial Decree n 37 22 January 2008 c Drawing of the finished installation d References to existing partial or previous declarations of conformity e g electrical wiring e Copy of the certificate of recognition of the professi...

Страница 12: ...LOR CASING See the specific manual for the DORICA METALCOLOR casing 4 4 UNPACKING THE DORICA MAIOLICA CASING See the specific manual for the DORICA MAIOLICA casing 4 5 UNPACKING THE AROMY CASING See the specific manual for the AROMIA casing 4 6 UNPACKING THE AROMY STONE CASING See the specific manual for the AROMIA STONE casing 4 7 UNPACKING THE SAINT MORITZ CASING See the specific manual for the ...

Страница 13: ...mbled symmetrically with the generator the connection to the flue outlet in this case must be carried out as indicated in figures 1 2 3 Pay particular attention when assembling the smoke outlet pipe as it must be no less 15 mm from the control panel Figure 2 if the pipe is positioned close to the panel it would certainly damage the control panel damage which is not covered by warranty Attention In...

Страница 14: ...e screws removed earlier Figure 5 Pay particular attention when assembling the smoke outlet pipe as it must be no less 10 mm from the control panel Figure 6 if the pipe is positioned close to the panel it would certainly damage the control panel damage which is not covered by warranty Installed in this way the hot air can be channelled to the back using only the RH side vent Caution In the ductabl...

Страница 15: ...aintenance booklet CAUTION Before each use make sure that the burner is clean and positioned correctly in its lodging CAUTION the door must always remain shut tight when the stove is operating It is strictly forbidden to open the door while the appliance is in operation While the appliance is in operation the smoke exhaust pipes can reach extremely high temperatures do not touch them It is strictl...

Страница 16: ...e smoke suction unit See para 5 5 THERMOCOMFORT This button is used to activate the connection with the optional handheld radio control See para 5 6 SHOW CRONO This button is used to view the parameters programmed with the CRONO function See Para 5 7 Display The following information can appear on the display Displays the preset combustion power and consequently the pellet consumption by the numbe...

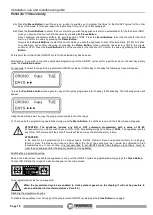
Страница 17: ...ns to change the day of the week each dot corresponds to one day of the week e g 1 corresponds to Monday 2 correspond to Tuesday etc To confirm the selection of the day of the week press the Flame Button Once confirmed the selector shifts to the flashing hour section 3 Press the Scroll Buttons to change the hour Once you have set the hour confirm the value by pressing the Flame Button Once confirm...

Страница 18: ...he selected day has been set The following screen will appear At this point if no further programming is required for that day go to point 5 A If on the other hand you wish to program a second ON OFF cycle for that day go to point 5 B 5 A Press the Menu Button to exit the screen in order to enable you to program the times for the ON OFF cycles for the other days of the week In this case repeat the...

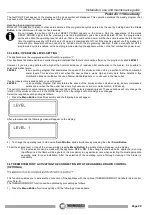
Страница 19: ... I press the Ventilation button once again to copy all the cycles programmed for Tuesday to Wednesday The following screen will appear Using the same logic we can copy the programmed cycles to the other days 7 To conclude the programming operations simply press the Menu Button to exit the screen and the initial screen will appear ATTENTION The appliance ignores any ON or OFF command programmed wit...

Страница 20: ... This level must be set when the user notices a weak high and very dark flame Attention this modification does not authorise the use of below standard pellets or no vacuum in the flue outlet If using loosely compressed pellets you could select LEVEL 0 is an operating program that decelerates the speed of the smoke suction unit when using loosely compressed pellets and or when the flue outlet has a...

Страница 21: ...he START or WORK stage The Thermocomfort function is automatically disabled when the appliance is OFF It automatically reactivates at the next START up To disable the THERMOCOMFORT function simply repeat operations 1 and 2 but this time select the OFF command The function will be disabled immediately 5 7 SHOW CHRONO ON OFF PROGRAMMING DISPLAY This function enables you to consult the programmed ON ...

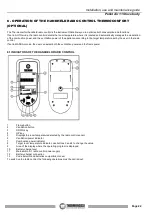
Страница 22: ... in the radio control If set in MANUAL mode the user can select both the ventilation power and the flame power 6 1 INDICATORS OF THE HANDHELD RADIO CONTROL 1 Flame button 2 Ventilation button 3 DOWN key 4 UP key 5 Displays the room temperature detected by the radio control sensor 6 Ventilation power indicator 7 Combustion power indicator 8 Target room temperature indicator use buttons 3 and 4 to c...

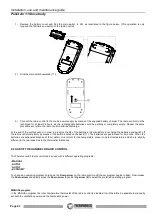
Страница 23: ...itch off the radio control completely by means of the switch located on the back 11 The batteries are guaranteed for 6 months When the batteries are exhausted dispose of them safely It is normal for the temperature sensor to detect temperatures which are slightly different to the real ones due to the thermostat tolerances 6 2 USE OF THE HANDHELD RADIO CONTROL The Thermocomfort radio control can be...

Страница 24: ...on depend on the preset target temperature if the required temperature is too high or not reachable the appliance could operate at maximum power for long periods of time AUTO 3 program In program AUTO 3 the room temperature thermostat is enabled The remote control adjusts the ventilation and combustion power automatically in relation to the target room temperature set in radio control display You ...

Страница 25: ...e the movable parts of the radio control Do not store the radio control in very hot environments High temperatures could shorten the life of the electronic devices damage the batteries and deform or even melt plastic parts Do not store the radio control in too cold environments When it heats up when it returns to normal operating temperature humidity could form inside it and damage the electronic ...

Страница 26: ...T cycle which takes roughly 20 minutes In this stage any level of combustion power set by the user is ignored to meet the correct power values set by the manufacturer Press the Ventilation button repeatedly to set the six fan speeds the fan will only activate once the smoke has reached the preset temperature The electrical heater will start to overheat and only after a few minutes the first lot of...

Страница 27: ...ossible to channel up to 16 metres using 1 vent up to 8 metres using 2 vents up to 6 metres using 3 vents up to 4 metres using 4 vents The appliance is supplied with both fittings already mounted The air can be ducted from the front or the back of the appliance by acting on the 2 levers indicated in Figure 1 and Figure 2 to completely or partially channel the air to the right rear pipe act on leve...

Страница 28: ... the appliance does not shut down therefore electrical energy consumption is kept to the minimum and the heater has a longer life When the room temperature drops the thermostat opens the contact and the appliance returns to its original position in terms of thermal power and ventilation The room temperature thermostat can be used to automatically start the appliance with programming from the CRONO...

Страница 29: ...tions in the smoke channel and flue outlet before putting it back into use It is important to carefully follow the instructions set out below failure to observe these instructions could cause serious damage to the product to the system to objects and to persons using the generator Failure to observe cleaning and maintenance instructions will immediately void the warranty Warning do not wet the app...

Страница 30: ...he front profiles the glass elements and the casing must be cleaned when the appliance has cooled with a special soft microfibre cloth for delicate surfaces such as lenses glasses monitors etc and water ATTENTION a daily deposit of soot and combustion residues on the glass is quite normal It is normal for the ash to fall to the floor when the door is opened ATTENTION after cleaning it is mandatory...

Страница 31: ...Page 31 Installation use and maintenance guide Pellet Air 11 Stove body Figura 2 B B A V Figura 4A ...

Страница 32: ...Page 32 Installation use and maintenance guide Pellet Air 11 Stove body Figura 4 B Figura 4 C ...

Страница 33: ...Page 33 Installation use and maintenance guide Pellet Air 11 Stove body Figura 5 A 1 Figura 6 ...

Страница 34: ...ss for symbols and or lines to appear haphazardly on the display The optimal battery autonomy is achieved after several battery charge discharge cycles During periods of non use over one week of the radio control it is obligatory to turn the radio control itself off completely to preserve its battery life by means of the main switch The batteries are guaranteed for 6 months Attention Use only the ...

Страница 35: ... from sources of pollution The openings in the walls must comply with the following conditions de in such a way that the vent openings both on the inside and outside of the wall cannot be obstructed they must not obstruct the correct operation of the combustion product discharge devices if this position is not possible the section of the ventilation openings must be enlarged by at least 50 9 2 2 V...

Страница 36: ...CIAIO A TENUTA STAGNA WATERTIGHT STEEL SHEET Every chimney must have minimum number of components as laid down by standard UNI EN 10683 which are also indicated in the figure on the left Wall outlets that is outlets installed on the outer front wall without the use of a chimney flue outlet flue pipe to convey the combustion products to the roof are strictly prohibited Components and accessories of...

Страница 37: ...e discharge path The appliance functions with the combustion chamber in a vacuum while the discharge of smoke to the flue outlet has a slight pressure consequently it is imperative to ensure that the discharge system is hermetically sealed The smoke discharge tube must be made from suitable materials such as for example porcelain coated steel tubes and the various fittings sealed with red silicone...

Страница 38: ... turning the switch 0 1 located in the power panel Before restarting the appliance check for any irregularities such as blocked flue outlet open firebox door etc and solve the problem AL T max Appears when the temperature of the appliance body exceeds 125 C Once the causes for the overtemperature have been identified and remedied unscrew the plastic cover from the thermostat located on the power p...

Страница 39: ...e Ratio motor green indicator Termostato riarmo Reset thermostat Ventilatore ambiente Room fan Resistenza Heater Fusibile 3 15A Fuse 3 15A Termocoppia Thermocouple Pannello comandi Control panel Connettore per Micro SD Card Connector for Micro SD card 220 V 50 Hz Comandi Pannello 9 8 6 7 5 Aspiratore fumi 220 V 50 Hz Motoriduttore spia verde Ventilatore Ambiente 5 1 2 1 3 2 4 Fusibile 3 15 A Resis...

Страница 40: ... the smoke and for safety purposes THERMOCOUPLE Its function is to verify the temperature of the combustion smoke when the smoke temperature exceeds a certain value it indicates that the appliance is on Similarly when the temperature drops below a certain limit it causes the presence of ALPE on the display TANK SAFETY THERMOSTAT This thermostat starts operating as soon as the temperature in or nea...

Страница 41: ...SMOKE INTO THE ROOM OCCURS THE FIRST TIME THE APPLIANCE IS SWITCHED ON AS THE SILICONE PAINT IS BEING BAKED RUN THE APPLIANCE AT HIGH POWER LEVELS FOR A FEW DAYS THE SMOKE EXHAUST IS NOT SEALED CORRECTLY CHECK THE TIGHTNESS OF THE FLUE OUTLET AND IN PARTICULAR THE CONDITION OF THE EXHAUST PIPES AND THE GASKETS IF THE APPLIANCE STARTS TO SMOKE AFTER 25 MINUTES DIRTY BURNER VERY DELAYED START CLEAN ...

Страница 42: ...PROPRIATE MODIFICATIONS THE TIME DOES NOT REMAIN IN THE MEMORY THE BUFFER BATTERY INSTALLED IN THE CONTROL PANEL IS EXHAUSTED REPLACE THE BATTERY THE HOURLY PROGRAM IS NOT COMPLIED WITH THE USER HAS NOT ENABLED IT PRESS THE CLOCK BUTTON TO ENABLE IT AS INSTRUCTED IN THIS USE AND MAINTENANCE GUIDE THE BUFFER BATTERY INSTALLED IN THE CONTROL PANEL IS EXHAUSTED REPLACE THE BATTERY AN ERROR HAS BEEN M...

Отзывы: