8
9.
PARTS REPLACEMENT
9.01 Heater Replacement
1.
Disconnect power.
2.
Remove the clamps securing the
thermostat bulbs to the floor. Carefully bend
the bulbs to a vertical position.
3.
Remove two screws securing control
panel and carefully lift control panel and
lay it on it's face.
Model 14EG: Then remove three screws
securing the front z-bracket,screws are
located directly above the control panel.
Remove one screw on back wall that
secures the oven floor. Lift bottom floor
straight up and out to remove it.
Model 25 & 45: Remove ten screws that
secure floor and lift out.
4.
Disconnect heater terminals and heater
mounting screws. Carefully lift straight
up and out.
5.
Replace with new heater, reinstall in
reverse order.
9.02 Probe Replacement, Models 25 & 45
1.
Disconnect power.
2.
Remove back panel screws.
3.
Pull probe straight out.
4.
Open control panel by removing top
screws
which secure it and disconnect probe
terminals.
5.
Replace with new probe, reinstall in
reverse order.
9.03 Motor Replacement (Mechanical
Models only)
1.
Disconnect power.
2.
Open control panel by removing top
screws which secure it and disconnect
motor and heater terminals.
3.
Remove screws which secure lower
floor and lift out.
4.
Disconnect/remove heater mounting
screws, remove heater and wires.
5.
Detach blower wheel from motor shaft.
8.04 Heater Resistance Check
WARNING
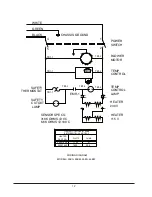
DISCONNECT OVEN FROM ITS POWER
SOURCE BEFORE PROCEEDING. REFER
TO THE APPROPRIATE WIRING DIAGRAM
AT THE END OF THE MANUAL AND
LOCATE THE ELECTRICAL LEADS FOR
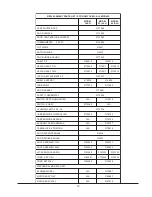
THE HEATER. USE THE VALUES IN THE
HEATER COLD RESISTANCE TABLE TO
FIND THE APPROPRIATE VALUE. BE SURE
TO DISCONNECT AT LEAST ONE HEATER
LEAD FROM THE TERMINAL STRIP
BEFORE TAKING THE RATING WITH YOUR
OHM METER. AGAIN, IT IS IMPERATIVE
THAT THE UNIT BE COMPLETELY
DISCONNECTED FROM ITS ELECTRICAL
POWER SOURCE BEFORE ANY
READINGS ARE TAKEN.
If the heater is open (infinite resistance) it should
be replaced. If the heater reads less than five
ohms it is shorted and should be replaced.
Check the resistance between each lead of the
heater and a base metal point on the oven
chassis. If there is less than infinite resistance
(a million ohms or greater) between the heater
and chassis, the heater is shorted to the ground
and should be replaced. Also, inspect all wires
leading to the heater for signs of shorting or
electrical contact to chassis of oven.


