background image

The View Data Screen

1-50

NITON XL3 Analyzer User’s Guide

Thermo Scientific

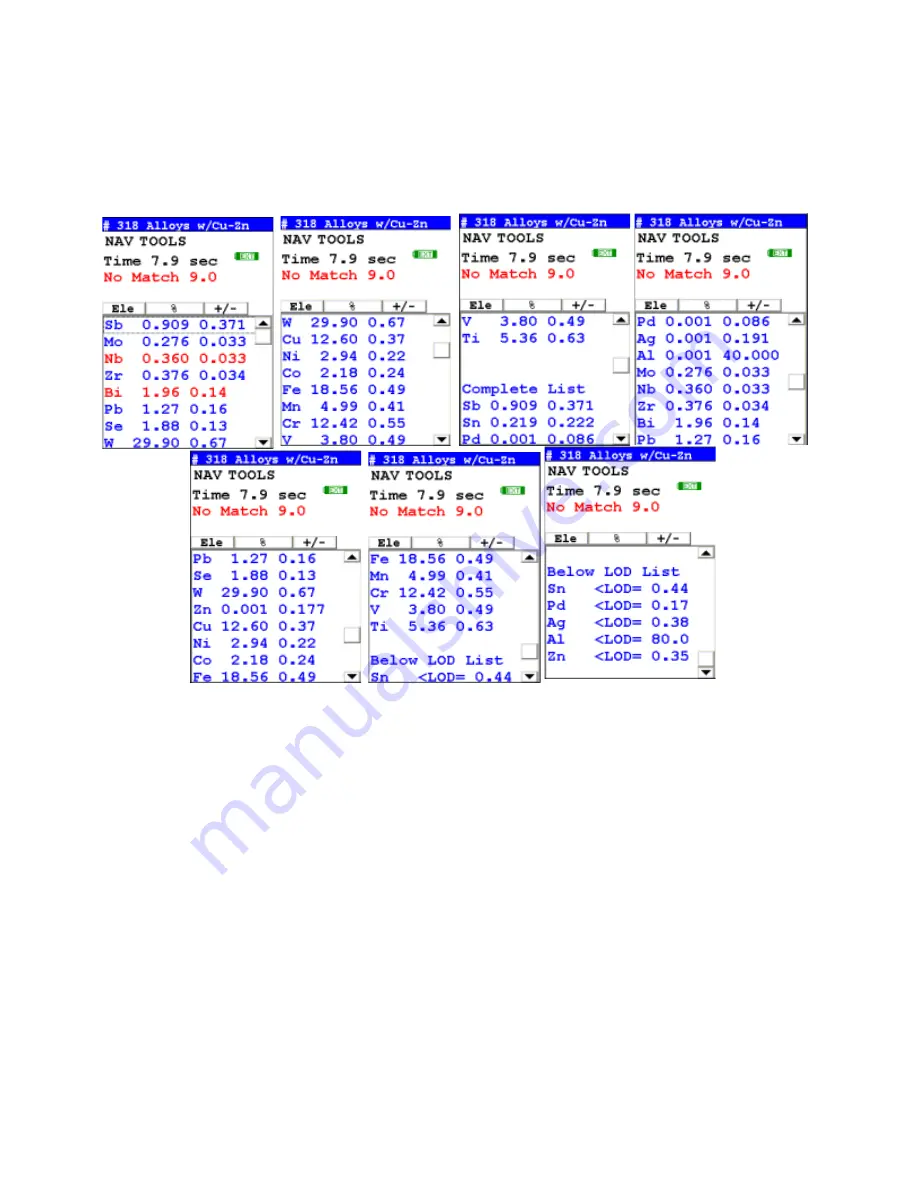
Scrolling Down Through

the Complete Listing of

Elements

Figure 1-6. Complete Listing of Elements

Pressing the "Left" arrow on the 4-way touch pad of your analyzer will 
display the previous reading, or if the first reading is currently displayed, the 
last reading. Pressing the "Right" arrow on the 4-way touch pad will display 
the next reading, or if the last reading is currently displayed, the first reading 
in memory. NITON Analyzers can store between 3000 to 6000 readings.

You can also look at the complete x-ray spectra for each reading stored in the 
analyzer's memory. 

Sorting Elements

You can sort element rows by various criteria in order to view your data in 
the manner you prefer.The Sort Buttons, which double as column headings, 
can be used to re-sort the data in different ways. The Data Screen always 
begins as a Standard Sort, as you have defined it. Selecting the appropriate 

Содержание NITON XL3t 500

Страница 1: ...NITON XL3t 500 Analyzer User s Guide Version 6 5 ...

Страница 2: ......

Страница 3: ...creen 1 25 Mining Cu Zn Mode 1 27 The Measurement Screen 1 29 Mining Ta Hf Mode 1 31 The Measurement Screen 1 33 To Prepare or Not to Prepare In Situ vs Ex Situ 1 35 Analysis of Unprepared Samples In Situ 1 36 On site vs Lab Analysis 1 42 Analysis of Prepared Samples Ex Situ 1 43 Cleaning Your Equipment 1 45 The View Data Screen 1 49 The Erase All Data Screen 1 53 The Erase Readings Screen 1 54 Th...

Страница 4: ...Maintenance Cleaning and Repairs 2 5 Replacing the Measurement Window 2 6 Storing and Transporting Your XL3 Analyzer 2 8 Networking and Connectivity 2 11 Entering Data with a Barcode reader 2 27 Chapter 3 Radiation and General Safety 3 1 Radiation and General Safety 3 1 Radiation Protection Basics 3 1 How to Use the NITON XL3t Analyzer Safely 3 6 Safe Handling of Samples 3 9 Radiation Profile 3 10...

Страница 5: ...y of its contents Open the packing carton If your analyzer is not packed in its carrying case please call Thermo Fisher Scientific immediately in the United States toll free at 800 875 1578 or outside the United States at 1 978 670 7460 Verify the contents of the shipping container against the enclosed packing list If there are any discrepancies between the actual contents of the shipping containe...

Страница 6: ...te through all of the analyzer s screens and menus You can control the movement of the screen cursor by pressing the four way control pad in one of four directions to highlight each of the menu options The Select button in the center of the four way touch pad is used to select highlighted menu options The on off escape button both controls the power to the analyzer and serves as an escape button W...

Страница 7: ... icon once The touch screen icons have the same functionality as the four way touch pad the on off escape button and the select or enter button This User s Guide will refer to the process of choosing a course of action by selecting an icon from a menu either using the touch screen or using the control panel buttons as selecting Selecting the Return icon works everywhere throughout the User Interfa...

Страница 8: ...these extremes until moved to a different angle When in closed position the screen is secured by a catch at the top center of the screen housing Figure 0 3 XL3 Analyzer Showing LCD Screen Tilted To raise the LCD Touch Screen disengage the catch at the top center of the LCD Touch Screen housing and gently pull the screen towards you until it is at the best angle for your use To close the LCD Touch ...

Страница 9: ...ware to the analyzer Remote Trigger Port The Remote Trigger Port controls the analyzer s trigger function for use with the Extend a pole In Situ Tripod and test stands Serial Port The Serial Port is a communications and control port for uploading and downloading data configuration files and software to the analyzer Power Port The power port is used to run the XL3 under external power Power Port Se...

Страница 10: ...tomatically count down from 9 to 0 in increments of one second Figure 0 6 Logon Screen When the Start is complete the Start Screen will be replaced by the Logon screen see Figure 0 6 Tap anywhere on this screen to continue The Logon Screen will be replaced by a Warning Screen see Figure 0 7 advising you that this analyzer produces radiation when the lights are flashing You must acknowledge this wa...

Страница 11: ...cientific NITON XL3 Analyzer User s Guide vii Figure 0 7 Warning Screen After selecting the Yes button the Virtual Numeric Keypad becomes available for you to log onto the analyzer Figure 0 8 Virtual Numeric Keypad for Logon ...

Страница 12: ...on creating user definable passwords Check the date time The time should be set correctly for accurate and verifiable record keeping See Chapter 1 page 72 Your analyzer can be stored and operated safely in temperatures from 5º C 23º F to 50º C 122º F You will not be able to take a measurement if the analyzer overheats If it is hot to the touch you should allow it to cool before testing The NAV Men...

Страница 13: ...ing you to change batteries as needed to avoid unexpected shutdowns Figure 0 10 Battery Life Indicator The more green visible in the indicator the higher the charge The more red visible in the indicator the lower the charge It s best to charge one battery while using the other to avoid work slowdowns or stoppages due to battery charge conditions WARNING In the highly unlikely event that the x ray ...

Страница 14: ...re 0 11 Example Menu Path In the Menu Path the order is top to bottom then if needed left to right starting with the Main Menu and ending with the function wanted The arrows show the succession of menus while the icon to be selected is highlighted by a heavy rectangular border This Menu path should be read as To get to this screen starting at the Main Menu select the Mode icon select the Metals ic...

Страница 15: ...Chapter 1 Applications The NAV Menu The NAV Menu enables you to move between various menus and screens directly without going through the intervening screens Select a destination from the drop down menu and you will be brought directly to that menu or screen Figure 1 1 The NAV Menu ...

Страница 16: ... until your analyzer is shut down or this feature is disabled To begin select the number of readings you want to average from the virtual numeric keypad Your analyzer will calculate an average reading after that number of tests and continue this pattern until stopped For example if you select 3 on the virtual keypad the analyzer will automatically calculate average and store a reading for every th...

Страница 17: ...re 1 3 The Virtual Numeric Keypad for Averaging Note You cannot average readings taken with different element lists or with different filter settings if the settings have different element lists with either Avg Back or Avg Forward Alloy and Mining modes each use the same element lists with the different filter settings so averaging works when switching between filter settings when in either of the...

Страница 18: ...mo Scientific Stop Avg Fwd Back Avg Back and Avg Forward are toggles The option on the Tools Menu changes to its opposite when selected To stop averaging select Stop Avg Fwd or Stop Avg Back from the Tools Menu as appropriate Figure 1 4 The Tools Menu Averaging Toggles ...

Страница 19: ...Applications Example Averaging Thermo Scientific NITON XL3 Analyzer User s Guide 1 5 Example Averaging Figure 1 5 Averaging example 3 readings ...

Страница 20: ...eed 1 6 NITON XL3 Analyzer User s Guide Thermo Scientific Live Spectrum Feed The Tools Menu may contain a toggle option to display live spectra as sample analysis occurs Figure 1 6 The Tools Menu showing the Spectra On Off Toggle ...

Страница 21: ... Guide 1 7 Activating and Deactivating the Live Spectrum From the Tools Menu select Spectra On to turn the Spectrun feed on Once the spectrum is displayed selecting Spectra Off from the Tools Menu will stop the live spectrum display Figure 1 7 Test Screen Showing Live Spectrum ...

Страница 22: ...Applications Live Spectrum Feed 1 8 NITON XL3 Analyzer User s Guide Thermo Scientific ...

Страница 23: ...thod you only need to place the measurement window close to the sample to be analyzed and pull the trigger for sample analysis to be initiated Trigger and Proximity Sensor method With the Trigger and Proximity Sensor method you must place the measurement window against the sample to be analyzed to engage the proximity sensor on the front of the instrument then pull the trigger for sample analysis ...

Страница 24: ...nstantly checking the backscatter characteristics to determine if a sample is against the measurement window whether or not the Easy Trigger method is being used and will shut off any radiation directed through the window if it determines that there is no sample present With any of these methods analysis will stop if any one of the preconditions are violated For example with the Trigger Interlock ...

Страница 25: ...tions for operation are met On startup the front pair of lights will blink If the LED lights blink at any other time disconnect the battery pack and call Thermo Scientific s Service Department in the United States toll free at 800 875 1578 or outside the United States at 1 978 670 7460 or your local Authorized NITON Analyzer Service Center Your NITON Analyzer will display the Results Screen throug...

Страница 26: ...u have created using the Drop down List button These fields are saved along with the subsequent reading and allow you to associate important information about the sample directly with the reading so that you have a full description of the sample tied into the reading itself Once you have input data into a field that information carries over into the next reading so that you only have to input the ...

Страница 27: ...mation if known Selecting Inspector allows you to input the parameter for the Inspector s name Selecting Cor1 allows you to input information on the sample s origin Latitude Coordinate Selecting Cor2 allows you to input information on the sample s origin Longitude Coordinate This is the second section of the Data Entry Screen There are two parameters in this section Selecting Misc allows you to in...

Страница 28: ... the Data Entry Screen to Two Column Figure 1 2 Data Entry Settings Menu Path You can change the Data Entry display from the default single column to two columns in order to fit all the fields on one page if you prefer Select the Data Entry Settings icon from the Misc Settings Menu to change your preferences ...

Страница 29: ...Screen Selecting the triangle button to the side of the Num of Data Entry Boxes field will open a drop down menu From this menu you can choose between showing up to five boxes per page the default and up to eight boxes per page Select the option you prefer and select the Save button to save the setting Figure 1 4 The Drop Down Menu ...

Страница 30: ...xes will display on one page with the overflow page not opening unless there are nine or more Data Entry boxes Figure 1 5 Comparing the Data Entry Display Options With the default up to five boxes setting the boxes are longer and can display more descriptive test With the optional up to eight setting the boxes are shorter but retain the full descriptive text internally Choose whichever settign you...

Страница 31: ...creen there is a checkbox to force the Data Entry screen to display Checking the Display Data Entry Before Every Test checkbox will enable this which can serve as a reminder to the user to enter data at test time Despite the text though this checkbox forces the Data Entry screen to display after every test not before every test This only works with the Up to Eight option enabled ...

Страница 32: ...Data Entry from View Data Mode You can select Data Entry from the NAV Menu while in View Data Mode but the ability to edit or enter data is disabled The screen will show the data already entered with no buttons for drop down menu selection or Virtual Keyboard Figure 1 6 Data Entry Screen while Viewing Data ...

Страница 33: ...e the Up and Down portions of the 4 way touch pad To select the highlighted option press the Enter button on the control panel The Data Entry Screen is divided into sections of 5 setting parameters By using the Down portion of the 4 way touch pad when you are on the last row of a section the display will change to the next section By using the Up portion of the 4 way touch pad when you are on the ...

Страница 34: ...The Virtual Keyboard 1 20 NITON XL3 Analyzer User s Guide Thermo Scientific The Virtual Keyboard Figure 1 8 Lower Case Virtual Keyboard Figure 1 9 Upper Case Virtual Keyboard ...

Страница 35: ...nd the Shift key to toggle between upper and lower case keyboards Last is the control key line This contains the keys for Return Space Clr and Backspace The Return key will enter the data and return you to the Data Entry Screen the Backspace key will delete the last entered character the Space key will insert a space at the cursor position and the Clr screen button will clear the data you have ent...

Страница 36: ... the reading Nominal seconds are true clock seconds slowed down to compensate for the electronic dead time that occurs when the analyzer is taking a measurement The Mode line displays the test mode in use during the measurement The Element left column shows the elements that have been detected in the sample The Concentration Level central column shows the concentration levels of the corresponding ...

Страница 37: ...peration is optimum for any sample whose elements of inter est are present at less than 1 Standard Soil Mode utilizes the Compton Scatter Inelastic Collisions of a particular sample Compton scatter occurs when primary X rays do not cause fluorescence but instead collide with the atoms of the sample The Compton Scatter that occurs is directly propor tional to the density average atomic number Z of ...

Страница 38: ...trument will correctly measure all other elements Test the standards regularly NITON recommends testing immediately after the instrument finishes self calibration Test the standard samples appropriate to the type of tests you are conducting and once every 1 2 hours thereafter Note For defensible Quality Control keep a record of the time and precision of every calibration WARNING Tampering with the...

Страница 39: ...ition of the sample Precision The measurement precision for each element displayed appears to the right of the measured concentration under the heading The precision of each measurement is two times the standard deviation sigma An element is classified as detected if the measured concentration in ppm is at least 1 5 times the precision Detected elements are displayed in ppm followed by the measure...

Страница 40: ...The Measurement Screen 1 26 NITON XL3 Analyzer User s Guide Thermo Scientific ...

Страница 41: ...urn to the Main Menu This mode of the operating software is intended primarily for the detection of metal concentrations in light matrices The full fundamentals parameter FP algorithm accurately measures elemental concentrations from trace levels to 100 and automatically corrects for inter element effects However elements lighter than magnesium cannot be detected by XRF and light element combinati...

Страница 42: ...ering with the 5 500 ppm Lead high lead in soil standard may cause exposure to lead dust Keep all standards out of reach of children CAUTION Never tamper with Test Standards They should not be used unless they are completely intact During each test the instrument looks at the full range of x ray spectrum and continuously corrects for cross element interference Testing Prepared Samples Set the NITO...

Страница 43: ...he elements Detection Limit For an element to be detected by the analyzer in a given sample the measured concentration of the sample must be at least three times the standard deviation of the measurement This detection limit will depend on the composition of the sample Precision The measurement precision for each element displayed appears to the right of the measured concentration under the headin...

Страница 44: ...d if the measured concentration in ppm is at least 1 5 times the precision Detected elements are displayed in ppm followed by the measurement precision Non detected elements are shown as the detection limit for that sample The detection limit for a given element varies depending on the other elements in the matrix ...

Страница 45: ...turn to the Main Menu This mode of the operating software is intended primarily for the detection of metal concentrations in light matrices The full fundamentals parameter FP algorithm accurately measures elemental concentrations from trace levels to 100 and automatically corrects for inter element effects However elements lighter than calcium cannot be detected by XRF and light element combinatio...

Страница 46: ...mpering with the 5 500 ppm Lead high lead in soil standard may cause exposure to lead dust Keep all standards out of reach of children CAUTION Never tamper with Test Standards They should not be used unless they are completely intact During each test the instrument looks at the full range of x ray spectrum and continuously corrects for cross element interference Testing Prepared Samples Set the NI...

Страница 47: ...nts Detection Limit For an element to be detected by the analyzer in a given sample the measured concentration of the sample must be at least three times the standard deviation of the measurement This detection limit will depend on the composition of the sample Precision The measurement precision for each element displayed appears to the right of the measured concentration under the heading The pr...

Страница 48: ...d if the measured concentration in ppm is at least 1 5 times the precision Detected elements are displayed in ppm followed by the measurement precision Non detected elements are shown as the detection limit for that sample The detection limit for a given element varies depending on the other elements in the matrix ...

Страница 49: ...u testing and of various degrees of preparation is crucial to obtaining useful data In situ measurements should be used to profile an area to locate areas of interest to determine the boundaries of such areas or to gather data that will subsequently be used to design a sampling plan In situ measurements are usually only approximations though they may correlate very well with lab analysis if the si...

Страница 50: ...eliminary mineral survey of a plot of land to get an overview of surface deposits and signs of sub surface deposits The area to be surveyed is gridded at a constant spacing usually 100m apart Samples are taken at each grid intersection first cleaning off the surface to a depth of 1 cm or so to avoid windblown contamination GPS links via Bluetooth assures location and elevation information are reco...

Страница 51: ... idea of the extent of the signs of any sub surface deposit Tracking Placer Deposits Streambeds and gullies can concentrate placer deposits as markers of minerals found upstream It may be valuable to work up water erosion channels separately to find the location of these deposits Rather than working off a grid such a survey would sample at a constant spacing working upstream from outflow to the so...

Страница 52: ...eir length giving half or sometimes quarter round sections There are several ways you can analyze these cores depending on what you want to know about them Spaced dots Take a sample every 10 cm If you bypass visibly different sections it s a good idea to infill with analyses in these sections This gives a trend overview over the length of the core Slide Take a single sample over the whole length o...

Страница 53: ...ing The purpose however is different The cores are taken around the edges of an already developed mine to define the extent and shape of the ore body Testing In Situ These are readings taken directly from rockfaces and mine walls to determine the composition of the ore prior to removal and processing Clean the measurement window of your analyzer before and after taking a sample to prevent cross co...

Страница 54: ...r before and after taking a sample to prevent cross contamination Crush the sample to roughly gravel sized pieces Place the pieces into a cloth bag Take several readings of the bagged sample For a 7 inch by 12 inch bag take at least three sample readings If the readings vary widely take more readings as the sample is not very homogeneous The more readings you take the more accurate the estimate wi...

Страница 55: ...l levels of metals Screening Techniques Use direct measurement when you need to determine whether an element is present rather than in accurately measuring how much is present Use preliminary direct measurements to survey a site quickly even if you intend to take samples WARNING When taking samples from a site where toxic chemicals may be present always use gloves and respiration equipment for you...

Страница 56: ...eat radiation with respect Do not hold your instrument near the measurement window during testing Never point your instrument at yourself or anyone else when the shutter is open Note Never use in situ testing with field portable XRF when comparing field results with laboratory results to justify XRF usage Always collect samples and prepare them before testing Refer to the instructions on sample co...

Страница 57: ...le to subdivide larger areas even if they have the same characteristics to ensure a thorough examination Make certain to label each bag thoroughly Common information included on each bag includes the person and or the company who collected the sample the location and area where the sample was taken and the date the sample was collected Prepared sample analysis is the most accurate method for deter...

Страница 58: ... sample into fusion crucible add 5 0 g of lithium tetraborate and 0 3 lithium fluorife and 10 20 mg lithium bromide as a nonstick agent 4 Fuse in a fluxer for at least 4 min in the flame 5 The resulting disk is released from the mold cooled the presented to the spectrometer Specimen Preparation Pressed powder briquette preparation 1 Thoroughly remix the sample in its jar by rotating in a figure ei...

Страница 59: ... sand in the mortar Use the short bristle brushes included in your Soil Testing Kit to clean the sieves If you have an electric soil grinder in your kit when the soil grinder blades wear out unbolt the worn blades and replace them Call the Thermo Sales Department at 1 800 875 1578 for replacement blades Note Using the soil grinder may artificially increase the amount of Fe in soil samples Sample P...

Страница 60: ... each more homogenous than the original Grind the sample to break up dirt clods and or paint chips WARNING Grinding and sifting dried samples produces dust Even clean soil contains silica which may be hazardous when airborne Prepare all samples in a ventilated area wear a mask gloves and an apron and spread a drop cloth Sift using the 10 2mm mesh and separate out the larger pieces stones organic m...

Страница 61: ...of polypropelene film on top of an XRF sample cup This film goes on the end of the cup with the indented ring Thermo recommends preparing the cup ahead of time if possible Secure the film with the collar The flange inside the collar faces down and snaps into the indented ring of the cup Inspect the installed film window for continuity and smooth taut appearance Set the cup on a flat surface film w...

Страница 62: ... cup with the liquid to be tested do not pad the sample with cotton The cup must be full so it is best if some liquid is allowed to overflow when the cap is put on Sludge Sludge can be placed directly into an XRF cup for screening This is considered in situ testing because no attempt has been made to prepare the sample For more accuracy the sludge can be dried sieved and ground Prepare in an XRF s...

Страница 63: ...est is shown on the LCD display Using the buttons on the control panel you may view different readings or additional data for individual readings Your analyzer will display the standard screen analysis Pressing the Down arrow on the 4 way touch pad will display a complete scrolling elemental chemistry listing Each press of the Down arrow scrolls the screen down to the next element You can also use...

Страница 64: ...uch pad will display the next reading or if the last reading is currently displayed the first reading in memory NITON Analyzers can store between 3000 to 6000 readings You can also look at the complete x ray spectra for each reading stored in the analyzer s memory Sorting Elements You can sort element rows by various criteria in order to view your data in the manner you prefer The Sort Buttons whi...

Страница 65: ...e element name Composition Sorts Composition sorts are performed numerically based on the percentage of composition Error Sorts Error sorts are performed based on the range of error in the reading Spectrum Graph For any reading result simply use the NAV Menu to gain access to the reading s spectrum graph Selecting Spectra will show a graphed spectrum of this reading called SpectraView SpectraView ...

Страница 66: ...The View Data Screen 1 52 NITON XL3 Analyzer User s Guide Thermo Scientific Figure 1 8 The SpectraView Screen ...

Страница 67: ... Data icon will bring up a confirmation screen see upper left asking you Are you sure with options to select YES or NO Selecting YES will erase all reading data from your analyzer Selecting NO will return you to the Erase Menu CAUTION Never turn off the analyzer while data is being erased WARNING Do not attempt to take measurements while downloading readings This will generate an error requiring a...

Страница 68: ... you sure with options to select YES or NO Selecting YES will erase all test reading data from your analyzer Selecting NO will return you to the Erase Menu Note We recommend that you download all your readings into an NDT file for recording purposes before erasing all data Figure 1 11 Select the Switch Libraries icon to toggle between the standard library and the currently loaded alternate library...

Страница 69: ...ny library to conform to your specifications Alloy Name Button Selecting this button sorts the list alphanumerically Name in List Selecting the actual name of the alloy i e Fe CS will bring up the Element Specification Screen Add Selecting the Add button will add a new alloy to the Library First the Alloy Name Editor will appear enabling you to enter the name of the new alloy ...

Страница 70: ...or is a standard Virtual Keyboard Use it as you would any Virtual Keyboard Hitting the return key enters the name into the alloy list Select the name to enter the Element Specification Screen and enter the specification of the alloy Del Selecting the Del key will delete the currently selected alloy First a confirmation screen appears ...

Страница 71: ...ete the alloy from the list Selecting No will return you to the Alloy List Save Selecting the Save button will save the current Library Close Selecing the Close button will close the current Library without saving it The Element Specification Screen The Element Specification Screen allows you to edit the elemental content of any alloy ...

Страница 72: ...ting Make suere you are editing the correct alloy before proceding further Element to be Edited This is the element you need to edit for this alloy Minimum Percentage This is the lowest amount of the element in question you want to be in the alloy If the element in the analyzed sample is any lower the sample will not be recognized as this alloy Selecting the element minimum will open the Minimum E...

Страница 73: ...ion Screen Maximum Percentage This is the highest amount of the element in question you want to be in the alloy If the element in the analyzed sample is any higher the sample will not be recognized as this alloy Selecting the element maximum will open the Maximum Editor Figure 1 17 Maximum Editor This is a standard numerical entry keypad C clear the current display means backspace one space and E ...

Страница 74: ...N XL3 Analyzer User s Guide Thermo Scientific OK Button Selecting this button will save the editied library Cancel Button Selecting this button will exit the Element Specification Screen for this alloy returning you to the Library Editor ...

Страница 75: ...rd calibration of your analyzer s detector Once you select the Calibrate Detector icon calibration will begin immediately The analyzer is programmed to calibrate for a specific predetermined period in order to ensure proper operation of your NITONXL3 analyzer in the field CAUTION Avoid any vibration loud noise strong electronic fields or other possible interference when your analyzer is calibratin...

Страница 76: ... displayed until calibration is complete After the calibration has finished the calibration results will be displayed Press the on off escape button or the Return icon to return to the Main Menu In order to ensure good test results it is essential that you calibrate your XL3 Analyzer s detector daily and if a check sample test reveals discrepancies in the reading ...

Страница 77: ... the Calibrate Touch Screen icon is selected the display will show the message Calibrate Touch Screen There will be a small cross in the upper left hand corner of the display Tap on this cross with the stylus and the cross will disappear and reappear in the upper right hand corner of the screen Tap on the cross again and it will reappear in the lower right hand corner of the screen Tap on the cros...

Страница 78: ...The Calibrate Touch Screen Screen 1 64 NITON XL3 Analyzer User s Guide Thermo Scientific Figure 1 21 The Touch Screen Calibration Screen ...

Страница 79: ...button and the center keypad is a 4 way switch The 4 way switch has 4 positions Up Down Left and Right The select and interlock buttons are not used in this procedure Figure 1 22 The Control Buttons for the XL3 1 Please turn on your XRF analyzer using the On Off button Note From this point please DO NOT touch the touch screen 2 Press the enter button You are now at the Radiation warning screen 3 U...

Страница 80: ...ouch pad move the cursor to highlight the Utilities icon and press the enter key to select 9 You will now be at the Utilities screen 10 From the Utilities screen move the cursor to highlight the Calibrate icon and press the enter key 11 Now move the cursor to highlight Calibrate Touch Screen and press the enter key 12 You are now at the Touch Screen Calibration screen Note You must now use the tou...

Страница 81: ...These specifications include your NITON analyzer s serial number software and firmware versions temperature bias and data coprocessors Press the Close button to return to the Utilities Menu Figure 1 24 The Specs Screen On the Specs Screen standard information on the state of your analyzer is shown for your reference This information should be reported to Service if there is a problem ...

Страница 82: ...ticularly important for date stamping SW Version This is the currently loaded software version which should be reported to Service if there is any problem FPGA This is the currently loaded FPGA software version which should be reported to Service if there is any problem FPGA versions are always a four digit number Any other number of digits may be a sign of a problem in the FPGA code Factory QC Th...

Страница 83: ...r analyzer Selecting the button will open the Cal Reminder Editor Select the number of days you want between reminders with the numeric keys Of the other keys C Clear All E Enter and OFF shuts off the Reminder Function Selecting E will enter the current value as the reminder interval and return to the Specs Screen Figure 1 25 Cal Reminder Edit Screen ...

Страница 84: ...s Cooler Voltage SubBias Energy Scale and Temperature in C and F scales The Diagnostics Screen can be of great utility in assuring proper operation of your analyzer Figure 1 26 Diagnostics Screen The proper ranges of operational values on the Diagnostics Screen follow Det Temp Detector Temperature should be within these ranges Standard 6 mm Detector 25 5 degrees F GOLDD SDD Detector 27 3 degrees F...

Страница 85: ...SDD Detector 220 15 VCool VCool will vary with the ambient temperature SubBias SubBias should be within these ranges Standard 6 mm Detector 11 3 GOLDD SDD Detector 8 3 Escale Escale should be within these ranges Standard 6 mm Detector or GOLDD SDD Detector 6 6 9 Preamp Preamp value should only be noted and reported to Service if there is a problem ...

Страница 86: ...shipping The format used is month day year MM DD YY and hour minute HH MM for the 24 hour clock Figure 1 28 Setting the Date Time When the Date Time icon is selected the Date Time Screen comes up on your analyzer s LCD Screen Initially the first character of the month is highlighted in reverse video white on black as in the sample display shown here To change a character select the digit you want ...

Страница 87: ...virtual numeric keypad then select the Enter Ent key from the virtual numeric keypad The change is accepted and the next digit is highlighted Continue to select the Enter Ent symbol from the virtual numeric keypad to skip over the remaining characters of the date and time until the last character is reached When you select the Enter Ent key from the virtual numeric keypad to confirm the last chara...

Страница 88: ...e brightness of the analyzer screen Selecting the red box will cause the slider to move some to the left and the screen to dim a bit Selecting the green box will cause the slider to move a bit to the right and the screen to brighten somewhat Find the setting most harmonious with the ambient lighting Selecting Close saves the backlight setting in the current state and returns you to the Utility Men...

Страница 89: ...4 If the camera is off saving of images will also be off If the camera is on and the image saving function is also on the images will automatically be saved with the reading Saving images will curtail the maximum number of readings stored How to Use the Camera When a Camera equipped XL3 analyzer is in the Ready to Test screen the video feed appears live on the analyzer s touch screen This is the i...

Страница 90: ...the analyzer How to Use the Small Spot Technology With a properly equipped Small Spot analyzer you can restrict the analysis to a small spot within the camera view You can toggle the Spot on and off from the Tools Menu as in Figure 1 3 A red circle with a small hash mark will appear on the display The small hash marks the center of the x ray analysis spot while the larger circle marks the area ana...

Страница 91: ...Camera and Small Spot Video Thermo Scientific NITON XL3 Analyzer User s Guide 1 77 Figure 1 3 Toggling the Small Spot from the TOOLS Menu Figure 1 4 Camera View ...

Страница 92: ...rent modes Mining 3mm spot size allows analysis of veins and inclusions in mineral samples Initiate from Tools Small Spot He Purged Helium purge allows analysis of light elements Mg V and Ti Small spot enables analysis of light elements in welds and inclusions Helium and Small Spot modes can be used simultaneously for Alloy and Mining modes ...

Страница 93: ...ardware Setup Menu Path The Hardware Setup Screen enables you to toggle various options on or off as well as select certain hardware dependant modes Selecting an empty checkbox enables the option and places a check in the box Selecting a checked box disables the option and clears the box Figure 1 6 Selecting Options Select ...

Страница 94: ... have laws or regulations which prohibit use of this feature In this case the feature will be disabled before shipping Figure 1 7 Selecting Interlock Start Select the Interlock Start checkbox to toggle the use of the rear interlock but ton This requires the interlock button to be used to start taking a sample on contact Enabling the Interlock Start feature allows the user to start an anal ysis by ...

Страница 95: ...81 Figure 1 8 Selecting Remote Trigger Select the Remote Trigger checkbox to toggle the use of the Remote Trigger This is used when your XL3 is in a test stand or with the Extend a Pole En abling the Remote Trigger feature allows you to start an analysis by remote control Select ...

Страница 96: ...The Hardware Setup Screen 1 82 NITON XL3 Analyzer User s Guide Thermo Scientific Figure 1 9 Selecting Option Combinations for Multiple Effects Select Select ...

Страница 97: ... seconds per reading A virtual numeric keypad will appear allowing you to set the number to whatever value you want up to the maximum of 36000 When the max testing time is reached during an analysis the analyzer reading will be automatically ended Your analyzer will continue switching filters as needed until you terminate the reading or the Max Time is reached Select Virtual Numeric Keypad ...

Страница 98: ...s when enabled will use two filters in sequence to produce a combined analysis result In typical alloy analysis applications Main Range is used for the analysis of most elements and Low Range is utilized for the subsequent high sensitivity analysis of V Ti and Cr Multi filter switching can be set to activate off time alone or when time switching is disabled off settings in the alloy grade library ...

Страница 99: ...nfig Screen Thermo Scientific NITON XL3 Analyzer User s Guide 1 85 Figure 1 12 Selecting the Mode Select the mode you wish to configure You can set different configurations for different modes Select Mode to Modify ...

Страница 100: ...r is used for sample testing Selecting an empty checkbox will enable that filter and place a check into the box as an indicator Selecting a checked box will disable the filter and clear the box In typical alloy analysis applications Main Range is used for the analysis of most elements Low Range is utilized for the subsequent high sensitivity analysis of V Ti and Cr High Range is not used in alloy ...

Страница 101: ...ime you set or the alloy library controls the switching of the filters Select the Filter Change on Time Only checkbox to override the alloy library s settings When this box is checked your analyzer will ignore the alloy library settings and change filters only according to the time intervals you have set for each filter Figure 1 14 The Filter Checkboxes In Electronic Alloy Mode Figure 1 15 The Fil...

Страница 102: ...e intended filter to change the filter switch time for that Filter The Filter Time Editor will appear This enables you to set the number of seconds each enabled filter is allotted before auto switching will occur when needed during sample testing Your analyzer will auto switch from one filter to another when the testing time for that filter is greater than or equal to the time you have chosen and ...

Страница 103: ...hermo Scientific NITON XL3 Analyzer User s Guide 1 89 Figure 1 17 The Filter Time Editor Select the C key to clear the current time then from the virtual numeric key pad select each digit you want to input then select E to enter ...

Страница 104: ...ic The Language Settings Screen Figure 1 18 The Language Settings Menu Path Selecting the Language Settings icon will load the Language Screen allowing you to change the language from the default English to French Spanish Portuguese or German Figure 1 19 The Language Setting Screen ...

Страница 105: ... Guide 1 91 Select the down pointing triangle and then select the language you want from the drop down menu The Menu system will now show on screen in the language you have selected Figure 1 20 Selecting Language From the Drop Down Menu Figure 1 21 The Main Menu in Chinese ...

Страница 106: ...etup Screen allows you to adjust which sections of your reading data are sent to your optional printer By default your analyzer prints the detected list reading number reading length reading mode and any applicable measurement data such as Alloy match grade names You can select any combination of options on the Printer Setup Screen to change what is printed ...

Страница 107: ...ption will enable printing of readings which are lower than the Limit of Detection Print Complete Selecting this option will enable printing of all the data fields in the reading Print Data Field Selecting this option will enable printing of all entered data fields Print Date Time Selecting this option will enable printing of the Date and Time ...

Страница 108: ...Analyzer User s Guide Thermo Scientific The Beep Setup Menu Figure 1 24 The Beep Setup Menu Path Selecting the Beep Times icon opens the Beep Setup Screen enabling changes to the beep settings for various modes The beeps sound as follows ...

Страница 109: ... Select the down arrow to access the list of modes First Beep This option allows you to change the delay before the First Beep Second Beep This option allows you to change the delay before the Second Beep Third Beep This option allows you to change the delay before the Third Beep Beep on Grade Match Selecting this option will enable a special beep when the reading chemistry matches and alloy grade...

Страница 110: ...Data Entry Settings icon opens the Data Entry Settings Screen enabling changes to the data entry settings for various modes Figure 1 27 The Data Entry Settings Screen By selecting the down arrow at the right of the Num of Data Entry Boxes field you may choose between Up to 5 or Up to 8 from the drop down menu changing the number of data entry boxes in the Data Entry Screen ...

Страница 111: ...tings icon opens the Safety Settings Screen enabling changes to the location of the rear interlock button Figure 1 29 The Safety Settings Screen By selecting the checkbox you can toggle between the rear interlock button s normal location and it s alternate location as the center Select button on the four way touch pad Alt Interlock Disabled Default Alt Interlock Enabled ...

Страница 112: ...c The Adjust Calibration Screen Figure 1 30 The Adjust Calibration Menu Path The Adjust Calibration Screen enables you to change calibrations for Mining Modes Select the mining mode you are using from the list Figure 1 31 Select Mode Screen The Calfactors Screen will now appear Select ...

Страница 113: ...or you wish to edit then select the appropriate Edit Button The Calibration Edit Screen will open You cannot edit the Factory Calibration You may edit and store up to four alternate calibrations per Mode Figure 1 33 The Calibration Edit Screen Select Edit Button Select Radio Button Select here to edit this element s Slope Select here to edit this element s Intercept ...

Страница 114: ...nts independent of the other elements A user may choose to correct a single element or a suite of elements The degree of severity of the bias should be evaluated before proceeding with routine measurement A few test samples should be carefully measured by another technique or by an outside lab These samples should then be analyzed using the analyzer If the agreement is good enough to provide the a...

Страница 115: ...sing the conversion factors and equation below This factor can be multiplied by oxide concentration to convert to elemental Formula Conc metal Conc oxide Mol Wt metal Mol Wt compound Table 1 1 Oxide Conversion Oxire Conveersion Factor MgO 0 603 Al2O3 0 529 SiO2 0 467 SO3 0 400 K2O 0 825 CaO 0 715 TiO2 0 5995 V2O5 0 5602 Cr2O3 0 6842 Mn3O4 0 7203 MnO 0 7745 Fe2O3 0 6994 FeO 0 7773 Co3O4 0 7342 NiO ...

Страница 116: ...Element Display Menu Path Select the Sort Element Display icon to configure sorting criteria used for analysis display Selecting the Sort Element Display icon opens up the Sort Criteria Screen Figure 1 35 Selecting the Mode from the Sort Element Display screen Select the mode you wish to change and the Sorting Options Screen will appear ...

Страница 117: ...igure 1 36 The Sort Element Display Figure 1 37 The Sorting Options Screen Element affected Current display option selected Top Arrow Button Bottom Arrow Button Scroll bar for elements Display Options Drop Down Menus Save Button Close Button Move up in rank Move down in rank Reset Button ...

Страница 118: ...ement one rank closer to the top with each click Use the Bottom Arrow Button to move an element one rank closer to the bottom with each click Figure 1 38 Changed Sort Order Display Options The Display Options Drop Down Menu allows you to change the display status of any element to one of three states Normal The standard state Element displays only when the elemental value is greater than the limit...

Страница 119: ... Options Select the Save Button to save your current status as the new default After saving you will go back to the Element Display Menu Close Button Select the Close Button to exit without saving When you select the Close Button after changing the display state of any element a screen will open asking you if you want to save the changes you made Selecting Yes will save these changes as the new de...

Страница 120: ...The Sort Element Display Menu 1 106 NITON XL3 Analyzer User s Guide Thermo Scientific Figure 1 40 Save Changes ...

Страница 121: ...107 The Set Element Threshold Menu Figure 1 41 The Set Element Threshold Menu Path Select the Set Element Threshold icon to configure pass and fail criteria for elemental analysis Selecting the Set Element Threshold icon opens the Set Threshold Screen Figure 1 42 Set Threshold Screen ...

Страница 122: ...e you wish to work with from the scrollable list This will open up the Settings Screen for that mode Figure 1 43 Pass Fail Settings Screen Selecting the Pass Value will open up the Pass Editor for the selected element Figure 1 44 The Pass Editor Mode Save Button Close Button Element Max Value Min Value ...

Страница 123: ...nt then press E to enter the number OFF resets the value to OFF Selecting the Fail Value will open up the Fail Editor for the selected element Figure 1 45 The Fail Editor The Fail Editor works the same as the Pass Editor When you press the E button in either editor you are returned to the Pass Fail Settings Screen with your new values in place Selecting the OFF button not only sets the value to OF...

Страница 124: ...ing you will go back to the Element Display Menu Select the Close Button to exit without saving When you select the Close Button after changing the display state of any element a screen will open asking you if you want to save the changes you made Selecting Yes will save these changes as the new default Selecting No will return you to the Element Display Menu without saving the changes Figure 1 47...

Страница 125: ...he Analysis Options Field will open a pop up menu allowing you to choose between the three Analysis Option Modes Select the mode you wish to edit Figure 1 48 The Analysis Options Pop up Menu Changing the settings for one mode will not affect the settings for other modes and the configurations can be saved independently ...

Страница 126: ...e Sigma value you want for the reading Selecting the Set Display Units icon opens the Set Display Units Screen Setting Display Units In the Set Display Units Screen you can select between Percent composition and Parts per Million as the units displayed in a measurement and you can change this setting independently for Alloy Mining Plastic Precious Metal and Soil modes You can also change the Sigma...

Страница 127: ...Changing Sigma Thermo Scientific NITON XL3 Analyzer User s Guide 1 113 Figure 1 50 The Set Display Units Screen Changing Sigma Figure 1 51 Selecting new Sigma values ...

Страница 128: ...ly sums of many independent identically distributed random variables tend towards the normal distribution as a limit Using this assumption about 68 of the values must be within 1 standard deviation of the mean about 95 of the values must be within two standard deviations about 99 7 must lie within 3 standard deviations and about 99 99 of the values must lie within 4 standard deviations The greater...

Страница 129: ...ocal Authorized NITON Analyzers Service Center Note Before beginning a test be certain that the battery has sufficient charge CAUTION Do not leave the battery pack connected to the charger for excessive periods of time Overnight recharging is recommended CAUTION Store the analyzer and the spare battery packs in a cool place away from direct sunlight Replacing The Battery Pack 1 Slide back the catc...

Страница 130: ...and will only fit into the charger fully one way If your battery pack is resting on the back of the back of the charger rather than sliding all hte way to the bottom remove the battery pack turn it around and re insert it into the charger 3 The red light is on when the charger is plugged in This is the power indicator light Figure 2 1 Power Indicator Light 4 The yellow light indicates that the bat...

Страница 131: ...t indicates that the battery pack has finished charging and is ready for use 6 If there is a fully seated battery pack in the charger and only the red light is on there is a fault with the battery pack or charger Figure 2 3 Rear and Side views of Battery Pack showing key Power Indicator Light Fully Charged Indicator Light Key Shoulder ...

Страница 132: ... Battery Charger 2 4 NITON XL3 Analyzer User s Guide Thermo Scientific Figure 2 4 Battery Pack in the Charger CAUTION Do not store battery packs or charger in direct sunlight CAUTION Do not let the battery pack recharge for excessive periods of time ...

Страница 133: ...entific s Service Department in the United States toll free at 800 875 1578 or outside the United States at 1 978 670 7460 or from your local Authorized NITON Analyzers Service Center From time to time your touch screen will need cleaning NITON recommends that you use a lens cleaning solution with a soft cloth Do not use water to clean your NITON Analyzer WARNING All Service except exterior cleani...

Страница 134: ...e Measurement Window 1 Remove the two Phillips head screws Figure 2 5 View of Face Plate and measurement window 2 Remove the face plate and place it face down Figure 2 6 Face Plate Removed showing measurement window on Reverse 3 Remove the old measurement window 4 Clean the back surface of the face plate and install the new Window ...

Страница 135: ...lyzer User s Guide 2 7 5 Turn the face plate over and replace it on the analyzer s front end fitting the plate carefully over the Proximity Button Figure 2 7 Fitting Face Plate over Proximity Button 6 Reinstall the two screws being careful not to over tighten them Figure 2 8 Replacing the Screws ...

Страница 136: ...r services no special labels are required on the outside of the NITON analyzer case or on additional packaging Figure 2 9 The NITON Carrying Case All padlocks are shipped with a default combination of 0 0 0 If you change this combination please inform Thermo of the new combination if you return the unit for service To change the combination 1 Dial the default combination to open the lock and pull ...

Страница 137: ...AUTION Within the United States always keep a copy of the US DOT compliance statement in your NITON analyzer case at all times A copy is included with your analyzer CAUTION Always follow all pertinent local and national regulations and guidelines wherever your analyzer is transported or used CAUTION Always obtain a Return Authorization RA number from Thermo Fisher Scientific s Service Department i...

Страница 138: ...Routine Maintenance Guidelines Storing and Transporting Your XL3 Analyzer 2 10 NITON XL3 Analyzer User s Guide Thermo Scientific ...

Страница 139: ...nd Connectivity Setting up Wireless Networking Figure 2 10 Wireless Networking Menu Path Bluetooth Wireless Networking enables you to connect to your computer and other Bluetooth enabled devices such as printers and GPS devices without the need of cabling ports or hubs ...

Страница 140: ... list of Bluetooth devices previously discovered The Bluetooth devices listed are only those which were present at the last time you ran a discovery scan for Bluetooth devices as the list is not automatically updated Selecting the List Available Devices icon brings up the Available Devices screen From the list you can connect your analyzer to those devices ...

Страница 141: ...gure 2 11 Available Devices Screen Under Devices in the Device List Box the Available Devices Screen lists all known applicable Bluetooth devices in the area found during the last refresh or scan Figure 2 12 Example Device List Device List Box Connect Button Refresh Button Close Button ...

Страница 142: ...h Button initiates a scan of the area for new Bluetooth devices Devices no longer present are removed Figure 2 13 Available Device Refresh Selecting a listed Bluetooth Device enables the Connect Button Selecting the Connect Button will connect your analyzer to the selected device See the Connected Screen ...

Страница 143: ...th Search Screen Select the Scan For Devices icon bring up the Bluetooth Search Screen enabling you to initiate a discovery scan of Bluetooth devices in the operational area This scan will find all appropriate Bluetooth devices in the operational area enabling you to connect to those devices ...

Страница 144: ...een The Bluetooth Search Screen does not retain information about previously detected Bluetooth Devices Each time the Bluetooth Search Screen is opened the Device List Box is empty Selecting the Search Button initiates a scan for Bluetooth Devices in the area Device List Box Connect Button Search Button Close Button ...

Страница 145: ...le Search List Depending on where and when the Search Scan is conducted certain devices may or may not be detected You can select a device and connect to that device in exactly the same manner as in the Available Devices Screen once the search is finished Figure 2 16 Search List with New Device Found ...

Страница 146: ...he connection With simple devices like GPS devices a notification that you are connected is given and everything just works but working with a PC is a bit more complex In order to use a Bluetooth Serial Connection with a PC you need to know which COM port Bluetooth is connected through To determine this right click on the Bluetooth logo in your system tray on your PC From the popup menu which appe...

Страница 147: ... Serial Port row the COM port used by Bluetooth is identified Use this port for any interactions between your analyzer and your computer such as NDT or NDTr Make sure that the Secure Connection setting for the Bluetooth Serial Port is set to Not Required Figure 2 20 Selecting Bluetooth Serial Port on PC To edit the setting double click the row ...

Страница 148: ...tivity 2 20 NITON XL3 Analyzer User s Guide Thermo Scientific Figure 2 21 Changing the Bluetooth Secure Connection Checkbox on PC Unselect the Secure Connections checkbox if it is already selected then select the OK button ...

Страница 149: ... Analyzer User s Guide 2 21 Bluetooth Status Screen The Bluetooth Status Screen enables you to see at a glance if and how your analyzer is connected to your computer Figure 2 22 Example Bluetooth Status Screen Please Wait Status Screen Normal Status Screen ...

Страница 150: ...n shows your analyzer s identification label its connection state the speed of the communication port setting your analyzer s network address and the COD In Figure 2 22 the analyzer XL3t 32832test is not connected to any computer was last in Master state i e the last connection was initiated by the computer and not by the analyzer has a com port set to communicate at 115200 baud has the unique net...

Страница 151: ...h Device icon to initiate an immediate reset of the Bluetooth Wireless Networking Selecting the Reset Bluetooth Device icon will clear out old settings and data as well as enabling you to switch between Bluetooth and standard serial cable While resetting your analyzer will show the following screen Figure 2 24 Bluetooth Reset Alert ...

Страница 152: ...nt information from the GPS after connection as shown in Figure 2 25 As shown in Figure 2 26 these coordinates can be viewed in the Data screen in entry positions eight nine and ten Scroll down to reach these fields When the results are downloaded using the NDT software the GPS coordinates are also stored and downloaded in data entry fields eight nine and ten Figure 2 25 Example of GPS Data Exampl...

Страница 153: ...oint are seconds First two digits to the left of the decimal point are minutes The next two or three digits to the left of the decimal point are degrees Thus 15111 594 is read 151 degrees 11 minutes 59 4 seconds W E E Compass direction of Longitude Altitude 17 Height above sea level in meters Quality 1 Quality of signal strength Num Sat 8 Number of satellites signals being received by GPS This num...

Страница 154: ... most commonly used for motor and marine directional mapping systems Tested Units include Copilot BTGPS3 http www alk com copilot pocketpc asp RoyalTek Star111 http www royaltek com index php content view 98 80 IOGEAR Bluetooth GPS http www iogear com main php loc product Item GBGPS201W6 Note These GPS systems have an accuracy of about 10 meters Haicom HI 408BT GPS http www haicom com tw hi_408bt ...

Страница 155: ...the data entry screen highlight the desired field While pressing the button on the Barcode Pencil swipe the desired barcode If the pencil successfully reads the barcode it will beep The barcoded data will show up in the data field after the beep There is a short delay while the information is being transmitted You may also use the Virtual Keyboard Screen to enter barcoded data You can replace appe...

Страница 156: ...d readers include The Baracoda Barcode Pencil The Baracoda Barcode Pencil supports these barcodes for use with the XL3 system Code 96 Code 128 EAN 128 EAN13 UPCA UPCE EAN8 Code 39 Codabar Interleaved 2 of 5 Standard 2 of 5 Code 11 MSI RSS14 RS Limited Consult your Baracoda Pencil Users Manual for more information and information on successful barcoding ...

Страница 157: ...th the supplied cable to communicate with your analyzer Figure 2 27 Location of Mini USB port Insert the smaller end of your USB cable into the Mini USB port on the back of your XL3 and the larger end into any USB port on your computer When you turn your analyzer on after it is connected or if you connect it while the analyzer is on a Found New Hardware Wizard will open as in Figure 2 28 Figure 2 ...

Страница 158: ... drive select No not this time then select Next The Wizard will now ask you what you want it to do as in Figure 2 29 Select Install the software automatically Figure 2 29 Wizard Choice The Wizard will now search the CD for the proper software as in Figure 2 30 When the Hardware Installation window comes up stating that the software has not passed XP logo certification don t worry The driver is fro...

Страница 159: ...ng you the process is complete Select Finish Figure 2 31 Final Installation Wizard Screen The driver will install as the next free COM device for example if you have devices installed as COM1 through COM 5 the driver will install as COM 6 You can find how the software has been installed by starting up NDTr and selecting Settings The Connect Using box shows you to which Comm port you are using as i...

Страница 160: ...Entering Data with a Barcode reader 2 32 NITON XL3 Analyzer User s Guide Thermo Scientific ...

Страница 161: ...l operators of the XL3t should be familiar with the instructions provided in this chapter in order to handle the XL3t in a safe manner In addition to reading the information presented on the following pages Thermo Fisher Scientific recommends that instrument users participate in a radiation safety and operational training class Radiation Protection Basics The NITON Model XL3t analyzer contains an ...

Страница 162: ... 100 rem The allowable limit for occupational exposure in the U S and many countries internationally is 5 000 mrem year 50 mSv year for deep penetrating dose and 50 000 mrem year 500 mSv year for shallow i e skin dose or dose to extremities Deep shallow and extremity exposure from a properly used NITON XL3t analyzer should be less than 200 mrem per year 2 0 mSv per year even if the analyzer is use...

Страница 163: ...from 4 pCi l radon in home 1 000 10 0 Typical Chest X Ray 6 0 06 Typical Head or Neck X Ray 20 0 2 Typical pelvis hip x ray 65 0 65 Typical lumbar spine x ray 30 0 3 Typical Upper G I x ray 245 2 45 Typical Barium enema x ray 405 4 05 Typical CAT scan 110 1 10 Table 3 2 Annual Occupational Dose Limits for Radiation Workers Source Code of Federal regulations Title 10 Part 20 Category Dose in mrem D...

Страница 164: ...wo common types of dosimeters are whole body badges and ring badges Whole body badges are often attached to the user s torso e g clipped to the collar shirt pocket or waist as appropriate A ring badge is worn on the finger as a measure of maximum extremity dose When worn the specific location of the dosimeter should be that part of the body that is expected to receive the highest dose This locatio...

Страница 165: ...y want to take special precautions to reduce their exposure to radiation For more information see the U S NRC Regulatory Guide 8 13 Instruction Concerning Prenatal Radiation Exposure which can be found on the resource CD The International Commission on Radiological Protection ICRP is an independent Registered Charity established to advance for the public benefit the science of radiological protect...

Страница 166: ... seldom receive a measurable dose and have not been known to receive in excess of 10 of the annual occupational dose limits a criteria that would require monitoring under regulation in the U S In addition to proper use of the XL3t it is recommended that you follow these precautions to ensure your safety and the safety of those around you Know where the beam is The primary beam is a directed beam o...

Страница 167: ... User s Guide 3 7 Figure 3 2 Secondary Scattered Beam The Shutter Open Indicator Lights When the lights are flashing the primary beam is on the shutter is open and radiation is being emitted from the front of the analyzer This does not include the brief flash of the lights when first turning the analyzer on ...

Страница 168: ... Follow a Radiation Protection Program Your organization should establish document and follow a Radiation Protection Program An example of such a program can be found on the resource CD provided with the instrument Take Proper Care of your NITON XL3t Analyzer Keeping your analyzer maintained in good condition will help minimize the risk of accidental exposure Mechanical malfunction of the shutter ...

Страница 169: ... that interfere with analytical results A test stand is an effective way of analyzing small samples accurately and safely Never hold samples during analysis or look into the path of the primary beam Irregularly Shaped Samples Irregularly shaped samples may not allow the proximity button to be depressed or they may not entirely cover the primary beam and cause additional scattering A back scatter s...

Страница 170: ...t Deep Window Contact Shallow 5 cm Deep 30 cm Deep kVp µA Max in Following Modes Filter mSv hr mSv hr mSv hr mSv hr 40 50 G D E A P F M J Main Filter 1 410 1 410 50 00 6 3 40 50 B Main Filter 750 2 250 40 00 5 4 50 40 H Main Filter D E M J High Filter 1 090 4 060 84 0 12 2 20 100 D H E M J Low Filter 1 450 31 717 5 2 0 5 15 100 A B Low Filter 133 10 567 4 3 0 42 Table 3 5 Primary Beam Dose Rates i...

Страница 171: ...t B 40 50 G D E A P F M J Main Filter Aluminum 25 2 0 5 40 50 G D E A P F M J Main Filter Stainless 16 1 2 0 1 40 50 B Main Filter Aluminum 4 0 4 0 1 40 50 B Main Filter Stainless 1 4 0 1 0 1 50 40 H Main Filter D E M J High Filter Plastic 400 35 20 50 40 H Main Filter D E M J High Filter Soil 80 4 0 7 20 100 D H E M J Low Filter Aluminum 0 15 0 1 0 1 20 100 D H E M J Low Filter Stainless 0 15 0 1...

Страница 172: ...F M J Main Filter Aluminum 2 5 0 2 0 05 40 50 G D E H A P F M J Main Filter Stainless 1 6 0 12 0 01 40 50 B Main Filter Aluminum 0 4 0 04 0 01 40 50 B Main Filter Stainless 0 14 0 01 0 01 50 40 H Main Filter D E M S J High Filter Plastic 40 3 5 2 50 40 H Main Filter D E M S J High Filter Soil 8 0 4 0 7 20 100 D H E M S J Low Filter Aluminum 0 015 0 01 0 01 20 100 D H E M S J Low Filter Stainless 0...

Страница 173: ...t is produced by the analyzer and emitted out through the kapton measurement window Individuals should never place any part of their body in the primary beam path when the x ray tube is on There should always be a sample in contact with the measurement window when the x ray tube is on The sample will absorb most of the primary beam radiation unless it is smaller than the instrument s ...

Страница 174: ...7 for a few common sample types over a wide range of densities The operator is reminded that one should never hold samples during analysis doing so will result in higher than necessary exposure to secondary radiation and could expose the operator directly to the much higher primary beam dose rates Deep and Shallow Dose You will find in Table 3 4 and Table 3 5 that shallow dose rates are listed for...

Страница 175: ...r away from your primary storage location such as hotels and motels and in vehicles You should contact your local Radiation Control Authority to identify the specific storage requirements in your jurisdiction Transportation There are no specific US Department of Transportation DOT or International Air Transport Association IATA radiation regulations regarding shipping the NITON XL3t analyzer It is...

Страница 176: ...ification is made to Thermo Fisher Scientific Damaged Instrument Minor Damage If the instrument is intact but there is indication of an unsafe condition such as a cracked case a shutter mechanism failure or the lights remain flashing after a measurement is terminated follow these steps 1 Stop using the instrument 2 Remove the battery the x ray tube can not produce radiation when the battery is dis...

Страница 177: ...MERGENCY CONTACT INFORMATION The Company RSO is ______________________________________ RSO Telephone Number ____________________________________ Regulatory Agency Emergency Number ________________________ Local Fire Department ______________________________________ Local or State Police Department _____________________________ Thermo Fisher Scientific s NITON Analyzer Contact Numbers Main Number U...

Страница 178: ...CY PROCEDURES 3 18 NITON XL3 Analyzer User s Guide Thermo Scientific Phone 49 89 3681 380 Fax 49 89 3681 3830 Email niton eur thermo com Asia NITON Analyzers Asia Hong Kong Phone 852 2869 6669 Fax 852 2869 6665 Email niton asia thermo com ...

Страница 179: ...t come up when filling out registration forms FAQ What is the max mA max kVp and max power Maximum mA is 0 1 mA Maximum kVp is 50 kVp Maximum power 2 watts What is the accelerator voltage or MeV This should be filled out as not applicable N A as it does not apply to XL3t analyzers What is the radioisotope There are no radioactive isotopes in XL3t analyzers What category is the XL3t States differ g...

Страница 180: ...please call us at 1 800 875 1578 and ask to speak with someone regarding X Ray tube registrations and we can look this number up for you What is the type of X Ray Processing None XL3t analyzers do not use film How often do I need to perform leak tests on the XL3t Never Leak tests are only required for analyzers with radioactive isotopes XL3t analyzers do not have radioactive isotopes Regarding Saf...

Страница 181: ...entific Contact Information Radiation Safety Group By phone 1 978 670 7460 By fax 1 978 670 7430 By e mail Radsafety Billerica thermofisher com Radiation Emergency Numbers Call only if there is a radiation emergency Phone 1 617 901 3125 Phone 1 978 790 8269 Service Departments USA Phone 1 800 875 1578 Fax 1 978 215 6127 Germany Phone 49 89 368138 0 Fax 49 89 368138 30 Hong Kong Phone 852 2869 6669...

Страница 182: ...Radiation and General Safety Contact Information 3 22 NITON XL3 Analyzer User s Guide Thermo Scientific ...

Страница 183: ...97 2 01 2 14 sulphur S 16 32 07 2 31 2 46 chlorine Cl 17 35 45 2 62 2 82 argon Ar 18 39 95 2 96 3 19 potassium K 19 39 10 3 3 3 6 calcium Ca 20 40 08 3 7 4 0 scandium Sc 21 44 96 4 1 4 5 titanium Ti 22 47 87 4 5 4 9 vanadium V 23 50 94 4 9 5 4 chromium Cr 24 52 00 5 4 5 9 manganese Mn 25 54 94 5 9 6 5 iron Fe 26 55 85 6 4 7 1 cobalt Co 27 58 93 6 9 7 6 nickel Ni 28 58 69 7 5 8 3 copper Cu 29 63 55...

Страница 184: ...29 8 33 6 4 1 4 4 5 0 cesium Cs 55 132 91 31 0 35 0 4 3 4 6 5 3 barium Ba 56 137 33 32 2 36 4 4 5 4 8 5 5 lanthanum La 57 138 91 33 4 37 8 4 7 5 0 5 8 cerium Ce 58 140 12 34 7 39 3 4 8 5 3 6 0 praseodymium Pr 59 140 91 36 0 40 7 5 0 5 5 6 3 neodymium Nd 60 144 24 37 4 42 3 5 2 5 7 6 6 promethium Pm 61 145 00 38 6 44 0 5 4 6 0 6 9 samarium Sm 62 150 36 40 1 45 4 5 6 6 2 7 2 europium Eu 63 151 96 41...

Страница 185: ... 10 0 11 8 13 8 2 19 thallium Tl 81 204 38 72 9 82 6 10 3 12 2 14 3 2 27 lead Pb 82 207 20 75 0 85 9 10 5 12 6 14 8 2 34 bismuth Bi 83 208 98 77 1 87 3 10 8 13 0 15 2 2 42 polonium Po 84 209 0 79 3 89 8 11 1 13 4 15 7 astatine At 85 210 0 81 5 92 3 11 4 13 9 16 2 radon Rn 86 222 0 11 7 14 3 16 8 francium Fr 87 223 0 12 0 14 8 17 3 radium Ra 88 226 0 12 3 15 2 17 8 actinium Ac 89 227 0 12 7 15 7 18...

Страница 186: ...23 2 26 1 3 1 3 3 3 7 calcium Ca 20 40 08 3 7 4 0 cerium Ce 58 140 12 34 7 39 3 4 8 5 3 6 0 cesium Cs 55 132 91 31 0 35 0 4 3 4 6 5 3 chlorine Cl 17 35 45 2 62 2 82 chromium Cr 24 52 00 5 4 5 9 cobalt Co 27 58 93 6 9 7 6 copper Cu 29 63 55 8 0 8 9 dysprosium Dy 66 162 50 46 0 52 2 6 5 7 3 8 4 1 29 erbium Er 68 167 26 49 1 55 7 6 9 7 8 9 1 1 41 europium Eu 63 151 96 41 5 47 0 5 8 6 5 7 5 francium F...

Страница 187: ... 9 4 11 1 12 9 2 05 plutonium Pu 94 244 00 14 3 18 3 21 4 polonium Po 84 209 0 79 3 89 8 11 1 13 4 15 7 potassium K 19 39 10 3 3 3 6 praseodymium Pr 59 140 91 36 0 40 7 5 0 5 5 6 3 promethium Pm 61 145 00 38 6 44 0 5 4 6 0 6 9 protactinium Pa 91 231 0 13 3 16 7 19 6 radium Ra 88 226 0 12 3 15 2 17 8 radon Rn 86 222 0 11 7 14 3 16 8 rhenium Re 75 186 20 61 1 69 3 8 7 10 0 11 7 1 84 rhodium Rh 45 10...

Страница 188: ... 0 16 2 19 0 thulium Tm 69 168 93 50 7 57 6 7 2 8 1 9 4 1 46 tin Sn 50 118 71 25 3 28 5 3 4 3 7 4 1 titanium Ti 22 47 87 4 5 4 9 tungsten W 74 183 84 59 3 67 2 8 4 9 7 11 3 1 77 uranium U 92 238 03 13 6 17 2 20 2 vanadium V 23 50 94 4 9 5 4 xenon Xe 54 131 29 29 8 33 6 4 1 4 4 5 0 ytterbium Yb 70 173 04 52 4 59 4 7 4 8 4 9 8 1 52 yttrium Y 39 88 91 15 0 16 7 zinc Zn 30 65 41 8 6 9 6 zirconium Zr 4...

Страница 189: ... screen after taking a measurement in any mode or while viewing a previous measurement by selecting Spectra from the NAV Menu Once you are in SpectraView you can use the up and down positions of the 4 way touch pad to scroll through the spectrum or you can tap on the spectrum display with the stylus to place the cursor at the point you tapped The vertical cursor line indicates the current position...

Страница 190: ...ent look at the count rate at that cursor position SpectraView cannot be used to determine exact element percentages in a sample Multiple Spectra SpectraView can display the reading spectra from multiple filter settings if your analysis uses more than one filter Use the NAV Menu to select which spectrum to view The Spectra1 choice will display the display the spectrum produced by excitation with t...

Страница 191: ...dices ix Figure Appendices 2 Viewing Multiple Spectra Select NAV to access the NAV Menu while viewing the first source spectrum Select Spectra2 to view the second source spectrum Select NAV to access the NAV Menu Select Spectra1 to return to the first source spectrum ...

Страница 192: ...are met If the LED lights blink at any other time disconnect the battery pack and call Thermo Scientific s Service Department in the United States toll free at 800 875 1578 or outside the United States at 1 978 670 7460 or your local Authorized NITON Service Center WARNING Tampering with the 5 500 ppm lead high lead in soil standard may cause exposure to lead dust Keep all standards out of the rea...

Страница 193: ...ray tube remains on when the trigger is not depressed disconnect the battery pack immediately to turn off the x ray tube and call Thermo Fisher Scientific s Service Department in the United States toll free at 800 875 1578 or outside the United States at 1 978 670 7460 or your local Authorized NITON Analyzers Service Center ...

Страница 194: ...mended CAUTION Store the instrument and the spare battery packs in a cool place away from direct sunlight CAUTION Always obtain a Return Authorization RA number from Thermo Scientific s Service Department in the United States toll free at 800 875 1578 or outside the United States at 1 978 670 7460 before returning your instrument to the NITON Service Department or local Authorized NITON Analyzers ...

Страница 195: ...r possible interference when your analyzer is calibrating its detector CAUTION Within the United States always keep a copy of the US DOT compliance statement in your NITON analyzer case at all times A copy is included with your analyzer CAUTION Whenever you turn on your NITON Analyzer after it has been off for more than 30 minutes you should measure your check sample to assure proper operation If ...

Страница 196: ...ce in which metallic ores or crystalized minerals are found source Webster s Revised Unabridged Dictionary via dictionary com Pearson correlation coefficient a dimensionless index that ranges from 1 0 to 1 0 inclusive and reflects the extent of a linear relationship between two data sets R2 the square of the Pearson correlation coefficient RMS error root mean squared error the square root of the a...

Страница 197: ...iohazard or other Radiation safety decontamination procedures and other product specific handling instructions then if applicable Buyer may return and receive the defective Products to Seller with all costs of freight and insurance prepaid by Buyer Replacement parts may be new or refurbished at the election of Seller the warranty of these parts expire with the instrument warranty All replaced part...

Страница 198: ...nder Buyer shall pay or reimburse Seller for all costs of investigating and responding to such request at Seller s then prevailing time and materials rates If Seller provides repair services or replacement parts that are not covered by this warranty Buyer shall pay Seller therefore at Seller s then prevailing time and materials rates ANY INSTALLATION MAINTENANCE REPAIR SERVICE RELOCATION OR ALTERA...

Страница 199: ...ths Test stands extend a poles and docking stations 12 months Parts or spares sold installed or supplied outside of the product warranty period and not listed above 12 months Thermo Fisher Scientific shall not be liable for delays deprivation of use or any other damages direct or indirect which may result to the purchaser because of defects in the product or because of the purchaser s inability to...

Страница 200: ...Appendix F Appendices xviii NITON XL3 Analyzer User s Guide Thermo Scientific ...

Страница 201: ... Screen Screen 63 COM device installing USB port as 31 Compton Scatter Inelastic Collisions 23 Concentration Level 22 conditions of normal use 6 Confidence 22 Control Panel The Description of ii Cu Zn Pb Testing Mode 27 D Damaged Instrument Notification process 16 Data Entry Screen Navigating 19 Detection Limit 25 Display Units Setting of 112 E Element Display Options 104 Element Display Sorting O...

Страница 202: ...Readings 54 Function Avg Back description of 2 Function Avg Forward description of 2 Function Stop Avg Fwd Back description of 4 G GPS Bluetooth Tested Units 26 H Handling of Samples 9 Hardware Setup Screen The explaination and use of 79 I Industrial Bulk 27 31 Interlock Start enabling and disabling 80 81 K Kapton Window Replacing 6 L LCD Touch Screen closing iv ...

Страница 203: ... Networing Bluetooth Status Display 21 Networking Bluetooth Available Devices Listing 12 Networking Bluetooth Connecting to PCs 18 Networking Bluetooth discovery scan 15 Networking Bluetooth GPS Data Tracking 24 Networking Bluetooth GPS Device Options 26 Networking Bluetooth PC Services 19 Networking Bluetooth Refreshing Available Device List 14 Networking Bluetooth Reseting Bluetooth Device 23 Ne...

Страница 204: ...ion Primary 13 Radiation Secondary 14 Re Ta Hf Testing Mode 31 Rotate Screen 180 Toggle 73 S Secondary Scattered Beam area of 7 soil standards 24 Sort Element Display 102 Specs Screen The Description of 67 Spectrum Graph 51 Standard Bulk Mode 23 Startup Instrument vi T Tools Menu The description of 2 U USB Installation Wizard 30 USB port installing 29 V Video Camera and Small Spot 75 Video hash ma...

Страница 205: ...ription and use of 20 Virtual Numeric Keypad vii X XL3 Registration and Licensing 19 XL3 Storage 15 XL3 Transportation 15 XL3t Radiation Frequently Asked Questions 19 X ray Beam position of 6 X ray Emission Energies Table A 1 i X ray Emission Energies Table A 2 iv X ray Indicator Lights 7 X ray Radiation Profile 10 ...

Отзывы: