background image

Operation

Rotor Installation

Thermo Scientific

Heraeus Fresco 17 / 21

4-3

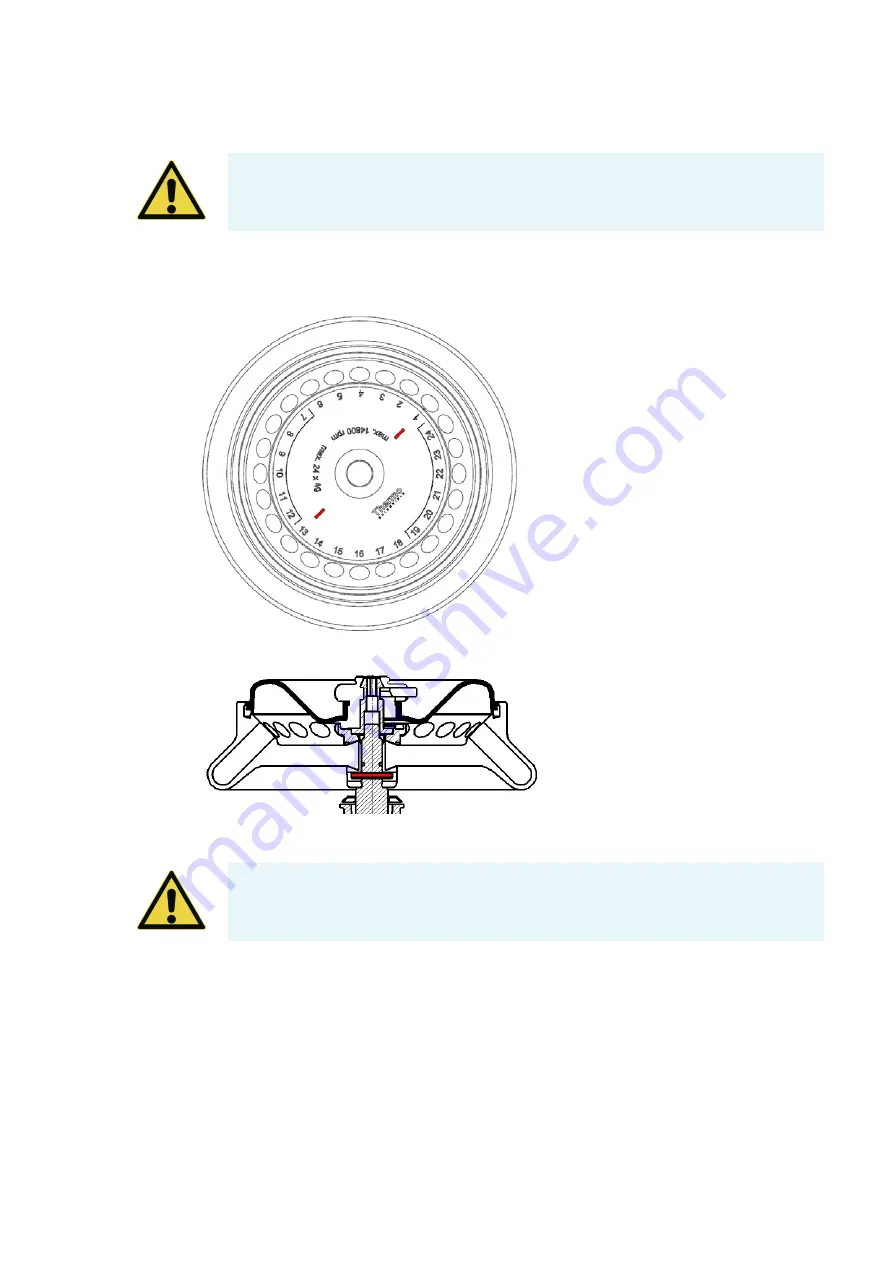
2. Hold the rotor over the centrifuge spindle. The two bars in the labeling on the upper side of the

rotor (a) must be above the retaining pin (b) of the centrifuge spindle.

3. Let the rotor slide slowly down the centrifuge spindle.

4. Thread the fastening tool into the centrifuge spindle clockwise. Hold the rotor with the other hand

into position.

5. Close the rotor.

6. Check if the rotor is properly installed by lifting it slightly on the handle.

CAUTION


Do not install the rotor when the temperature difference between shaft 

and rotor lock is >20


°C. Otherwise the rotor might jam during the installation. A 

jammed rotor can lead to damages of centrifuge and rotor.

a

b

CAUTION 

Do not force the rotor onto the centrifuge spindle.

If the rotor is very light, then it may be necessary to press it onto the centrifuge spindle 
with a bit of pressure.

Содержание Heraeus Fresco 17

Страница 1: ...Thermo Scientific Heraeus Fresco 17 21 Centrifuge Instructions for Use 50133376 4 02 2020 Visit us online to register your warranty thermofisher com labwarranty ...

Страница 2: ...WEEE Conformity This product is subject to the regulations of the EU Waste Electrical Electronic Equipment WEEE Directive 2012 19 EU It is marked by the following symbol ...

Страница 3: ... 1 Before Setting up 2 2 Transporting the Centrifuge 2 2 Location 2 2 Aligning the Centrifuge 2 3 Mains Connection 2 3 Storage 2 4 Chapter 3 Control Panel 3 1 Control Panel 3 2 Keys 3 2 Chapter 4 Operation 4 1 Switch on Centrifuge 4 2 Door Opening 4 2 Close Door 4 2 Rotor Installation 4 2 Entering Parameters 4 4 Centrifugation 4 8 Short term Centrifugation 4 8 Removing the Rotor 4 9 Aerosol tight ...

Страница 4: ...ing 5 5 Service of Thermo Fisher Scientific 5 6 Shipping and Deposing of Accessories 5 6 Chapter 6 Troubleshooting 6 1 Mechanical Emergency Door Release 6 2 Troubleshooting by User 6 3 When to contact Service Technician 6 5 Chemical Compatibility Chart A 1 Contact Information B 1 ...

Страница 5: ...ply If any parts are missing please contact your nearest Thermo Fisher Scientific representative Article number Quantity Check Centrifuge Heraeus Fresco 17 21 1 Power Supply Cable 1 Rotor 1 20360104 Allen Wrench 1 50133376 CD with Instruction Manual 1 This symbol refers to general hazards WARNING means that injuries or material damage or contamination could occur CAUTION means that material damage...

Страница 6: ... sample density at maximum speed 1 2 Accident Prevention g cm 3 WARNING If a hazardious situation occurs turn off the power supply to the centrifuge and leave the area immediately WARNING In case of a rotor failure the centrifuge can be damanged The cooling agent can escape Ventilate the room well and leave it Inform Customer Service Prerequisite for the safe operation of the Heraeus Fresco 17 21 ...

Страница 7: ... the rotor Do not use rotors which show any signs of corrosion and or cracks Do not touch the mechanical components of the rotor and do not make any changes to the mechanical components Use only with rotors which have been properly installed Follow the instructions in section Rotor Installation on page 4 2 Use only with rotors which have been loaded properly Follow the instructions given in the ro...

Страница 8: ...ironment Do not centrifuge inflammable substances Remaining risk Improper use can cause damages contamination and injuries with fatal consequences Do not centrifuge toxic or radioactive materials or any pathogenic micro organisms without suitable safety precautions When centrifuging microbiological samples from the Risk Group II according to the Biosafety Manual of the World Health Organization WH...

Страница 9: ...duction and Description Contents Characteristics of the Heraeus Fresco 17 21 on page 1 2 Technical Data on page 1 3 Directives Standards and Guidelines on page 1 4 Functions and Features on page 1 5 Mains Supply on page 1 5 Rotor Selection on page 1 6 ...

Страница 10: ... speed and RCF or the entry mode These settings can be changed even while the centrifuge is running With the help of the key you can also centrifuge a sample for just a few seconds if called for The Heraeus Fresco 17 21 is equipped with various safety features The housing is made of high impact resistant plastic and the interior of armour steel The lid is equipped with a view port and a lock The l...

Страница 11: ...eraeus Fresco 17 230 V 120 V 100 V 1092 BTU h 1126 BTU h 1126 BTU h IP 20 20 20 Run Time unlimited unlimited unlimited Max Speed nmax 13300 rpm 13300 rpm 13300 rpm Min Speed nmin 300 rpm 300 rpm 300 rpm Maximum RCF Value at nmax 17000 x g 17000 x g 17000 x g Maximum Kinetic Energy 1 90 kNm 1 90 kNm 1 90 kNm Noise Level at maximum Speed 50 dB A 50 dB A 50 dB A Dimensions Height Width Depth 330 mm 2...

Страница 12: ...t Rotor 28 kg 28 kg 28 kg Table 1 2 Technical Data Heraeus Fresco 21 Feature Value Table 1 3 Directives Standards and Guidelines Region Directive Standard Europe 220 230 V 50 60 Hz 230 V 50 60 Hz 98 79 EC In Vitro Diagnostics 2011 65 EU RoHS Directive on the Restriction of the use of certain Hazardous Substances in electrical and electronic equipment Protective golas of 2006 42 EC Machinery 2014 3...

Страница 13: ...ed in the chamber and cannot enter the instrument Drive Induction drive without carbon brushes Keys and Display Easy to clean keypad and display surface Controls Microprocessor controlled Internal Memory Most recent data is saved Functions RCF selection temperature control pretemp Imbalance Recognition Electronic in ventilated centrifuges Door Lock Automatic door closing and locking starting from ...

Страница 14: ...atocrit Rotor 75003473 Art No 75002420 Refrigerant R 134a Quantity 0 26 kg Pressure 21 bar GWP 1430 CO2e 0 37 t Contains fluorinated greenhouse gases in a hermetically sealed system 75002421 R 134a 0 26 kg 21 bar 1430 0 37 t 75002423 R 134a 0 26 kg 0 37 t 75002402 R 134a 0 26 kg 21 bar 1430 0 37 t 75002425 R 134a 0 26 kg 0 37 t 75002426 R 134a 0 26 kg 21 bar 1430 0 37 t 21 bar 1430 21 bar 1430 750...

Страница 15: ...eraeus Fresco 17 21 2 1 2 Before Use Contents Before Setting up on page 2 2 Transporting the Centrifuge on page 2 2 Location on page 2 2 Aligning the Centrifuge on page 2 3 Mains Connection on page 2 3 Storage on page 2 4 ...

Страница 16: ...everal people Always lift the centrifuge at both sides on the bottom plates Figure 2 1 Lifting the centrifuge at both sides The centrifuge can get damaged due to impacts Location The centrifuge should only be operated indoors The set up location must fulfil the following requirements A safety zone of at least 30 cm must be maintained around the centrifuge People and hazardous substances must be ke...

Страница 17: ...r supply switch on the back press 0 2 Plug the centrifuge into grounded electrical sockets only 3 Check whether the cable complies with the safety standards of your country 4 Make sure that the voltage and frequency correspond to the figures on the rating plate Establish the connection to the power supply with the connecting cable CAUTION If the centrifuge is not level imbalances can occur and the...

Страница 18: ... Scientific Storage Before storing the centrifuge and the accessories it must be cleaned and if necessary disinfected and decontaminated Store the centrifuge in a clean dust free location Be sure to place the centrifuge on its feet Avoid direct sunlight ...

Страница 19: ...Thermo Scientific Heraeus Fresco 17 21 3 1 3 Control Panel Contents Control Panel on page 3 2 Keys on page 3 2 ...

Страница 20: ...lease see Mechanical Emergency Door Release on page 6 2 Pulse By pressing the key the centrifuge starts immediately and accelerates up to the end speed Releasing the key initiates a stopping process at the highest braking curves PreTemp By pressing the key you start the pretemp function of the centrifuge By pressing the key up and down you change the value in the display If you hold the key presse...

Страница 21: ...r Opening on page 4 2 Close Door on page 4 2 Rotor Installation on page 4 2 Entering Parameters on page 4 4 Centrifugation on page 4 8 Short term Centrifugation on page 4 8 Removing the Rotor on page 4 9 Aerosol tight Rotors on page 4 9 Audible Alarm on page 4 9 Turning off the Centrifuge on page 4 10 ...

Страница 22: ...on The approved rotors for the Heraeus Fresco 17 21 are listed in section Rotor Selection on page 1 6 Use only the rotors and accessories from this list in the centrifuge Proceed as follows 1 Open the door of the centrifuge and if necessary remove any dust foreign objects or residue from the chamber Thread and o ring must be clean and undamaged Note Use the emergency release only for malfunctions ...

Страница 23: ...le clockwise Hold the rotor with the other hand into position 5 Close the rotor 6 Check if the rotor is properly installed by lifting it slightly on the handle CAUTION Do not install the rotor when the temperature difference between shaft and rotor lock is 20 C Otherwise the rotor might jam during the installation A jammed rotor can lead to damages of centrifuge and rotor a b CAUTION Do not force ...

Страница 24: ... modes WARNING Check for any damage to the rotor Damaged rotors must not be used Keep the centrifuge spindle area of the rotor clear of objects CAUTION Check that the rotor is properly locked on the centrifuge spindle before each use by pulling it at its handle Fasten the rotor if necessary Be sure to check all sealings before starting any aerosol tight applications See the information in the roto...

Страница 25: ... to a minimum of 300rpm The maximum speed depends on the centrifuge variant Note The RCF value can be set to a minimum of 100 x g The maximum speed depends on the centrifuge variant The displayed RCF value is always corresponding to the maximum of centrifuge radius of the 24 x 1 5 2 0 mL Rotor 75003424 Refer to the Explanation of RCF Value on page 4 5 and the rotor manual for further information E...

Страница 26: ...entrifuge will continue running until you stop it manually with the key Pre selecting the Temperature You can determine the sample temperature in C Proceed as follows 1 Enter the desired value by pressing the key under the right display repeatedly until the desired value shows You increase or decrease the temperature in steps of 1 C 2 Press the key to confirm the pre selected value If you do not p...

Страница 27: ...until the desired value shows You increase or decrease the temperature in steps of 1 C 3 Press the key The rotor will be operated at optimal speed Changing the settings during the run You can change the settings during the run as follows 1 Press one of the three keys in the control panel The current value will switch into the pre selecting value mode 2 Enter the new value as described above Note W...

Страница 28: ... Program With preset Run Time If the run time has been pre selected and all you have to do is to wait until the centrifuge terminates the run automatically As soon as the speed drops to zero the message END will appear in the display By pressing the key you can open the door and remove the centrifuge material You can also stop the centrifuging program manually at any time by pressing the key Conti...

Страница 29: ...s Aerosol tight Rotors When using an aerosol tight lid the rotor can be removed with the lid closed This is to protect you and the samples Audible Alarm Error Accompanying all error messages a warning signal is given out Press any key to silence the warning signal End of Run By default there is an acoustic signal at the end of any centrifugation run To switch off this signal proceed as follows Pre...

Страница 30: ...is turned on or off 5 Press the key to confirm the pre selected value Turning off the Centrifuge 1 To turn off the centrifuge put the mains switch to 0 Note The centrifuge is equipped with a special switch for balancing potential voltage discrepancies in the power grid After pressing the mains switch the display therefore may still flash up to 10 seconds ...

Страница 31: ... Fresco 17 21 5 1 5 Maintenance and Care Contents Cleaning Intervals on page 5 2 Cleaning on page 5 2 Disinfection on page 5 4 Decontamination on page 5 5 Autoclaving on page 5 5 Service of Thermo Fisher Scientific on page 5 6 ...

Страница 32: ...50 C since higher temperatures could damage the material and shorten the lifetime of the parts Use only disinfectants with a pH of 6 8 Dry aluminum parts off with a soft cloth After cleaning treat the entire surface of aluminum parts with corrosion protection oil 70009824 Also treat the cavities with oil Store the aluminum parts at room temperature or in a cold storage room with the cavities point...

Страница 33: ...h oil After some applications there might be ice in the rotor chamber Let the ice melt and drain it off Clean the rotor chamber as described above Cleaning Filter Unit Refrigerated centrifuges have a filter unit to protect the cooling device 1 Pull the centrifuge to the edge of the table 2 Pull the clip below the sucking grid and remove the filter unit completely by pulling it down 3 Remove the cu...

Страница 34: ... the disinfectant Adhere strictly to the given application times 7 Be sure the disinfectant can drain off the rotor 8 Rinse the rotor and accessories thoroughly with water 9 Dispose of the disinfectant according to the applicable guidelines 10 Dry all of the rotors and accessories after cleaning with a cloth or in a warm air cabinet at a maximum temperature of 50 C 11 After cleaning treat the enti...

Страница 35: ...all of the rotors and accessories after cleaning with a cloth or in a warm air cabinet at a maximum temperature of 50 C 11 After cleaning treat the entire surface of aluminum parts with corrosion protection oil 70009824 Also treat the cavities with oil Autoclaving 1 Before autoclaving clean rotor and accessories and described above 2 Place the rotor on a flat surface Rotors and adapter can be auto...

Страница 36: ...Fisher Scientific offers inspection and service contracts for this work Any necessary repairs are performed for free during the warranty period and afterwards for a charge This is only valid if the centrifuge has only been mainained by a Thermo Fisher Scientific service technician Shipping and Deposing of Accessories CAUTION Never exceed the permitted temperature and duration when autoclaving If t...

Страница 37: ...Thermo Scientific Heraeus Fresco 17 21 6 1 6 Troubleshooting Contents Mechanical Emergency Door Release on page 6 2 Troubleshooting by User on page 6 3 When to contact Service Technician on page 6 5 ...

Страница 38: ... The braking process lasts much longer than usual Proceed as follows 1 Make sure the rotor has stopped view port in the lid 2 Pull out the power supply plug 3 Insert a 3 inch long wire e g a staple into the hole above the control panel 4 Press the centrifuge door down gently Push the wire further into the hole until you hear and feel the door latch unlocking 5 Remove the wire from the hole and ope...

Страница 39: ... lit 2 If this is unsuccessful you may open the centrifuge door using the mechanical emergency door release Mechanical Emergency Door Release on page 6 2 Exceptionally running noise Imbalance 1 Stop the centrifuge Press the key or unplug mains power cord 2 Wait until the centrifuge comes to a complete stop 3 Check whether the rotor is properly loaded Check whether a broken tube damage to the rotor...

Страница 40: ...again inform Customer Service E 29 Motor does not start Motor or rotor blocked 1 Switch instrument off and on again using the mains switch 2 Open the centrifuge door 3 Check whether the rotor can turn freely If an error message appears again inform Customer Service E 31 Rotor stops without deceleration to standstill or does not start Overtemperature in the motor 1 Turn instrument off and unplug ma...

Страница 41: ...not be operated Internal program error Switch the instrument off and on again If an error message appears again inform Customer Service E 60 Rotor stops with deceleration Insufficient temperature in the refrigeration unit 1 Stop the centrifugation run 2 Open the centrifuge door and defrost the chamber Never touch the chamber directly with your hands you may freeze up 3 After approx 60 minutes you ...

Страница 42: ... S Aluminum Chloride U U S S S S U S S S S M S S S S S S S S S M U U S S Formic Acid 100 S M U U U S M U U S S U S U S U Ammonium Acetate S S U S S S S S S S S S S U S S S S S S S S S S Ammonium Carbonate M S U S S S S S S S S S S S U U S S S S S S M S S S Ammonium Hydroxide 10 U U S U S S M S S S S S S U M S S S S S S S S S M S Ammoniumhydroxid 28 U U S U S U M S S S S S U S U M S S S S S S S S S...

Страница 43: ...U U Diethylpyrocarbonate S S U S S S S S U S U S U S S S M S S S S S S Dimethylsulfoxide S S U U S S S S U S S U S U U S S U U S S S S U U Dioxane M S U U S S M M S U U S U M U U M M M U S S S S U U Ferric Chloride U U S M S M S S S S M U S S Acetic Acid Glacial S S U U S S U M S U S U U U U U M S U M U S U U S U Acetic Acid 5 S S M S S S M S S S S S M S S S S S S S M S S M S S M Acetic Acid 60 S ...

Страница 44: ...S U M U U U S M M U U U U Potassium Permanganate S S S S S S S S S U S S S M S M S U S S M S U S Calcium Chloride M U S S S S S S S S S S S S M S S S S S S S M S S S Calcium Hypochlorite M U S M M S M S S M S S S S M S M U S S Kerosene S S S S S S U S M U S U M M S M M M S S U S S U S Sodium Chloride 10 S S S S S S S S S S S S S S S S S S M S Iodoacetic Acid U S U S S S S S S S S S S S S S M S Car...

Страница 45: ... S M S S S Oils Petroleum S S S S U S S S S U U M S M U U S S S U S S S S Oils Other S S S M S S S S U S S S S U S S S S S S M S Oleic Acid S U S S S U U S U S S M S S S S S S S S S M U S M M Oxalic Acid U U M S S S U S S S S S U S U S S S S S S S S U M S S Perchloric Acid 10 U U S U U S M M M U M S M M M S U S S Perchloric Acid 70 U U U U U S U M U U M U U U M M U M S U U S U S Phenol 5 U S U S M...

Страница 46: ... U U M Trichloroacetic Acid U U U S S U M S U S U U S M M S S U U S U U U M U Trichloroethane S U M U U S U U U U U U U U U S U S S Trichloroethylene U U U U S U U U U U U U U U S U U S Trisodium Phosphate S M S S S S S S S Tris Buffer neutral pH U S S S S S S S S S S S S S S S S S S S S S S S S S Triton X 100 S S S S S S S S S S S S S S S S S S S S S S S S S Urea S U S S S S S S S M S S S S S S S...

Страница 47: ...r materials under the stress of centrifugation When in doubt we recommend pretesting sample lots Key S Satisfactory M Moderate attack may be satisfactory for use in centrifuge depending on length of exposure speed involved etc Suggest testing under actual conditions of use U Unsatisfactory not recommended Performance unknown suggest testing using sample to avoid loss of valuable material ...

Страница 48: ...tamination 5 5 Deposing 5 6 Description 1 1 Directives 1 4 Disinfection 5 4 E Emergency Door Release 6 2 F Features 1 5 Filter Unit 5 3 Functions 1 5 G Guidelines 1 4 I Intended Use iv Introduction 1 1 K Keys 3 2 L Location 2 2 M Mains Connection 2 3 Mains Supply 1 5 Maintenance 5 1 O Opening 4 2 Operation 4 1 P Parameters 4 4 Precautions v Preface iii R RCF Value 4 5 Removing the Rotor 4 9 Rotor ...

Страница 49: ...Index 2 Heraeus Fresco 17 21 Thermo Scientific T Technical Data 1 3 Transporting 2 2 Troubleshooting 6 1 6 3 Turning off 4 10 ...

Страница 50: ...l products are available in all countries Please consult your local sales represen tative for details Shown pictures within the manual are examples and may differ considering the set parameters and language Pictures of the user interface within the manual are showing the English version as example Italy 39 02 95059 552 Japan 81 3 5826 1616 Korea 82 2 2023 0600 Netherlands 31 76 579 55 55 New Zeala...

Отзывы: