6
Unpacking and Installation
Packing List
Item
Qty
Low Temperature Incubator
1
Instructions
1
Wall Bracket (with screws)
2
Installation
The Low Temperature Incubator should be installed on a
level, stable floor. Use the adjustable feet to level the
incubator. Locate the unit so that there is at least 3 inch-
es of clearance around the sides, top and back to ensure
sufficient ventilation. To prevent heat build up within the
unit, do not install it where it will be exposed to strong
sunlight, nor near radiators, furnaces, or other sources of
heat. Do not install the incubator where flammable or
corrosive atmospheres may exist.
The Low Temperature Incubator is not to be used out-of-
doors or where excessive moisture or contamination
could cause degrading of mechanical or electrical com-
ponents.
1. Unbolt and remove the wooden slats under-
neath unit.
2. Remove all protective tape from doors and
shelves.
3. Clean interior and exterior with warm soap and
water. Shipping tape residue can be removed
using isopropyl alcohol.
4. Uncoil line cord from rear of unit. Connect the
plug to a power outlet that complies with the
electrical requirements specified on the unit's
label and with proper safety ground connection.
If line cord replacement is necessary, use CSA
types: SJ, SJO or SJT, 16 GA, 3 cond. or
equivalent.
Note
If damage is observed, keep the
shipment intact (including the carton
and all packing material) and file a
claim with the final carrier. Remove
shipping box by cutting bands that
attach box to pallet then lift box off.
Note
When cooling is enabled, heat is dis-
sipated on sides of unit resulting in
side temperatures that are warm but
not hazardous.
Содержание 3554-35A
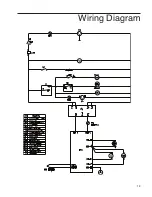
Страница 19: ...19 Wiring Diagram ...
Страница 21: ...21 ...
Страница 22: ...22 ...
Страница 23: ...23 ...


