background image

11

12

User's Maunal

S

H

A

R

K

S

H

A

R

K

Chapter4  Other

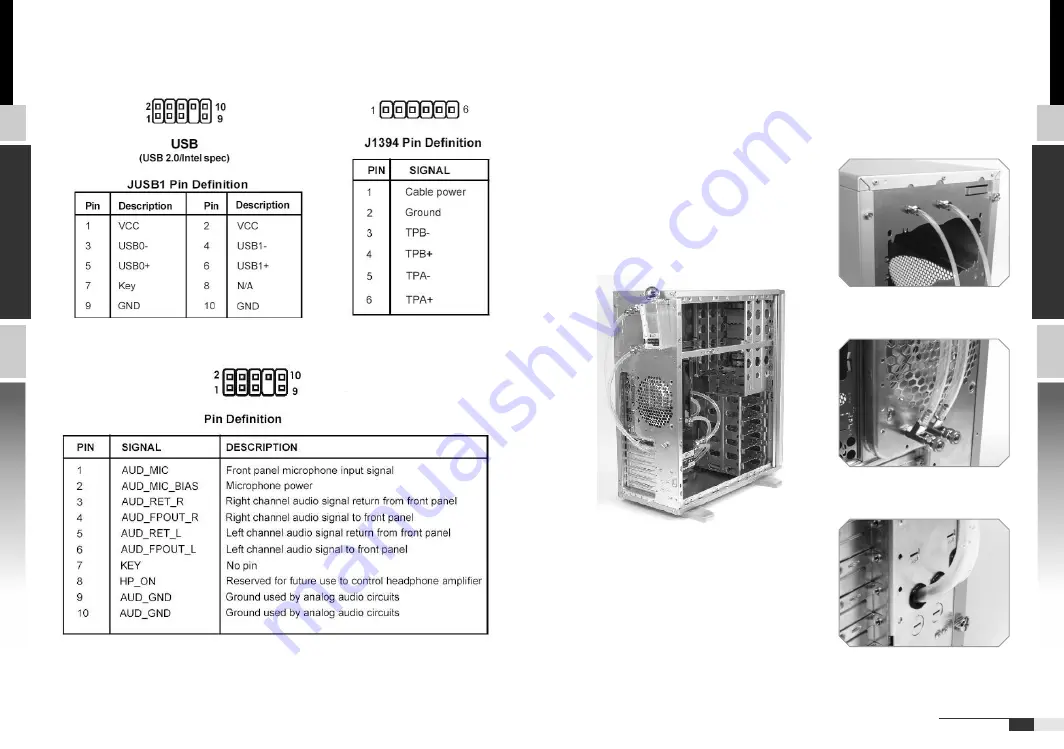
The pictures displaying below is for users to know that holes are 
made to the chassis for the installing of water-cooling system.  
It can be used for other brands of water-cooling system as well.


3.2 Front I/O pin definition

4.1 Fits all Tt liquid Cooling system

Содержание Shark

Страница 1: ...User s Manual User s Manual C 2004 Thermaltake TechnologyCo Ltd All Rights Reserved www thermaltake com ...

Страница 2: ...ice 5 2 4 Installing Internal 3 5 Device 6 2 5 Installing External 3 5 Device 7 Chapter3 Motherboard Leads Installation 3 1 Case LED connections 10 3 2 Front I O pin definition 11 Chapter4 Other 12 TM 4 2 Silent Purepower power supply optional 13 Contents 1 2 Features 2 2 6 PCI slot tool free function operation 8 2 7 Motherboard Installation 9 4 1 Fits all Tt liquid Cooling system ...

Страница 3: ...ycomb See through side panel ØRemovable motherboard tray ØDual 12 cm fans in front rear ØFits Tt liquid cooling system performance radiator with 12 cm fan or any other specific brands ØSee through side panel with EMI shield ØSecurity lock in front bezel and side panel ØRetractable foot stand Ø Features Dual USB2 0 IEEE1394 Firewire audio speaker ports USB 1394 Firewire Net Weight Full Tower Case T...

Страница 4: ...lock the side panel turn the key clockwise shown in the picture 2 2 Front door lock operation Insert the provided key and turn it clockwise Chapter2 Case Mechanical Operation 2 1 How to open the side panel 1 Push side panel lever to the direction shown in the picture Then swing the panel outward to remove 2 ...

Страница 5: ...ht corner and swinging outward 1 Insert the railed device into the 5 25 drive bay then slide it along the fixed positioning rack inside the 5 25 cage 4 1 2 After removing the bezel drive rails will be located behind the bezel just removed 2 Mount two drive rails onto the side of 5 25 device Be sure the tab from the rail angles out away and faces toward the front of the device 3 Mount your HDD or o...

Страница 6: ...the plastic clip then take off the PCI bracket as follow u Squeeze tab and pull external 3 5 device cage out Remove bezel v Mount 3 5 device into the cage and fasten device in the case by screws w Slide the cage into drive bay till the fixed postition 2 5 Installing 3 5 External Device ...

Страница 7: ... to your M B at the PLED POWER SW connects to the PWR connector on the motherboard H D D LED connects to the 2 pin labeled HDD LED connector RESET SW connects to the RSW connector on the motherboard SPEAKER connects to the SPK connector on the motherboard 3 1 Case LED connections Chapter3 Leads connection 2 7 Motherboard Installation Unscrew the thumbscrews on the tray and remove it 1 Slide the mo...

Страница 8: ...he pictures displaying below is for users to know that holes are made to the chassis for the installing of water cooling system It can be used for other brands of water cooling system as well 3 2 Front I O pin definition 4 1 Fits all Tt liquid Cooling system ...

Страница 9: ...put cycled on off under high temperature condition Furthermore it has been approved by UL CSA TUV VDE NODIC CB FCC CE CNS 4 Over current protection 3 Over voltage protection Under voltage protection 2 Short circuit protection on all output 1 Over thermal protection at 100 C 105 C TM The functions can assure the Silent Purepower meet the balance in TM noise control and heat exhausted The Silent Pur...

Отзывы: