Thames & Kosmos SUPERSPHERE Скачать руководство пользователя страница 9

7

DOWNLOAD AND INSTALL THE APP

You can download the free 

Super Sphere app for iOS 

devices from the iOS App Store, or for Android devices 
from 

Google Play. The app, also referred to as the control 

app, allows you to remotely control and program your 
robots. 

For specific device requirements, see the Information 
section in the Super Sphere app’s download page. 

To get the app:

1.  Turn on your tablet or smartphone.

2.  Scan the QR code to the right to take you to the product 

page for this kit (or search for the “Super Sphere 
Robotics app”).

3.  On the product page, scroll down until you see the 

images of the app icons and the links to the app pages in 
the app stores. Follow the links for the correct app store 
based on your device.

4.   Follow the steps on the app download page to 

download and install the app on your device.

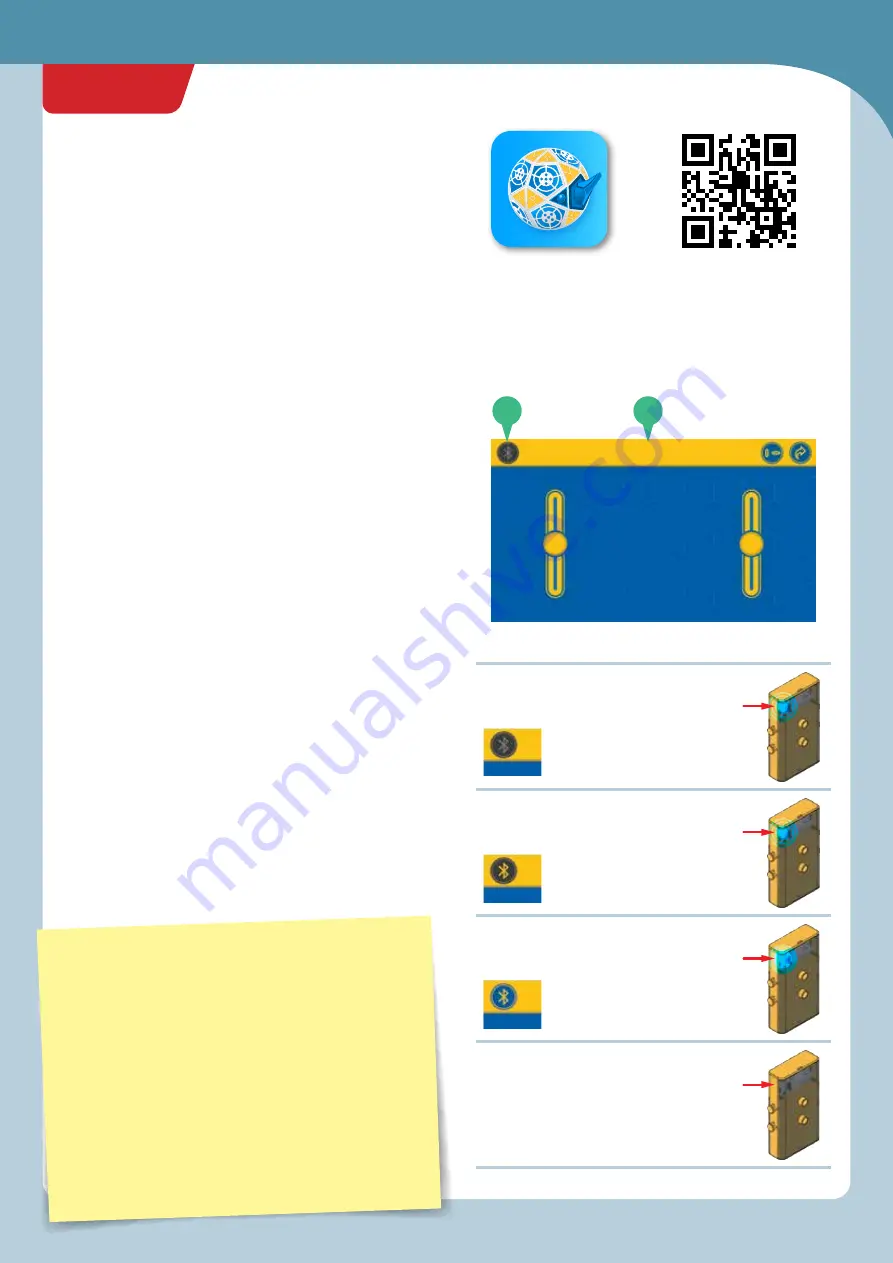
5.  Open the app and the interface for 

remote control mode 

(A) will appear. 

ESTABLISHING A CONNECTION

1.  Connect the app to your robot’s Bluetooth battery box 

by pressing the 

Bluetooth button (B) in the upper left 

corner of the app screen.

2.  When the connection has been made, the Bluetooth 

symbol will change color, the 

blue light on the battery 

box will change from blinking to solid, and, if a motor is 
connected, the motor will drive for a brief moment to 
indicate the connection has been made. See the chart to 
the right for descriptions of each connection state.

Scan this QR code to go 

to the product page, 

where there are links to 
download the app from 

the app stores.

APP SETUP

Super Sphere

Blue light on 

baery box: 
Blinking

Bluetooth icon in app: 
Gray with blinking ring

Bluetooth not connected

Blue light on 
baery box: 
Blinking

Bluetooth icon in app: 
Blinking yellow

App searching for Bluetooth connection

Blue light on 
baery box: 
On and not 
blinking

Bluetooth icon in app: 
Solid yellow with blue circle

Bluetooth connected

Blue light on 
baery box: 
Off

• No Bluetooth connection
• Power-saving mode
• Automatically sleeps after 
about a minute of inactivity
• Jiggle it to wake it up

Bluetooth baery box sleeping

TROUBLESHOOTING THE CONNECTION

If the Bluetooth connection isn’t working:

›››  

Make sure the batteries are fully charged a

nd the 

Bluetooth battery box is awake (the blue l

ight is blinking).

›››  

Make sure Bluetooth is enabled on your d

evice and 

location services are enabled for the Supe

r Sphere app.

›››  

Try restarting the app or the device.

›››  

If the blue light on the battery box is solid b

ut there is no 

Bluetooth connection, quit the app and w

ait for the blue 

light to start blinking again. Then restart t

he app.

›››  

Try removing and reinserting the batterie

s to reset the 

battery box.

A

B

Getting Started

Содержание SUPERSPHERE

Страница 1: ...7 70184 Stuttgart Germany 49 0 711 2191 0 www kosmos de Thames Kosmos 89 Ship St Providence RI 02903 USA 1 800 587 2872 www thamesandkosmos com Thames Kosmos UK LP 20 Stone Street Cranbrook Kent TN17...

Страница 2: ...n tested and meets FCC RF exposure guidelines when used with an accessory that contains no metal and that positions the device a minimum of 5 mm from the body Use of other accessories may not ensure c...

Страница 3: ...4 150 mm axle black 1 7026 W10 P1D 25 Short anchor pin black 20 7344 W10 C2D 26 Long anchor pin gray 10 7061 W10 C1S 27 Connector pin pink 11 1187 W10 E1K 28 Joint pin blue 10 7413 W10 T1B 29 Long joi...

Страница 4: ...tiple gear wheels installed in a row In order for the models to work well these gears will have to mesh well Otherwise the force from one gear wheel won t be properly transferred to the next G Inserti...

Страница 5: ...mbo Wheel Bot 25 Programming the Jumbo Wheel Bot 28 Bigfoot Bot 29 Programming the Bigfoot Bot 34 Penguin Bot 35 Programming the Penguin Bot 41 Dancing Bot 42 Programming the Dancing Bot 46 Horseshoe...

Страница 6: ...map terrain climb mountains entertain people cook dinner the list goes on and on With this kit you can build robots that move in fascinating ways including a spherical robot that can roll in any direc...

Страница 7: ...started with the Super Sphere We suggest you read and follow the instructions in this manual in order But here is an overview of the instructions for building and using the Super Sphere to get you or...

Страница 8: ...an program your robots to perform different actions depending on how many claps one to four it detects ABOUT THE SUPER SPHERE S MOVEMENT The primary robot model in this kit the Super Sphere moves in a...

Страница 9: ...otor is connected the motor will drive for a brief moment to indicate the connection has been made See the chart to the right for descriptions of each connection state Scan this QR code to go to the p...

Страница 10: ...e left hand slider controls the forward and backward motion and the right hand slider controls the left and right motion However if you tap the slider orientation button D the right hand slider toggle...

Страница 11: ...mands H notes sound commands I and rest pause commands J Each command is set to run for a certain amount of time zero to five seconds in the program K You can tap a command block to edit it as long as...

Страница 12: ...program you have written press the down arrow button P The program script will immediately be saved inside the program you are currently in A confirmation screen will appear REVERT TO SAVED To revert...

Страница 13: ...a command to that sequence 4 The commands menu C pops up You can select between three types of commands Choose motors to add motor commands Choose notes to add sound commands Choose rest to add a paus...

Страница 14: ...nge the direction See the bottom of page 8 for more information 3 With the time slider E you can also set the duration for which the motor s will turn from 0 to 5 0 seconds 4 When you are satisfied wi...

Страница 15: ...and icon and the rest programming window L appears You can choose the duration 0 to 5 seconds of the pause in the program Press the green check mark button and the rest block M is added to the program...

Страница 16: ...gramming page immediately after these assembly instructions to run a program for this model Please read the driving tips on pages 22 and 23 1 2 5 6 8 7 10 9 3 12 14 15 16 17 18 20 22 25 26 27 28 19 29...

Страница 17: ...le Part 2 with side hole Part 2 9 10 6 7 8 11 12 15 Super Sphere 10 7 Subassembly Subassembly Make sure the batteries are already inserted into the battery box See page 2 Pay attention to the orientat...

Страница 18: ...otor A motor B motor A motor B motor A motor B If there are gaps the rod on the bottom may hit the inside of the sphere in the finished model Make sure there are no gaps between the bottom parts here...

Страница 19: ...ht or else the controls in the app will be switched Attach the wires to the battery box The indented lines on the plugs should be facing left when the battery box is oriented in this direction Rotate...

Страница 20: ...HERE Do this step two times The blue pentagon in the middle is Subassembly 21 Pay attention to the alignment of the black anchor pins in the blue pentagon and the blue triangle For tips on connecting...

Страница 21: ...Back 23 24 19 Super Sphere Pay attention to the alignment of the blue gear attached to the blue pentagon and the blue triangle The blue pentagon in the middle is Subassembly 23...

Страница 22: ...ly with the small gray gear and that the gears mesh when you attach the shell to the inner assembly Line up the eyes on both sides of the sphere To attach the two halves of the sphere together start b...

Страница 23: ...how to drive the Super Sphere To ensure that the sphere is strong and stable while rolling on the floor make sure that all of the joints between the shell pieces are securely connected Spherical shell...

Страница 24: ...hand slider motor B left or right to make the Super Sphere turn left or right respectively NOTE If your model moves in the opposite direction from how it should you need to reverse the direction in wh...

Страница 25: ...ch will work better on it It works best if you use it in a big open area It turns better when it is already rolling rather than when it is stationary Make sure the weights aren t hitting the bottom of...

Страница 26: ...3 Claps Spin around left and right 4 Claps Create your own program 24 Spherical Robots There are many types of spherical robots or ball shaped robots Writers engineers and inventors have imagined and...

Страница 27: ...x2 x2 x14 x2 x1 x18 x2 x2 x1 x1 x2 26 x2 First follow these assembly instructions to build the model Then you can use the model in remote control mode or you can follow the instructions on the program...

Страница 28: ...JUMBO WHEEL BOT x2 9 X 2 x2 7 8 9 10 26 JUMBO WHEEL BOT Wheels done Fold and connect the shell pieces at the joints...

Страница 29: ...ke sure you plug the wire from motor B into the socket on the left and the wire from motor A into the socket on the right or else the controls in the app will be switched The indented lines on the plu...

Страница 30: ...e slower 2 Claps Drive in an S shaped curve 3 Claps Create your own program 4 Claps Create your own program Gigantic Wheels Many trucks and industrial vehicles have huge wheels like your Jumbo Wheel B...

Страница 31: ...x2 x15 x6 x4 x6 x1 x2 x2 x1 x18 x4 x1 x1 x1 x2 30 mm axle 30 mm axle x4 70 mm axle First follow these assembly instructions to build the model Then you can use the model in remote control mode or you...

Страница 32: ...8 8 7 30 30 mm axle BIGFOOT BOT 9 10 11 Make sure the rods are aligned Make sure the rods are parallel to one another and perpendicular to the rods on the other side...

Страница 33: ...18 12 13 14 15 16 17 31 Bigfoot Bot x4 x2...

Страница 34: ...19 20 19 32 x2 BIGFOOT BOT Feetdone Fold and connect the shell pieces at the joints...

Страница 35: ...t and the wire from motor A into the socket on the right or else the controls in the app will be switched The indented line on the motor B plug should be on the right side when the battery box is orie...

Страница 36: ...t to walk on legs is more complicated than designing one that rolls on wheels The ability for various animals humans included to walk on legs is actually quite a feat of nature Robot engineers often l...

Страница 37: ...irst follow these assembly instructions to build the model Then you can use the model in remote control mode or you can follow the instructions on the programming page immediately after these assembly...

Страница 38: ...e x2 30 mm axle 12 gear A gear B Wing assembly Neck assembly 9 10 11 12 13 14 15 16 Make sure the middle holes are aligned Make sure the motor is positioned vertically Rotate gear A and make sure gear...

Страница 39: ...23 Make sure you plug the wire from motor B into the socket on the top as pictured here and the wire from motor A into the socket on the bottom or else the controls in the app will be switched The in...

Страница 40: ...38 PENGUIN BOT 24 25 26 27 Head assemblydone Tip You can connect the orange curved rods together first and then pass the assembly through the holes in the shell Side view Backbody assembly done...

Страница 41: ...39 Front body Back body Penguin Bot 28 29 Side view Side view Frontbodyassemblydone...

Страница 42: ...40 PENGUIN BOT 31 x2 motor A motor B Done 30...

Страница 43: ...etics is a term used to describe the imitation of things from the natural world for the purposes of performing tasks or solving problems Humans take inspiration from the structures and materials of th...

Страница 44: ...x2 x1 x3 x3 x2 x2 x2 x1 x2 x1 x3 x3 x1 x14 x6 x5 x3 x1 x1 x2 x1 x18 x5 x2 x1 x1 x2 5 2 3 4 1 First follow these assembly instructions to build the model Then you can use the model in remote control m...

Страница 45: ...43 30 mm axle 30 mm axle 6 7 8 9 10 11 12 Dancing Bot Front view...

Страница 46: ...44 13 x2 13 14 DANCING BOT Wheels done Fold and connect the shell pieces at the joints...

Страница 47: ...e you plug the wire from motor B into the socket on the left and the wire from motor A into the socket on the right or else the controls in the app will be switched The indented lines on the plugs sho...

Страница 48: ...g Robots Have you ever seen a robot dance Or have you ever seen someone do the dance move called the robot Robot engineers have been inspired by dancers and dancers have been inspired by robots for a...

Страница 49: ...e 30 mm axle 30 mm axle 30 mm axle 30 mm axle 1 2 4 3 First follow these assembly instructions to build the model Then you can use the model in remote control mode or you can follow the instructions o...

Страница 50: ...48 30 mm axle x2 5 9 10 11 6 7 8 HORSESHOE CRAB BOT...

Страница 51: ...plug the wire from motor B into the socket on the right as pictured here and the wire from motor A into the socket on the left or else the controls in the app will be switched The indented lines on t...

Страница 52: ...50 15 16 14 HORSESHOE CRAB BOT...

Страница 53: ...51 Horseshoe Crab Bot 18 19 17 Shelldone...

Страница 54: ...52 20 motor A motor B Done HORSESHOE CRAB BOT...

Страница 55: ...program Exoskeletons and Geodesic Domes A horseshoe crab is a marine animal with a hard dome like shell covering its whole body It is very well protected from above which is part of the reason why th...

Страница 56: ...2 x2 x2 x1 x16 x10 x1 x1 x1 35 mm axle 35 mm axle back 30 mm axles x2 1 5 6 2 3 4 First follow these assembly instructions to build the model Then you can use the model in remote control mode or you c...

Страница 57: ...55 Cornhole Bot 9 10 7 8...

Страница 58: ...56 CORNHOLE BOT 11 12...

Страница 59: ...4 Make sure you plug the wire from motor B into the socket on the bottom as pictured here and the wire from motor A into the socket on the top or else the controls in the app will be switched The inde...

Страница 60: ...into the hole PROGRAM 7 1 Clap Go forward go backward go forward go backward go forward go backward 2 Claps Drive in an S shaped curve 3 Claps More challenging moving target 4 Claps Create your own p...

Страница 61: ...s shown here Note They are all completely enclosed no sides are left open The solutions are on the next page Triangle Tetrahedron Four pointed 3D Star Rocket ship Sphere Teardrop Pentagon GEOMETRIC SH...

Страница 62: ...fold and link the joint Solutions 60 GEOMETRIC SHAPES LESSON 1 2 3 4 5 x4...

Страница 63: ...phics and Packaging Dan Freitas Manual design concept Manual illustrations Genius Toy Taiwan Co Ltd Taichung Taiwan R O C and Thames Kosmos Manual photos p 4 top center soccer robot Maxisport fotolia...

Страница 64: ...620384 03 190620...

Отзывы: