background image

6.


Ensure the wheelchair is fully open (see wheelchair manufacturer’s handbook).  Adjust the position of the 

clamps so that they are directly opposite each other and the crossbar is at right angles to the wheelchair 

frame.  Now lightly tighten the clamp retaining bolts with the allen key provided.  


7.


Compress the crossbar and remove from the wheelchair.  Now hold the Powerpack so that the wheel is 

making contact with the ground and the crossbar housing is pointing away from you.  Keeping the crossbar 

hand wheel to the left, insert the crossbar into the crossbar housing tube at the front of the motor. 
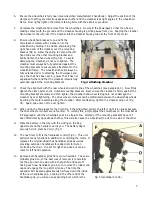
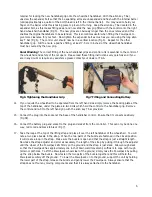
 

8.


Ensure wheelchair brakes are on and fit the 
Powerpack complete with crossbar on to the 

wheelchair by holding it in position and placing the 

right hand end of the crossbar over the mounting 

bracket (Fig 4).  Allow the spring to extend the left 

hand tube over the other mounting bracket and 

lightly tighten the hand wheel (Fig 3E).  To avoid 
damaging the crossbar, do not over tighten.  The 

crossbar must always be fully extended against the 

mounting brackets to ensure safe attachment to the 

wheelchair frame.  The wheelchair should always be 

fully extended prior to attaching the Powerpack and 

once the chair has been sat in, ensure that it has not 
expanded further and that the crossbar remains fully 

extended against the mounting brackets.   

      Fig 4  Attaching Crossbar
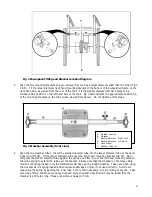
 

9.


Check the alignment with the rear wheels and centre line of the wheelchair (see paragraph 3).  Now firmly 

tighten the clamp bolts on the crossbar mounting brackets.  Next ensure the crossbar is firmly against the 

mounting bracket shoulders and then tighten the crossbar hand wheel taking care not to damage the 
crossbar by over tightening.  The drive wheel or wheels can be centralized between the wheelchair wheels 

by sliding the motor assembly along the crossbar.  After centralising, tighten the crossbar wing nut (Fig 

3F).  Again, take care not to over tighten. 


10.


When using the Powerpack for the first time, if the wheelchair pulls to the left or right it is usually because 

the drive wheel or wheels are not central.  To remedy this, simply adjust the Powerpack on the crossbar as 
in Paragraph 9 until the wheelchair pulls in a straight line.  Similarly, if the mounting brackets have not 

been fitted directly opposite each other, this will also cause the wheelchair to pull to one side or the other. 
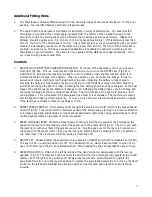
 

11.


Place the battery in the tray with the writing on the bag 

uppermost and the handle towards you.  The battery bag is 
securely held in place by Velcro (Fig 7).     
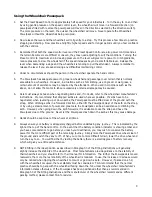
 

12.


The next item to fit is the handlebar control (Fig 5).  This unit 

performs many functions in addition to controlling the motor.  I

replaces the original wheelchair handlebar grips as well as 

providing extension handlebars for added comfort when 
controlling the chair.  It is set for right hand use but can be 

reset for left hand operation.   


13.


Remove both handlebar grips from your wheelchair.  These are 

probably glued on, so the best way of removal is to carefully 

cut the grip down one side with a sharp knife and peel off.  
Taking each new handlebar grip in turn, remove the rubber end 

caps and engage the long 4mm allen key T bar into the 

expander bolt located approximately half way down the inside 

of the new handlebar grip.  Looking in the other end of the 

handlebar grip, you will see an expanding bolt, which is the  

Fig 5  Handlebar Control  


5

Содержание Powerpack 4 Series

Страница 1: ...air Powerpack Series 4 Designed and made in Britain the TGA Powerpack is the most technically advanced easiest to fit and simplest to use Powerpack ever Operating Instructions and Owners Handbook All Models 1 ...

Страница 2: ...rs 5 Remove Powerpack from box first then remove battery Do not remove both together in case the battery slips causing damage or personal injury 6 Check to ensure you have all contents as listed below Fig 1 Powerpack with lifting strap Battery in bag complete with leads Battery Charger Crossbar Mounting brackets left hand and right hand Right hand handgrip with control Left hand handgrip Allen key...

Страница 3: ...metimes be even more difficult We strongly recommend the fitting of attendant controlled brakes to your wheelchair if moderately steep or long slopes are likely to be negotiated 16 Your batteries will need to be cycled charged and discharged between 10 and 15 times before they will give their maximum performance and range See battery charging Range is also dependant on various other factors such a...

Страница 4: ...el F Crossbar Wing nut 5 Take the two crossbar tubes Insert the smaller diameter tube into the larger diameter tube at the hand wheel end Fig 3E Fit the larger diameter tube over the right hand mounting bracket Fig 3C Now compress the smaller diameter tube against the spring and offer it up to the left hand mounting bracket Allow the spring to extend the tube over the bracket Please note that the ...

Страница 5: ...ing bracket shoulders and then tighten the crossbar hand wheel taking care not to damage the crossbar by over tightening The drive wheel or wheels can be centralized between the wheelchair wheels by sliding the motor assembly along the crossbar After centralising tighten the crossbar wing nut Fig 3F Again take care not to over tighten 10 When using the Powerpack for the first time if the wheelchai...

Страница 6: ...be operated from the left hand side simply remove the backing plate at the top of the handlebar under the plate are two bolts which hold the control to the handlebar grip Remove the control and re fit to the left hand grip with the allen key T bar provided 15 Connect the plug into the socket at the base of the handlebar control Ensure that it connects positively Fig 5E 16 Connect the battery plug ...

Страница 7: ...arge and should be recharged at the very earliest opportunity The third function of the light is to provide a fault code indication This will operate if the Powerpack has a fault or is overloaded The machine will cutout and the light with flash a certain sequence To re set switch off wait a few seconds and switch on again If the fault has not cleared contact your dealer or TGA 2 PRESET SPEED CONTR...

Страница 8: ...gotiated when reversing up or down kerbs the Powerpack must be lifted clear of the ground with the strap When climbing kerbs in a forwards direction either lift the Powerpack clear of the kerb on the strap or by using a small amount of power and great care the Powerpack can be an assistance to climbing the kerb However when going down the kerb forwards it is advisable to use the strap and have the...

Страница 9: ...our carrier prior to departure NB Each carrier reserves the right to carry what may be termed as hazardous cargo TGA cannot be responsible for their final decision Battery Charging 1 Always use the charger supplied with the Wheelchair Powerpack It is designed for use with the battery supplied and any other charger may be dangerous to use or cause damage to the battery In addition alternative charg...

Страница 10: ... is cycled for the first 10 15 charges This means run it down as much as you safely can in use and then give it a full charge Your battery will not work at its best until this process has been carried out Care Warning Do not allow charger to get wet or use in the rain Do not smoke or use a naked flame while your batteries are being charged Do not use the charger if it has received a sharp blow bee...

Страница 11: ...nted TGA will not be responsible for defects caused by abuse in return transit vandalism misuse abuse accident negligence alteration or misuse caused by non observance of instructions set out in the Operator s Manual This warranty does not cover commercial or rental use of the Powerpack or any use other than normal Returns are only accepted when the product is shipped in the original carton with o...

Страница 12: ...TGA Electric Leisure Ltd Woodhall Business Park Sudbury Suffolk CO10 1WH T 01787 882244 F 01787 882248 sales tga electric com www tga electric com JULY 2008 12 ...

Отзывы: