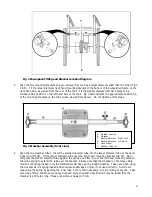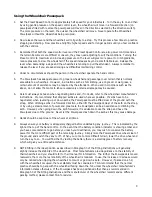
Fig 2 Powerpack Fitting and Bracket Location Diagram
4.
Take the two mounting brackets and you will see that one has a larger diameter shaft than the other (Fig 3
C & D). Fit the larger diameter right hand mounting bracket to the bottom of the wheelchair frame on the
right hand side, as viewed from the rear of the chair. Fit the smaller diameter left hand bracket in a
corresponding position on the left hand side of the chair. Fig 2 demonstrates the approximate positioning
of the mounting brackets on the chair (when viewed from above). Do not tighten at this stage.
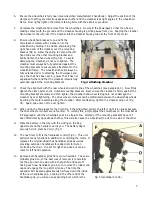
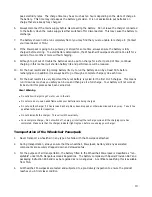
Fig 3 Crossbar Assembly (front view)
A.
Crossbar Housing
B.
Crossbar
C.
Mounting Bracket – Right Hand
D.
Mounting Bracket – Left Hand
E.
Hand Wheel
F.
Crossbar Wing nut
5.
Take the two crossbar tubes. Insert the smaller diameter tube into the larger diameter tube at the hand
wheel end (Fig 3E). Fit the larger diameter tube over the right hand mounting bracket (Fig 3C). Now
compress the smaller diameter tube against the spring and offer it up to the left hand mounting bracket.
Allow the spring to extend the tube over the bracket. Please note that the crossbar on the Heavy Duty
model is not spring loaded, only the standard model has a spring loaded crossbar. Take care when using
the crossbar as it is spring loaded and could cause damage or injury if not used correctly. Avoid over
tensioning the spring by pushing the inner tube in more than necessary. Avoid pointing at anyone. Take
care when fitting. NB On some heavy duty and some specialist wheelchairs it may be found that the
crossbar is a little too long. Please consult your dealer or TGA.
4


