background image

25

24

PRIMAVERA 

- Wireless weather station 

PRIMAVERA 

- Wireless weather station 

• With the hanging hole at the back of the outdoor transmitter, the transmitter can be

wall mounted at the respective location. Choose a shady and dry position for the out-
door transmitter. (Direct sunshine falsifies the measurement and continuous humidity
strains the electronic components needlessly). 

• Check the transmission of the signal from the outdoor transmitter to the base station

(transmission range of up to 60 m free field). Within ferro-concrete rooms (basements,
superstructures), the received signal is naturally weakened. 

• If necessary choose another position for the outdoor transmitter and/or receiver.

13. Care and maintenance

• Clean the devices with a soft damp cloth. Do not use solvents or scouring agents. 
• Remove the batteries and pull out the power adapter of the socket, if you do not use

the products for a long period of time.

• Store the devices in a dry place.

13.1 Battery replacement

• Change the batteries of the outdoor transmitter, when the battery symbol appears on

the display of the outdoor values. 

• Change the batteries of the base station, when the battery symbol appears on the dis-

play of the indoor values. 

Please note

: When the batteries are changed, the contact between outdoor transmitter

and base station must be restored – so always insert new batteries into both devices
or start a manual transmitter search.

14. Troubleshooting

Problems

Solution

No indication at the base station

Operation with mains adapter:

➜ 

Connect the base station to mains adapter

➜ 

Activate backlight permanently

➜ 

Control the power adapter

Operation with batteries:

Ensure that the batteries polarity are correct 

Press any button to activate the backlight 
briefly

Change the batteries

No DCF reception

Press and hold the +/RCC button for three 
seconds and start the initialization manually

Wait for attempted reception during the night

Choose another place for your product 

Manual setting of the clock 

Check if there is any source of interference

Restart the base station according to the 
manual 

10.2 Setting of the temperature unit

• In the normal mode you can change between °C (Celsius) or °F (Fahrenheit) as tem-

perature unit.

• Press the -/°C/°F button.

10.3 Heat index

• The heat index is the temperature perception in conjunction with humidity. 
• Press the HEAT/DEW button in normal mode, to show the current heat index temperature.
• HEATINDEX and the temperature appear on the display.
• The indoor and outdoor humidity values disappear.
• The display automatically switches back to the current display of temperature and

humidity.

10.4 Dew point

• The interdependency of temperature and relative humidity is expressed by means of

the dew-point: 
If the air is cooled continuously at constant absolute humidity, then the relative humid-
ity will steadily increase up to a maximum of 100%. If the air is cooled further, then the
excess water vapour is separated out in the form of water droplets.

• Press the HEAT/DEW button, to show the current dew point.
• DEWPOINT and the temperature appear on the display. 
• The indoor and outdoor humidity values disappear.
• The display automatically switches back to the current display of temperature and

humidity. 

11. Additional outdoor transmitters

• For having more than one additional outdoor transmitter select with the 1/2/3 switch in

the battery compartment of the outdoor transmitter for each single outdoor transmitter
a different channel. The reception of the new transmitter will be transmitted automati-
cally to the base station. Press and hold the CH button on the base station or restart
the base station according to the manual. 

• The outdoor values will be shown on the display of the base station. If you have

installed more than one outdoor transmitter, press the CH button on the base station to
change between the channels 1 to 3. 

• You can also choose an alternating channel display. After the third channel, press the

CH button again, AUTO appears for an alternating channel.

• Press the CH button again to deactivate the alternating channel and the first outdoor

transmitter will be shown permanently.

• Once registered outdoor transmitters (channels), which are no longer needed, can be

deleted manually by pressing the CH button for three seconds. Once a new outdoor
transmitter is received, there will be another indicator.

12. Positioning and fixing of base station and the outdoor transmitter

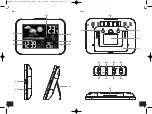
• With the foldable leg at the back of the base station, the base station can be placed

onto any flat surface or wall mounted at the respective location by the hanging holes at
the back of the unit. Avoid the vicinity of any interfering field like computer monitors or
TV sets and solid metal objects.

TFA_No. 35.1136_Anleitung_04_20  09.04.2020  14:08 Uhr  Seite 13

Содержание 35.1136

Страница 1: ...Bedienungsanleitung Instruction manual Mode d emploi Instrucciones de uso Gebruiksaanwijzing Istruzioni per l uso Kat Nr 35 1136 TFA_No 35 1136_Anleitung_04_20 09 04 2020 14 08 Uhr Seite 1...

Страница 2: ...3 2 Fig 1 Fig 2 RCC C 1 C 1 C 2 C 3 B 1 RCC B 2 B 3 B 4 B 5 B 6 B 7 B 8 B 9 B 1 A 1 A 5 A 4 A 7 A 6 A 2 A 3 C 4 C 5 C 3 TFA_No 35 1136_Anleitung_04_20 09 04 2020 14 08 Uhr Seite 2...

Страница 3: ...zteil Au ensender Kat Nr 30 3215 02 Bedienungsanleitung 3 Einsatzbereich und alle Vorteile Ihres neuen Ger tes auf einen Blick Au entemperatur und Luftfeuchtigkeit ber kabellosen Au ensender 433 MHz R...

Страница 4: ...n nicht richtig einsch tzen k nnen Ziehen Sie sofort den Stecker aus der Steckdose wenn eine St rung auftritt oder das Ger t f r l ngere Zeit nicht benutzt wird Verwenden Sie ausschlie lich das mitgel...

Страница 5: ...gen Sie in den Schnelllauf 7 1 Manuelle Einstellungen Halten Sie die SET Taste im Normalmodus f r zwei Sekunden gedr ckt um in den Ein stellmodus zu gelangen 6 2 Einlegen der Batterien in den Au ensen...

Страница 6: ...omatisch um Mitternacht zur ckgesetzt Dr cken Sie die MAX MIN Taste im Normalmodus MAX erscheint auf dem Display Die dauerhafte Hintergrundbeleuchtung schaltet sich automatisch an TIME ZONE und 0 Vore...

Страница 7: ...n Achtung Bei einem Batteriewechsel muss der Kontakt zwischen Au ensender und Basisstation wiederhergestellt werden also immer beide Ger te neu in Betrieb nehmen oder manuelle Au ensendersuche starten...

Страница 8: ...bereich Au en Temperatur 40 C 60 C 40 F 140 F Luftfeuchtigkeit 1 99 Reichweite ca 60 m Freifeld bertragungsfrequenz 433 MHz Maximale Sendeleistung 10mW 14 Fehlerbeseitigung Problem L sung Keine Anzeig...

Страница 9: ...and heat index Radio controlled clock with weekday and date Alarm and snooze function Colour display 4 For your safety This product is exclusively intended for the field of application described abov...

Страница 10: ...not fully appreci ate the potential risks of handling electrical equipment Pull out the plug of the socket immediately if any fault occurs or if the device is not used for a long period of time Only u...

Страница 11: ...lt will be flashing on the display Press the RCC or C F button to make the time zone correction Press the SET button again TIME appears on the display 6 2 Inserting the batteries in the outdoor transm...

Страница 12: ...MIN button for two seconds while the maximum or minimum values are displayed to clear the recorded readings The setting sequence is shown as follows 12 or 24 hours system 24H default the hours the min...

Страница 13: ...eption in conjunction with humidity Press the HEAT DEW button in normal mode to show the current heat index temperature HEATINDEX and the temperature appear on the display The indoor and outdoor humid...

Страница 14: ...outdoor transmitter is installed outdoor transmitter Check batteries of external transmitter Indication do not use rechargeable batteries for channel 1 2 3 Restart the outdoor transmitter and the base...

Страница 15: ...osants et touches 5 1 Station de base r cepteur Affichage Fig 1 A1 Pr visions m t o par symboles A2 Temp rature et humidit ext rieures A3 Symbole pour l ext rieur avec num ro de canal Nous vous remerc...

Страница 16: ...o En cas de r ception correcte apr s 2 12 minutes l heure radio et le symbole de r cep tion DCF apparaissent en continu sur l cran L clairage de fond permanent s allume automatiquement Vous pouvez gal...

Страница 17: ...abouti aucun symbole aucun r ception r glage manuel de l heure Si votre horloge radio pilot e ne peut pas recevoir le signal DCF par exemple en cas de perturbations d une distance de transmission exce...

Страница 18: ...c s sera limin e sous forme de gouttelettes Lorsque l heure de r veil fix e est atteinte le r veil commence sonner Le symbole d alarme clignote Appuyez sur une touche de votre choix pour teindre l ala...

Страница 19: ...ise en compte automatiquement par la station de base Mainte nez la touche CH sur la station de base ou d marrez une nouvelle installation de la sta tion de base selon l instruction Les valeurs ext rie...

Страница 20: ...Mannheim HRA 570186 04 20 Modifiez la distance entre l metteur et la station de base liminez les sources de parasitage Indication incorrecte Changez les piles 15 Traitement des d chets Ce produit a t...

Страница 21: ...i d acqua ma non impermeabile Cercare un luogo ombreggiato e al riparo dalla pioggia per il trasmettitore 5 Componenti e tasti 5 1 Stazione base ricevitore Display Fig 1 A1 Previsioni del tempo con si...

Страница 22: ...il tasto RCC Il simbolo della ricezione del segnale DCF lampeggia La retroilluminazione continua si spegne automaticamente Interrompere l operazione di ricezione tenendo premuto il tasto RCC per tre...

Страница 23: ...ualizzati sul display Nel caso in cui l orologio non riesca a ricevere il segnale DCF a causa di guasti della distanza di trasmissione ecc l ora pu essere impostata manualmente L orologio funziona com...

Страница 24: ...e anche un cambio canale automatico Dopo canale 3 in caso di ulteriore pressione del tasto CH viene visualizzato AUTO per il cambio automatico di canale 7 3 Retroilluminazione Attenzione La retroillum...

Страница 25: ...go una nuova visualizzazione 12 Posizionamento della stazione base e fissaggio del trasmettitore Con il supporto pieghevole situato nella parte posteriore possibile disporre la stazio ne base in posiz...

Страница 26: ...pparecchio etichettato in conformit alla Direttiva UE sullo smalti mento delle apparecchiature elettriche ed elettroniche WEEE Questo prodotto non deve essere smaltito insieme ai rifiuti domestici Il...

Страница 27: ...s uit voor de buitenzender 5 Onderdelen en toetsen 5 1 Basisapparaat ontvanger Display Fig 1 A1 Weersverwachting met symbolen A2 Buitentemperatuur en luchtvochtigheid A3 Symbool voor buiten met kanaal...

Страница 28: ...De permanente achtergrondverlichting schakelt zich automatisch uit U kunt de ontvangstpoging onderbreken door de RCC toets ingedrukt te houden Het DCF ontvangstsymbool verdwijnt Het DCF signaalontvan...

Страница 29: ...De DCF ontvangsymbool verdwijnt en de klok werkt dan als een gewone kwartsklok zie Manuele instellingen 6 3 1 Aanwijzing voor de ontvangst van het zendergestuurde tijdsignaal De tijdbasis voor de zen...

Страница 30: ...basisapparaat ingedrukt of start het basisapparaat opnieuw volgens de handleiding Inbedrijfstelling Het alarmsymbool verdwijnt of verschijnt Druk op de SET toets om naar de normaalmodus terug te keren...

Страница 31: ...de eerste buitenzender verschijnt permanent op het display Reeds geregistreerde buitenzenders kanalen de niet meer worden gebruikt kunt u handmatig wissen door de CH toets drie seconden ingedrukt te h...

Страница 32: ...gooid Als consument bent u wettelijk verplicht om gebruikte batterijen en accu s bij uw dealer af te geven of naar de daarvoor bestemde containers volgens de nationale of lokale bepalingen te brengen...

Страница 33: ...ia para el emisor 5 Componentes y teclas 5 1 Estaci n base receptor Indicaci n de pantalla Fig 1 A1 Previsi n meteorol gica con s mbolos A2 Temperatura y humedad exterior A3 S mbolo para emisor exteri...

Страница 34: ...lada por radio y el s mbolo de recepci n DCF constantemente en la panta lla La iluminaci n de fondo se activa permanentemente Puede comenzar la inicializaci n manualmente Mantenga pulsada la tecla RCC...

Страница 35: ...i n est activa se mantiene la recepci n con xito ning n s mbolo ninguna recepci n de DCF ajustar la hora manualmente Si su reloj radiocontrolado no es capaz de recibir la se al DCF p ej debido a inter...

Страница 36: ...en la estaci n base o inicie un nuevo fun cionamiento de la estaci n base de acuerdo con la instrucci n 7 2 1 Activar y desactivar la funci n de la alarma Pulse la tecla ALARM en el modo normal ALARM...

Страница 37: ...necesarios puede borrar manualmente manteniendo pulsada la tecla CH durante tres segundos Cuando se reci be un nuevo emisor exterior aparece una nueva indicaci n 12 Instalaci n y fijaci n de la estac...

Страница 38: ...materiales y componentes de m xima calidad que pueden ser reciclados y reutilizados Las pilas y bater as no pueden desecharse en ning n caso junto con la basu ra dom stica Como consumidor est obligado...

Страница 39: ...77 76 Fig 1 Fig 2 RCC C 1 C 1 C 2 C 3 B 1 RCC B 2 B 3 B 4 B 5 B 6 B 7 B 8 B 9 B 1 A 1 A 5 A 4 A 7 A 6 A 2 A 3 C 4 C 5 C 3 TFA_No 35 1136_Anleitung_04_20 09 04 2020 14 09 Uhr Seite 39...

Страница 40: ...g sunny ensoleill soleggiato zonnig soleado teilweise bew lkt partly cloudy l g rement nuageux parzialmente nuvoloso halfbewolkt parcialmente nubloso bedeckt cloudy couvert coperto bewolkt cubierto Re...

Отзывы: