GASOLINE UTILITY VEHICLES
Page 21
Owner’s Manual and Service Guide
Read all of manual to become thoroughly familiar with this vehicle. Pay particular attention to all Notes, Cautions and Warnings
LIGHT BULB REPLACEMENT
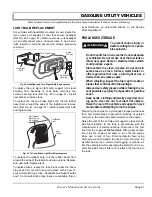
For vehicles with headlights mounted in cowl, locate the
two screws on backside of cowl that secure headlight
(Ref Fig. 40 on page 21). Remove screws, pull headlight
out and disconnect wires. Connect wires to new head-
light, install in cowl and secure with screws previously
removed.
To replace the turn signal light bulb, support turn signal
housing from backside of cowl while removing two
screws securing lens (Ref Fig. 40 on page 21). Install
new bulb and replace lens.
To replace the tail and brake light bulb, roll the rubber
bezel from around the edge of the taillight and remove
lens (Ref Fig. 41 on page 21). Install replacement bulb
and replace lens.
To replace the taillight bulb, roll the rubber bezel from
around the edge of the taillight and remove lens. Replace
with new bulb. Replace lens.
To replace fuses, locate the fuse block under the driver
side seat. Pull out old fuse and replace with a new 15
amp automotive type fuse. Headlight and taillight bulbs
and 15 amp automotive type fuses are available from a
local distributor, an authorized Branch or the Service
Parts Department.
PROLONGED STORAGE
To prevent serious injury or
death resulting from a possi-
ble explosion:
Do not handle fuel in an area that is not adequate-
ly ventilated. Do not smoke near the fuel tank or
refuel near open flame or electrical items which
could produce a spark.
Store vehicle in a clean, dry area. Do not store in
same area as a stove, furnace, water heater, or
other appliance that uses a pilot light or has a
device that can create a spark.
When refueling, inspect the fuel cap for leaks or
breaks that could result in fuel spillage.
Always wear safety glasses while refueling to pre-
vent possible eye injury from gasoline or gasoline
vapor.
Keep hands, clothing and jewelry away from mov-
ing parts. Use care not to contact hot objects.
Raise the rear of the vehicle and support on jack
stands before attempting to run the engine.
Preparing the engine for a prolonged storage period calls
for a few simple steps to prevent a build up of varnish
and gum in the carburetor and corrosion in the engine.
Raise the rear of the vehicle and support on jack stands.
Add fuel stabilizer to the tank in accordance with the
manufacturer’s recommendations. Disconnect the fuel
line from the engine at the fuel tank. With proper ventila-
tion, start the engine and allow to run until the engine
stops due to lack of fuel. Drain carburetor bowl using
drain screw and re-tighten the drain screw. Remove the
air filter and spray a commercial fogging or cylinder oil
into the carburetor while operating the starter for 2-3 sec-
onds. Reinstall the air filter and re-attach the fuel line to
the tank.
Fig. 40 Headlight and Turn Signal Bulb Replacement
Fig. 41 Tail and Brake Light Bulb Replacement
Headlight
Bulb
Turn Signal Lens
Turn Signal
Housing
Inside
of Cowl
Rear
Fender
Tail/Brake
Light
Roll Rubber
Bezel Away
From Body
!
!
Содержание Jacobsen 3500
Страница 1: ...GASOLINE POWERED UTILITY VEHICLE ISSUED APRIL 2005 OWNER S MANUAL AND SERVICE GUIDE 28835 G01...
Страница 6: ...Page iv NOTES Owner s Manual and Service Guide...
Страница 10: ...Page vi Owner s Manual and Service Guide TABLE OF CONTENTS...
Страница 14: ...Owner s Manual and Service Guide SAFETY INFORMATION Page x Notes...
Страница 43: ...Page 25 GENERAL SPECIFICATIONS Owner s Manual and Service Guide GENERAL SPECIFICATIONS...
Страница 47: ...Page 29 Owner s Manual and Service Guide VEHICLE WARRANTIES VEHICLE WARRANTIES...
Страница 50: ...Page 32 Owner s Manual and Service Guide VEHICLE WARRANTIES...
Страница 54: ...Page 36 Owner s Manual and Service Guide VEHICLE WARRANTIES CALIFORNIA 2004...


