53
SHB MPE850 Rev A | 409135 |
12
8 Servicearbeiten in der Werkstatt
8.6 Zündkerzen prüfen
►
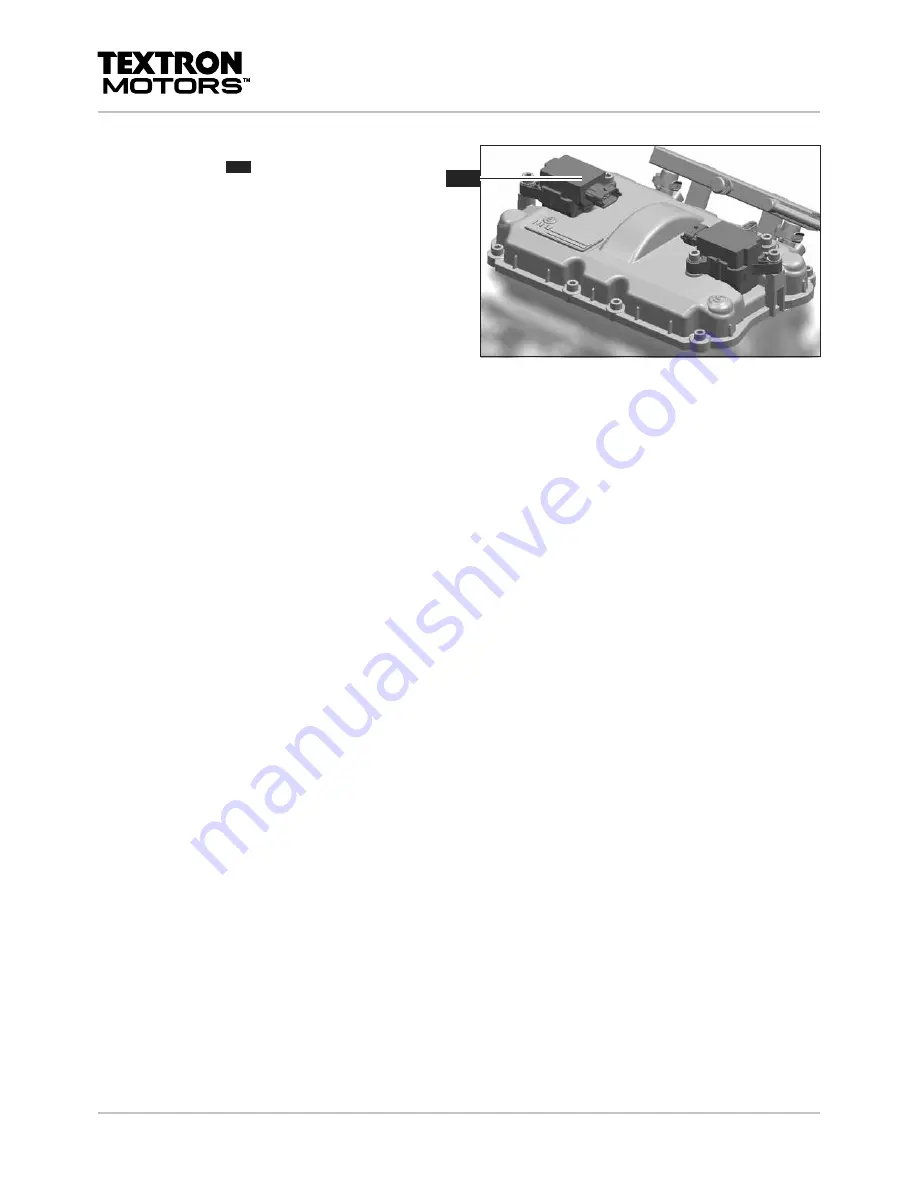
Connect the wire harness connectors to the
ignition coils
.
Test-drive the vehicle.
Страница 1: ...5 MPE 850 OFF ROAD 409135 I2 846 UTV NA 80 This service manual is valid for the following engine models Read this service manual thoroughly before operating the engine for the first time SERVICE MANUA...
Страница 2: ......
Страница 3: ...to make continual improvements as part of the ongoing technical development of its products All documentation is therefore subject to technical modifications Reprints and translations in whole or in p...
Страница 4: ...3 8 Technical specifications 17 3 9 Supported vehicle equipment 18 3 9 1 Lights in vehicle 18 4 Operation 20 4 1 Service intervals 20 4 2 Operation during the break in period 21 4 3 Operating engine 2...
Страница 5: ...gine oil and oil filter 36 8 4 Checking and adjusting valve lash 39 8 4 1 Checking valve lash 39 8 4 2 Adjusting valve lash with valve adjustment kit 43 8 4 3 Adjusting valve lash without special tool...
Страница 6: ...that all persons using the vehicle have access to this service manual If you sell the vehicle always pass on this service manual to the new owner The latest version of the servicew manual is availabl...
Страница 7: ...the information in this service manual Accident prevention Environmental protection Handling of hazardous materials Personal safety equipment Traffic laws 2 Safety 2 1 Meaning of safety alert symbol...
Страница 8: ...alfunctions to a qualified workshop All the components in your engine have been carefully tested and fulfill strict quality and safety requirements Textron Motors offers spare parts to the highest qua...
Страница 9: ...ids immediately Fuel is highly flammable Vapors may ignite and cause an explosion Do not smoke in the vicinity of the engine and do not allow open flames or sparks near the engine or the fuel system A...
Страница 10: ...th numbers are important in questions regarding your engine 3 1 Intended use 3 Description 3 1 Intended use 3 2 Identification Engine model I2 846 UTV NA 80 The label with the part number and the seri...
Страница 11: ...tane Observe that using of fuel with minimum requirements can cause loss of power and or increased fuel consumption 91 ROZ or 82 5 MOZ USA Regular 87 Permissible share of ethanol NOTICE A greater conc...
Страница 12: ...action and they may lose their effectiveness The suggested coolant additives are laboratory tested for compatibility If you use another coolant additive verify the compatibility previously BASF Glysan...
Страница 13: ...t 2 2nd cylinder Fuel supply 3 Throttle body 4 Air intake Intake Manifold 5 Intake side Engine oil oil tank to engine 6 Engine oil engine to oil tank 7 The intake manifold is not shown in the figure O...
Страница 14: ...15 13 12 11 14 3 Description 3 6 Engine components and information Permanent vent coolant circuit 11 Exhaust ports 12 Exhaust side Engine rotation direction 13 Stub shaft 14 Power take off Crankcase...
Страница 15: ...are required See chapter 3 9 1 Lights in vehicle Coolant temperature 115 C The temperature warning light and the malfunction indicator light illuminate at the same time The engine power is reduced to...
Страница 16: ...ft control lever is in reverse gear 6000 min 1 rpm Overtemperature coolant Speed limitations are active for the following malfunctions 5000 min 1 rpm Synchronization fault of sensors camshaft cranksha...
Страница 17: ...ngine speed limit min 1 rpm Idle speed min 1 rpm Fuel system Sequential multipoint manifold injection Lubrication system Dry sump Cooling system Closed coolant circuit and open sea water cooling circu...
Страница 18: ...s after the engine is started until the required oil pressure is achieved NOTICE Serious engine damage due to insufficient lubrication If the oil pressure light remains on after starting the engine th...
Страница 19: ...aking cooling system Immediately inspect the cause and repair possible faults by a qualified workshop All Textron Motors authorized workshops are qualified to repair your engine If the expansion tank...
Страница 20: ...nowledge of this engine These service tasks must be performed in a qualified workshop All Textron Motors authorized workshops are qualified to service your engine All activities are described in chapt...
Страница 21: ...ed first minutes until the engine is warm Observe the following guidance to achieve optimal break in Avoid engine speeds over 6000 min 1 rpm long periods of idle operation long periods of operation at...
Страница 22: ...n the MIN marking 3 and the MAX marking 2 NOTICE Overheating damage caused by too low coolant level If coolant level is below the MIN marking follow instructions in Refilling coolant section NOTICE Ov...
Страница 23: ...specific requirements Observe strictly the vehicle manufacturer s documentation Put the shift control lever in neutral position Actuate the brake pedal Turn on ignition and press the starter button o...
Страница 24: ...t the oil level immediately after turning off the engine Remove the oil dipstick 2 and check oil level The oil level must be between the MIN marking 4 and the MAX marking 3 NOTICE Engine damage caused...
Страница 25: ...ngine oil Refill engine oil in small quantities with repeatedly checking The difference between the MIN marking 7 and the MAX marking 6 is approximately 0 5 liter 0 5 qt US engine oil Fill engine oil...
Страница 26: ...scription of the decommissioning it describes only the engine specific requirements Observe strictly the vehicle manufacturer s documentation Actuate the brake pedal Put the shift control lever in par...
Страница 27: ...in storage read the following instructions If you do not intend to operate the engine for 90 days or more prepare the engine for storage See chapter 5 1 Engine storage for more than 90 days Transport...
Страница 28: ...gine for 90 days or more Preparing the engine for storage will prevent the cylinder from corroding and ensure the engine starts again correctly at the end of the storage period Preparation for storage...
Страница 29: ...gine brake pedal is not operated Actuate the brake pedal See chapter 4 3 2 Put the engine into operation The power supply of vehicle is disconnected for safety reasons Depending on equipment of the ve...
Страница 30: ...ngine stalls but can be started again Lack of fuel Fill up fuel See the vehicle manufacturer s documentation The engine stalls and cannot be started again No fuel Fill up fuel See the vehicle manufact...
Страница 31: ...or com for a list of all authorized Textron Motors workshops 7 2 Tools and parts Textron Motors offers a selection of accessories to prepare you for the most important situations Visit your local vehi...
Страница 32: ...icular attention to the safety messages All service tasks require disconnection of the engine from the power supply Starting the engine inadvertently may endanger the safety of persons Read the vehicl...
Страница 33: ...Spark plug Champion RC7PYCBX Feeler gauge 0 05 2 mm Sealing kit valve cover Figure Description Valve adjustment shims in different sizes Serrated lock washer Valve adjustment kit Textron Motors offers...
Страница 34: ...0 05 mm Bar magnet In addition to the service case you will require the following tools and accessories for service tasks The figures are only examples of suitable tools All tools and accessories are...
Страница 35: ...ks Unless otherwise specified use the products as directed by the manufacturer Supplies Recommended products Anti Seize assembly paste for lubricating threaded connections Weicon Anti Seize High Tech...
Страница 36: ...ning of the oil dipstick 2 until the hose reaches the oil tank bottom 3 and pump out as much as possible engine oil from oil tank or The following procedure is the practice with a Textron Motors oil t...
Страница 37: ...the workshop 8 3 Changing engine oil and oil filter The remaining engine oil will be pumped out with the suction pump in the dry sump Disconnect the power supply of the ignition coils and injectors Se...
Страница 38: ...ly of the ignition coils and injectors Check the oil level See chapter 4 3 3 Checking oil level Update the engine control unit calibration See the Textron Motors Diagnostic Tool manual Clear the servi...
Страница 39: ...the camshaft when the engine is started Disconnect the engine from the power supply Disconnect the wire harness connectors from the ignition coils 1 and sensor camshaft 2 8 4 1 Checking valve lash Uns...
Страница 40: ...feeler gauge Required valve lash A Intake side 0 1 0 2 mm B Exhaust side 0 2 0 3 mm If the valve lash of one or more valves is not right continue with chapter 8 4 2 Adjusting valve lash Checking valve...
Страница 41: ...alve lash on the 2nd cylinder Turn the crankshaft in the same direction as the engine rotates until the position of the camshaft is as illustrated See the vehicle manufacturer s documentation The cams...
Страница 42: ...washers 21 and serrated lock washers as illustrated Tightening torque 8 Nm 2 Nm 5 9 lbf ft 1 5 lbf ft Connect the wire harness connectors to the ignition coils 22 and sensor camshaft 23 Update the en...
Страница 43: ...ervice tasks in the workshop 8 4 Checking and adjusting valve lash Adjusting the valve lash on the 2nd cylinder Turn the crankshaft in the same direction as the engine rotates until the position of th...
Страница 44: ...inder head can result in serious damage and cause the crank drive to seize Cover the chain channel 6 Hold the valve adjustment tool 7 in position Screw in the bolts 5 Tightening torque 8 Nm 2 Nm 5 9 l...
Страница 45: ...te 15 slightly using the rocker arm pusher Slide the pin 16 forward by hand Slowly release the rocker arm pusher The valve spring slides the slide plate upwards again 8 Service tasks in the workshop 8...
Страница 46: ...pply Turn the crankshaft in the same direction as the engine rotates until the position of the camshaft is as illustrated See the vehicle manufacturer s documentation The camshaft is marked at the 1st...
Страница 47: ...Engine damage from small components in the engine or cylinder head Operating the engine when there are small components in the crankcase and cylinder head can result in serious damage and cause the cr...
Страница 48: ...circlip 12 is installed Slide in the rocker axle 11 Remove the cover from the chain channel NOTICE Valve breakage due to insufficient valve lash Check the valve lash Continue with chapter 8 4 1 Checki...
Страница 49: ...rness connectors from the ignition coils 1 Unscrew bolts 2 Unplug ignition coils 3 Unscrew the spark plugs 4 using a spark plug wrench Replace the spark plugs Screw in the spark plugs using a spark pl...
Страница 50: ...d lock washers 6 Assemble the bolts 7 washers 8 and serrated lock washers as illustrated Tightening torque 8 Nm 2 Nm 5 9 lbf ft 1 5 lbf ft Connect the wire harness connectors to the ignition coils 9 T...
Страница 51: ...ugs Remove spark plugs with a cold engine Disconnect the wire harness connectors from the ignition coils 1 Unscrew bolts 2 Unplug ignition coils 3 Unscrew the spark plugs 4 using a spark plug wrench 8...
Страница 52: ...arbeiten in der Werkstatt 8 6 Z ndkerzen pr fen Screw in the spark plugs 7 using a spark plug wrench Tightening torque 22 Nm 10 Nm 16 2 lbf ft 7 4 lbf ft If the electrodes 5 are extremely sooty clean...
Страница 53: ...53 SHB MPE850 Rev A 409135 12 8 Servicearbeiten in der Werkstatt 8 6 Z ndkerzen pr fen Connect the wire harness connectors to the ignition coils 12 Test drive the vehicle...
Страница 54: ...tation Drain the coolant with a cold engine Unscrew the expansion tank cover 1 The vehicle manufacturer has provided a drain device See the vehicle manufacturer s documentation Place the drain tray un...
Страница 55: ...the MIN marking 4 wait until the engine has cooled down Refill coolant until the coolant level is between the MIN marking and the MAX marking NOTICE Leaks in the hoses due to increased pressure When t...
Страница 56: ...56 SHB MPE850 Rev A 409135 8 8 Replacing fuel filter See the vehicle manufacturer s documentation 8 Service tasks in the workshop 8 8 Replacing fuel filter...
Страница 57: ...fuel tank Add a fuel stabilizer according to the manufacturer s instructions Check spark plugs See chapter 8 6 Checking spark plugs Spray engine internal preservative into the cylinder through the sp...
Страница 58: ...Rev A 409135 8 10 Disposal When disposing of engine fluids replaced parts or the whole engine always comply with the relevant applicable national laws and guidelines 8 Service tasks in the workshop 8...
Страница 59: ...ur engine was serviced You can use the following documents 9 Confirmation of service tasks Date Work carried out Engine oil and oil filter changed Valve lash checked Spark plugs replaced Coolant chang...
Страница 60: ...ged Valve lash checked Spark plugs replaced Coolant changed Fuel filter replaced Status hours of operation Company seal signature Date Work carried out Engine oil and oil filter changed Valve lash che...
Страница 61: ...61 SHB MPE850 Rev A 409135 Appendix Engine manufacturer Textron Motors GmbH Kautexstra e 52 53229 Bonn Germany www weber motor com Engine manufacturer Appendix Engine manufacturer...
Страница 62: ...ne 10 L Lights vehicle 18 Locating a workshop 31 M Malfunction indicator light 18 Malfunctions 29 Manufacturer engine 61 O Oil filter replace 36 Oil level check 24 Oil pressure light 18 P Part number...