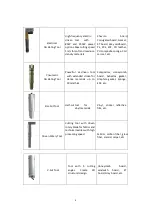
background image


4


Electrical 

Oscillating Tool


High-frequency electric-
driven  tool 

with


80W  and  250W  power 
options. Max cutting speed 
1m/s for soft and medium-
density materials.


Chevron 

board,

Corrugated board, Gasket, 
KT board, Gray cardboard, 
PE,  XPE,  EPE,  PU  leather, 
PU composite sponge, Coil 
car mat, etc.


Pneumatic


Oscillating Tool


Powerful  air-driven  tool 

with extended stroke for 
dense  materials  up  to 
50mm thick.


Composites,  Honeycomb 
board,  Asbestos  gasket, 
Graphite  gasket,  Sponge, 
EPE, etc.


Kiss-Cut Tool


Half-cut tool 

for


vinyl materials.


Vinyl,  sticker,  reflective 
film, etc.


Driven Rotary Tool


Cutting  tool  with  driven 
rotary blade for fabrics and 
technical textiles with high 
processing speed.


Fabrics,  carbon  fiber,  glass 
fiber, aramid, carpet, etc.


V-Cut Tool


Tool  with  5  cutting 
angles. 

Create 

3D 

structural design.


Honeycomb 

board, 

sandwich 

board, 

KT 

board, Gray board, etc.


Содержание XYZ 2517

Страница 1: ...TEXI XYZ 2517...

Страница 2: ...ation 14 3 1 Opening and inspecting packing crates 14 Note 14 Note 14 3 2 Initial leveling of the base frame 15 3 3 Base machine installation 16 3 4 Assembling the workstation 20 3 4 1 Connect the mon...

Страница 3: ...l 35 6 1 5 PRT tool 36 7 Operating 37 7 1 Preparation 37 7 2 Operating 37 7 3 Maintenance 38 7 3 1 Daily Maintenance 38 7 3 2 Weekly Maintenance 39 7 3 3 Monthly Maintenance 41 7 3 4 Quarterly Mainten...

Страница 4: ......

Страница 5: ...Cut Tool Router V Cut Tool Creasing Tool Driven Rotary Tool North Drill Tool Pen User can use bar code scanner to scan the bar codes that created by RIP software 1 3 Working Principles Import the file...

Страница 6: ...50HZ 60HZ Three phase five wire system Air pressure requirement 0 6 0 85MPa Dry compressed air Operating environment Temperature 0 40 Humidity 20 80 RH Storage temperature 20 to 55 C 1 5 Cutting modul...

Страница 7: ...s 3 times s pen Material thickness 50mm North Drill Module Two heads 3 times s head Material thickness 10mm 1 6 Tools Picture Name Feature Materials Tangent Tool Universal Cutting Tool for materials u...

Страница 8: ...r driven tool with extended stroke for dense materials up to 50mm thick Composites Honeycomb board Asbestos gasket Graphite gasket Sponge EPE etc Kiss Cut Tool Half cut tool for vinyl materials Vinyl...

Страница 9: ...carton box making for Corrugated board carton board etc Milling Router Routing tool high performance routing on hard tough materials up 16mm thick with and to Acrylic Di bond aluminium composite MDF...

Страница 10: ...mposite MDF etc Electrical Oscillating Tool EOT3 High frequency electric driven tool with 200W power options Max cutting speed 1m s for soft and medium density materials Chevron board Corrugated board...

Страница 11: ...7 Perforating tool PTK Perforating tool KT board Corrugated cardboard paperboard cardboard etc Universal drawing tool UDT Universal drawing tool Stencils technical labeling labeled paper etc...

Страница 12: ...8 1 7 Circuit boards Board positions in electrical box Board positions on machine 1 8 List of tools Image Description Activity Various Allen keys SW 1 5 to 8...

Страница 13: ...9 Various open ended spanners SW 5 5 19 2x10 various Phillips and slotted screwdrivers screwdriver Ratchet set with bolt nuts and Allen inserts Dial gauge resolution of 0 1 mm To align the table plate...

Страница 14: ...on Activity Holder for dial gauge support Table plate set height Electric drill Side cutters to open the transport locking devices Measuring tape Precision spirit level recommended value 0 05 mm m To...

Страница 15: ...quirements listed in the technical data the installation location is well lit At least 1 meter of space is available all around the cutting system for service and daily operation 2 2 Personnel Make su...

Страница 16: ...its Operating pressure 0 6 MPA Min air flow 0 4 m min Control of Pot tool supply of 1kw Router Value Units Operating pressure 0 8 MPA Min air flow 0 6 m min 2 6 Flooring Space Requirement Machine Dime...

Страница 17: ...13 Without Length Length 2 4m Width Width 2 4m...

Страница 18: ...and without damage 3 2 Initial leveling of the base frame A Lift each side support end to keep the balance by precision spirit level B Determine the lowest position of the foot and use the setscrews...

Страница 19: ...15 M16 x 70mm...

Страница 20: ...16 3 3 Base machine installation Picture 1...

Страница 21: ...17 Picture 2...

Страница 22: ...18 Picture 3 Picture 4...

Страница 23: ...19 Picture 6 Put the beam on the table two ends of the beam correspond the round pins The side with carriage is the front side of the machine Picture 1 Tighten M6X16 4pcs Picture 3 Picture 5...

Страница 24: ...n M5X40 2pcs Picture 5 Tighten M4X6 and M4X16 to install the side cover Picture 6 3 4 Assembling the workstation 3 4 1 Connect the monitor keyboard and mouse 1 Emergency stop button A Install the moni...

Страница 25: ...21 1 Video card 2 Serial card USB 890k A Communication cable to connect the serial card B VID 1 connect to video card...

Страница 26: ...22 3 5 Assemble the Milling support device The total height 2 8 m...

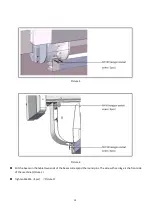
Страница 27: ...23 3 5 1 Connect cables in the milling device support...

Страница 28: ...tube cable 3 AC 220V Power input 6 Milling tool 4 Danger area during initialization 4 1 Danger area on the module carriage Caution Risk of injury on the module carriage The danger area on the module...

Страница 29: ...25 Secure the danger area on the module carriage with protective slot plates 1 Module 2 Danger area Safety distance during initialization is 25 cm 4 2 Safety device on the machine and PC table...

Страница 30: ...5 Power installation and air supply connection Users should prepare two cables and 8mm air tube 1 Vacuum pump three phase four wire electronic control system plug in the power with five wire 2 Machine...

Страница 31: ...27...

Страница 32: ...l the module in the way shown in Picture 7 Make sure the locating slot matches the round pin Picture 8 Take the bottom of the module as shaft rotate the module upward Picture 8 Slot Round pin Front Ba...

Страница 33: ...ule carriage lower the module until it stops approximately 15mm make sure the electrical connection of tool holder and support aligned Picture 9 Picture 10 Important Position the module on the mountin...

Страница 34: ...30 Picture 11 Use the 4 mm Inner hexagon spanner to fix the module in place Picture 11 6 1 Tools installation M5 Screw 6 1 1 Tangenttool Picture 12 Picture 13...

Страница 35: ...ert tangent tool as shown picture12 picture13 The tool holder and a UCT are each marked with a red dot The tool is in the correct position when the dots are aligned Fasten in clockwise direction Pictu...

Страница 36: ...ol Picture 16 Picture 17 Insert the EOT into the module red point on the EOT corresponds the red point on the module Picture 16 and 17 Picture 18 Rotate the clamp clockwise to tight rotate the EOT clo...

Страница 37: ...ut tableting squeeze blade screw two M4 8 bolt picture 20 blade installation is complete note If the cylindrical pin don t get stuck blade it will lead to blade breakage and scarp Picture 21 Picture 2...

Страница 38: ...arts and other issue Oblique knife mount and oblique turret should completely butt picture 24 Picture 25 Picture 26 Use inner hexagon 4th wrench tighten oblique knife mount hex bolts picture 25 obliqu...

Страница 39: ...ed with the red dot on cutting head then insert it into the hole on the head Confirm the big creasing wheel holder into the cutting head in place then tighten the screw on the head with clockwise pic...

Страница 40: ...on cutting head then insert it into the hole on the tool head Confirm the PRT tool holder into the cutting head in place then tighten the screw on the head with clockwise pic 32 Picture 33 Picture 34...

Страница 41: ...ls on the table start the vacuum pump which make the materials adsorping on the table If with the breathable materials need to put the plastic on it Open Digital cutting system import the files DXF or...

Страница 42: ...everything after finishing the jobs Do the dust work clean up the dust and oil in Y guide daily Clean up the water in the regulating valve of air compressors and equipment Do not put the machine in t...

Страница 43: ...l the screws whether in loose condition 7 3 2 Weekly Maintenance In order to absorbing the chips during long working which makes small suction should clean up the pump inlet weekly Check the original...

Страница 44: ...40 Clean the filter of vacuum pump Check the connection of each power line if the necessary 7 3 3 Monthly Maintenance Repair the connections of felt monthly Check the leakage protector...

Страница 45: ...with lubricating oil and all the screws are loose Lubrication method clean the rotating parts with cloth wipe the dirty oil then lubricant in the surface of the part Better with Mobil 1 5W 30 7 3 5 A...

Страница 46: ...cked 3 Check whether there s leakage on the vacuum plate and pipes 3 Materials could not cut though 1 Knife height not enough Increase cutting knife depth 2 Change new blades 3 Check the flatness of t...

Страница 47: ...materials fragments Press the Emergency stop button or switch off the power in case emergency Operators and staffs shall not reach into the danger area when the cutter works In principle any troublesh...

Отзывы: