background image

17


· 

Motiv 5

Po

wer

Mut

e

Main Front Re

ar

Sub

wo

ofer

Ce

ntr

e

Mute

Channel

Select

Reset

Volume

+

Start-up · remote control

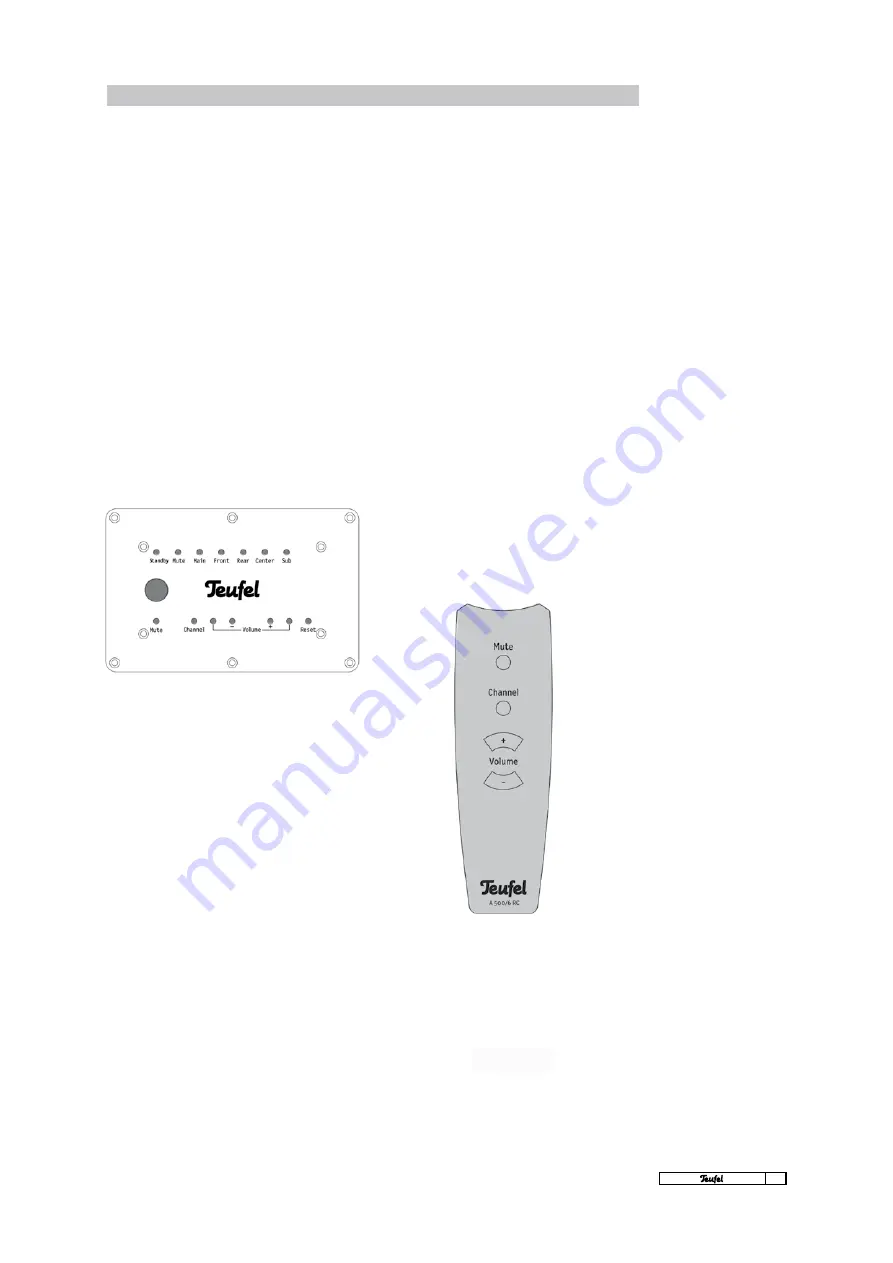
What is shown on the subwoofer display: 

Once the subwoofer has been switched on using
the  rear  main  power  switch,  the  Standby  LED 
lights up red when the system is in Standby mode. 
While the subwoofer is being operated the Stand

-

by LED turns dark. In this case, the LED over the 
word “Main” lights up red. The system is now ready 
for operation.

Mute = all sounds switched off

Main 

=  Master volume

Front  =  Volume of the front speakers
Rear 

=  Volume of the rear speakers

Centre  =  Volume of the centre speakers

Sub 

=  Volume of the subwoofer 

The red LED marks the selected channel for ad

-

justment.

With the exception of Reset, all of the above

described functions can be accessed by the 
remote control.

Please note

If you are going to be away  

for a long period of time or  

if the 5.1 amplifier is not 


being used, switch the mains 

switch 

U

 to “Off”. 

Start-up 

Switch on the 5.1 amplifier by setting the mains 

switch on the rear 

U

 to “On” and set the opera

-

tion mode switch (“Off/Auto/On”) 

Q

 to “Automat-

ic” mode (middle position). If your PC/DVD player 
is switched off or is not sending output to the 5.1 
amplifier, the 5.1 amplifier will be in standby mode. 
The 5.1 amplifier switches on automatically when 
it receives an audio signal. If the signal stops, it 

will  automatically  return  to  standby  mode  af-

ter around twenty minutes. When the operation 

mode  switch 

Q

  is  set  to “On”,  the  5.1  amplifier 

will stay on permanently (regardless of whether a 
programme is running or not). 

Settings on the display 

It is also possible to perform all equalisation set

-

tings on the subwoofer of the Motiv 5 using the 

remote control. The display for the settings is lo

-

cated on the front of the subwoofer. 

The  “Mute”  button  immediately  mutes  the  com

-

plete system; if you press it again, the system re

-

turns  to  its  previous  operating  status.  When  the 
system  has  been  muted,  the  LED  over  the  word 
“Mute”  on  the  front  of  the  subwoofer  lights  up 

continuously in red.

The  “Channel  Selection”  button  scrolls  through 

each  of  the  available  control  areas  of  the  sub-
woofer.

Use  the [+]  and [-]  keys  in  the “Volume”  area  to 
set each required level. During level increases or 
decreases, the adjoining LEDs flash red. Once the 
maximum or minimum level has been reached, the 
respective LED lights up constantly.
You should ensure that all of the speakers gener

-

ate the same level at the listening position. In or

-

der to achieve this, it is best to use a sound level 
meter and the signal generator built into the DVD 
player/AV receiver.

The  level  set  is  automatically  saved  by  the  sub-
woofer.

Press the “Reset” button to reset the system to its 

original factory settings.

Содержание DecoderStation 5

Страница 1: ...gb was here Technical description and operating instructions Motiv 5 Digital...

Страница 2: ...PC multimedia home cinema system with integrated 5 1 amplifier and remote control Technical specifications and operating instructions Motiv 5...

Страница 3: ...quired as the warranty document This warranty is exclusively valid for speakers power amplifiers and electronics that have been purchased from Teufel for private use by end customers The warranty is n...

Страница 4: ...system Page 8 Home cinema system Page 9 Connection Satellites Page 10 5 1 sound card Page 11 DVD player recorder Page 12 Stereo sources Page 13 AV receiver Page 14 Set up DVD player Receiver Decoders...

Страница 5: ...could also result in interference and cau se the sound to be disrupted The electricity supply cable should be laid so that it is not likely to be stepped on or squashed from the sides or above by hea...

Страница 6: ...s and a source of the signal for example via a DVD player with ana logue 5 1 outputs A selection of suitable cables can be found on our website www teufelaudio com in the accessories area Because the...

Страница 7: ...Motiv 5 satellite speakers MO 5 FCR 41 x Motiv 5 remote control A 500 RC incl batteries 45 x U shaped profiles for attaching the satellites to the wall brackets bases 4Screws for mounting speakers 420...

Страница 8: ...ty shielding against interference from other sources with stable gold plated connectors to pro vide secure contact The cable is available in three different lengths so your subwoofer can truly stand w...

Страница 9: ...nt because of different distances and heights can be compensated for in the setting options of the sound card s control software Setting up the Motiv 5 as a PC system When using the Motiv 5 as a PC so...

Страница 10: ...tion area It is important that the centre and main speakers are placed in an even arc possibly slightly curved towards the TV Example set up of a Motiv 5 being used as a home cinema system Imperfect p...

Страница 11: ...e the correct polarity when connect ing the speakers the plus pole of the speaker to the plus pole of the amplifier and the minus pole of the speaker to the minus pole of the ampli fier Connecting the...

Страница 12: ...t connection to any computer If your sound card is set up for 5 1 op eration you will usually find three 3 5mm mini jack outputs Connect the card using three adapters 3 5 mm stereo mini jacks to 2 x c...

Страница 13: ...rder does not have a decoder or six analogue cinch outputs you can still successfully use the Motiv 5 Connect the stereo output of your appliance using a stereo cinch cable with the front input In R L...

Страница 14: ...to the subwoofer via the speaker cable The subwoofer now pro duces a mixed signal for all speakers With this type of connection the four satellites reproduce a stereo signal and the centre and the su...

Страница 15: ...woofer from the front R input via a mono cinch cable to the sub out output on the A V receiver amplifier If the AV receiver amplifier has preamplifier out puts for all channels front R L rear R L cent...

Страница 16: ...onsult the handbook for your DVD player The following basic settings should always be made 4The front centre rear speakers should be defined in the speaker set up menu speaker management bass manageme...

Страница 17: ...kers we recommend 0 For a position near the listening area we recommend 180 If the sub woofer is in a different position the setting at 180 can compensate for reduced bass reproduc tion E Sub bypass s...

Страница 18: ...mode The 5 1 amplifier switches on automatically when it receives an audio signal If the signal stops it will automatically return to standby mode af ter around twenty minutes When the operation mode...

Страница 19: ...s a portable CD player If the subwoofer now plays it could not have been getting the correct signal before Either the cinch cable is defective or the subwoofer output of your source appliance is not g...

Страница 20: ...the Motiv 5 and not a defect As you can set the volume yourself using the volume options on your PC DVD player instead of using the remote control and the equalizer on the subwoofer this critical sett...

Страница 21: ...irectly connected CD player properly the Motiv 5 was not re ceiving the correct signal before Either the cinch cable is defective try exchanging it or the out put of your source appliance is not produ...

Страница 22: ...Decoderstation 5 Technical specifications and operating instructions...

Страница 23: ...he date of purchase with the exception of damage caused by incorrect use or electrical or mechanical over load An original copy of our invoice is required as the warranty document This warranty is onl...

Страница 24: ...unction 8 Front Display Decoderstation 5 8 Back Decoderstation 5 9 Remote control 10 Connection 12 Signal sources with digital and analogue outputs 13 Setting the Decoderstation 5 14 Menu structure 14...

Страница 25: ...e never use different types of batteries together If the batteries leak remove them immediately and wipe away the liquid inside the battery compartment Risk of explosion Ne ver throw batteries in a fi...

Страница 26: ...ur product and provide the best possible support Before contacting us with a question please read these instructions carefully and visit our website at www teufel eu where you can find the answers to...

Страница 27: ...digital output using the optical fibre cable avail able from our online shop Equalisation measuring device The equalisation measu ring device also available from our online shop allows the Decodersta...

Страница 28: ...this type of connection The digital signals are transmitted to the optical or coaxial connections of the Deco derstation 5 Analogue signal sources The Decoderstation 5 also offers ample connec tion o...

Страница 29: ...Q Dial control with push function The dial control is used to select menu items spe cific parameters and to adjust values It controls the overall volume of the system in its default setting The push f...

Страница 30: ...ion 5 has an analogue 5 1 input You can connect the appropriate signal sources e g from a professional computer soundcard here and forward them to the connected sound system TV CD Aux Stereo In You ca...

Страница 31: ...ay of the Decodersta tion 5 You can select the required input using the se lection buttons on the remote control 5 1 Direct selection of the analogue 5 1 signal input on the back of the decoder as inp...

Страница 32: ...he same functions as rotating the control wheel on the Decoderstation 5 OK Pressing this button triggers the same functions as pressing the dial control on the Decodersta tion 5 push function Front L...

Страница 33: ...able 5 1 amplifier system e g multi channel subwoofer with 5 1 input Analogue 5 1 signal source e g profes sional sound card MP3 Player CD player CD recorder Video recorder TV set DAT recorder SAT rec...

Страница 34: ...logue stereo inputs They can be assigned to analogue appliances of your choice for example a stereo sound card an MP3 player a TV set CD player or video recorder etc Either a stereo cinch cable or a 3...

Страница 35: ...ected The availability of the subwoofer entry depends on the speaker size selected Note The display shows arrows during selection If you follow these arrows further choices will be made available Sett...

Страница 36: ...trol This activates a test tone that cycles through all satellites and the subwoofer in sequence First make sure that the left and right front spea kers are set to 0dB You can select the required spea...

Страница 37: ...digital inputs Dolby and DTS encoded formats are recognised by the Decoderstation 5 and the sound configurations are set automatical ly and cannot be changed 3 SPEAKER Selecting speaker configuration...

Страница 38: ...ching value Example Distance to the front speakers 3 5 metres each Distance to the centre box 2 6 metres Subtracting the distances gives the following re sult 3 5 2 6 0 9 metres Therefore the centre s...

Страница 39: ...ands The Decoderstation 5 differentiates between the front speaker pair F in small or large the centre speaker C in small or large the rear or side surround speaker pair R in small or large and a subw...

Страница 40: ...configurati on You are probably using a digital input If a Dolby or DTS signal is being received at this input the Decoderstation 5 will automatically switch to the correct sound configuration No Dolb...

Страница 41: ...have any questions suggestions or if there is anything you think we could do better Lautsprecher Teufel GmbH B lowstra e 66 10783 Berlin Germany Tel 49 30 30 09 30 0 Fax 49 30 30 09 30 30 www teufel e...

Отзывы: