Terex T300-1 Скачать руководство пользователя страница 124

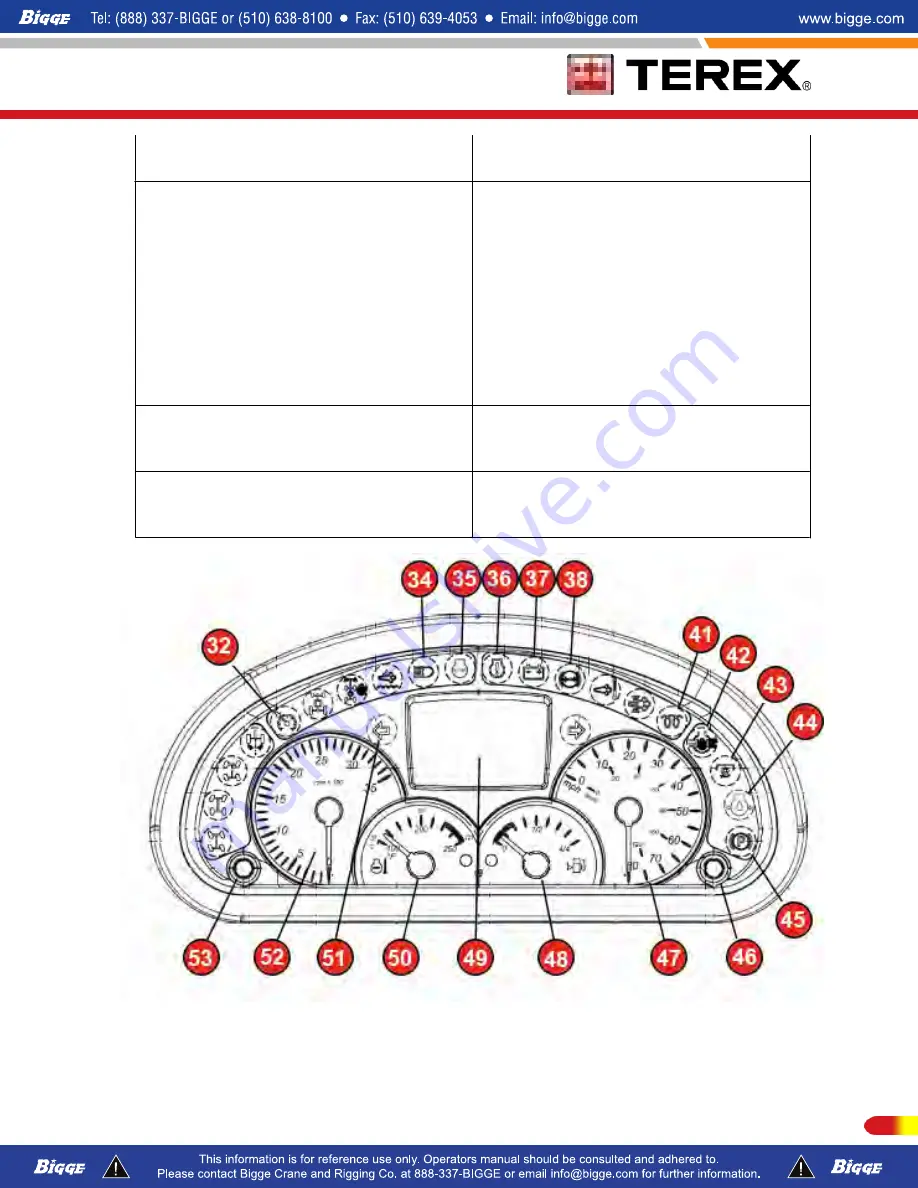
13. PTO AIR VALVE SWITCH-Push up to
engage pumps, push down to disengage.

29. ACCELERATOR PEDAL-Depress to
accelerate.

14. INTER AXLE LOCKOUT VALVE-Lock out
inter-axle differential. Should the machine
become stuck, a spinning whell will receive
all power transmitted by the drivetrain
causing tha wheel to spin faster and worsen
the condition. Use of the lockout divides the
available power between the two axles of
the rear tandem. With the lockout engaged,
the stuck wheel may continue to spin but the
other side of the tandem will begin "driving",
thus

30. BRAKE PEDAL-Depress to actuate.

15. AIR GUAGE (REAR) -indicates air
pressure in rear air tank. Maintain 110 to 115
psi normal system air pressure.

31. CIRCUIT BREAKERS-Electrical circuit
breakers are under this panel.

16. PARKING BRAKE CONTROL VALVE -
Controls parking brakes. Pull to apply, push
to release.


123

P/N 12261-683 REVISED: January 2015

Содержание T300-1

Страница 1: ...T 3 0 0 1 T 5 0 0 1 T 7 8 0 O p e r a t o r sMa n u a l R e v i s e d J a n u a r y 2 0 1 5 1 2 2 6 1 6 8 3 2 0 1 3O N H I G H WA Y E X P O R TT I E R3 O R I G I N A LI N S T R U C T I O N S...

Страница 2: ...8 Ending Crane Operations 49 Turning Driving in Reverse 50 Parking the Vehicle 51 Lock Out Tag Out 52 Access Egress 54 Personal Safety 57 Seat Belts 59 Temperature Effects on Telescope and Boom Hoist...

Страница 3: ...Engine Overview of Operation 164 Fuel Warning 164 Aftertreatment Regeneration Lamp Behaviors 165 Regeneration Modes 168 Manual Regeneration Procedure 169 Operating the Unit 171 Operating the Engine 17...

Страница 4: ...nit Filter 253 Engine Indicator Lamps 258 Aftertreatment Switch 264 Operating Characteristics with Aftertreatment Particulate Filter 265 Engine Indentification 270 Diesel Exhaust Fluid Specification 2...

Страница 5: ...369 Engine Storage 371 Transmission Storage 374 Restoration to Service 375 Restoring Engine to Service 376 Restoring Transmission to Service 377 Chrome Cylinder Rod Storage 378 Specifications 381 WIR...

Страница 6: ...Two Block System 429 Service Parts 433 General Service Information 433 Outrigger Position Sensors 435 Torque Wrench Extensions 437 Welding Instructions 439 Outriggers 441 Rear Suspension 448 Front Axl...

Страница 7: ...ensors 508 Repairs Adjustments Remarks Log 510 Appendix 513 Conversion Tables 513 Average Weight of Materials 517 Torque Specs SAE Metric 519 California Proposition 65 Warning 521 Lead Warning State o...

Страница 8: ...ppropriate information and training to those people who are to operate maintain and supervise the use of equipment in a proper and safe manner Construction and industrial equipment is designed and man...

Страница 9: ...garding the care and operation of the machine we will gladly furnish it upon request Because we build various types of equipment we ask that you include your machine model and serial number in all cor...

Страница 10: ...used 1 UPPERSTRUCTURE The upperstructure weldment swing mechanism counterweight cab 2 BOOM ATTACHMENT The telescopic crane boom with hydraulic winch lift cylinder hook block assembly jib arrangement...

Страница 11: ...s are designed to lift lower and move freely suspended loads within the rated capacity of the crane Use of this product in any other way is prohibited and contrary to its intended use T300 1_T500 1_T7...

Страница 12: ...ied to specific machines using the machine model number and PIN serial number Distribution of bulletins is based on the most current owner of record along with their associated dealer so it is importa...

Страница 13: ...Questions regarding product applications and safety Standards and regulations compliance information Questions regarding product modifications Current owner updates such as changes in machine ownersh...

Страница 14: ...e fill out the form below and submit via Fax scan and e mail or mail as indicated at bottom of form This will ensure that you are the owner on record for this machine allowing you to receive any appli...

Страница 15: ...lds Product Information Machine Model Name Serial Number Purchase Date mm dd yy New Owner Information Company Name Contact Name Terex Acct if applicable Mailing Address 1 Mailing Address 2 City State...

Страница 16: ...e is anything in this manual that is not clear or which you believe should be added please send your comments to Technical Publications Coordinator Terex Cranes 106 12th Street SE Waverly Iowa 50677 o...

Страница 17: ...rity of the potential hazard Signal words used without the safety alert symbol relate to property damage and protection only All are used as attention getting devices on decals and labels fixed to the...

Страница 18: ...or hand force applied two directions pinched Stay Clear of Moving Turret and Boom CRUSH HAZARD Death or Serious Injury can result from contact with moving machine Keep clear of moving machine Safety...

Страница 19: ...gineis running Stop engine before servicing Explosion Burn Hazard Will cause death burns or blindness due to ignition of explosive gases or contact with corrosive acid Keep all open flames and sparks...

Страница 20: ...appropriate ladder to reach high places Maintain 3 Point Contact when using access system Two blocking the crane can cause death serious injury or property damage Do not allow the hook block to contac...

Страница 21: ...Distance From Electrical Power Lines These are general safety rules which must be followed You are also required to read and understand the Operators Manual as there are instructions which are more d...

Страница 22: ...General Safety Safety Sign Locations 21 P N 12261 683 REVISED January 2015...

Страница 23: ...zard Fluid escaping under pressure can penetrate skin and result in serious injury Relieve pressure before disconnecting hydraulic lines Stay clear of leaks and pin holes Use a piece of cardboard or w...

Страница 24: ...tanglement Hazard Stay clear of belts and fan when engine is running Stop engine before servicing Contact with rotating parts can result in death or serious injury 23 P N 12261 683 REVISED January 201...

Страница 25: ...n move hand in small horizontal circle A3 USE MAIN HOIST Tap fist on head then use regular signals A4 USE WHIP LINE Auxiliary Hoist Tap elbow with one hand then use regular signals A5 RAISE BOOM Arm e...

Страница 26: ...d slightly raise make pushing motion in direction of travel C4 DOG EVERYTHING Clasp hands in front of body C5 TRAVEL Both Tracks Use both fists in front of body making a circular motion about each oth...

Страница 27: ...aged in jib Read and understand operator s manual before using or stowing jib Crush Hazard Serious injury can result from contact with moving counterweights Keep clear of counterweight slabs while low...

Страница 28: ...l cool Release of hot fluid under pressure can result in death or serious injury ELECTROCUTION HAZARD Stay clear of machine Contact with electric power lines will result in death or serious injury 27...

Страница 29: ...ing or otherwise handle personnel must only be done in compliance with OSHA 1926 1431 and ANSI B30 23 MAINTAIN CLEARANCE LISTED Line Voltage Required Clearance 0 to 50KV 10 ft 3m 50 to 200KV 15 ft 4 6...

Страница 30: ...derstand the information in the manuals consult your supervisor the owner or the manufacture Fall Crush Hazard Two blocking the crane can result in death or serious injury Do not allow hook block to c...

Страница 31: ...h or serious injury NO RIDERS Overturning Hazard Death or Serious Injury can result from an overturning crane The boom angle must be between 35 and 70 unless the boom is positioned over the rear in li...

Страница 32: ...gloves face shield and long sleeve shirt Read manuals If you do not understand the information in the manuals consult your supervisor the owner or the manufacturer Improper lifting of personnel can re...

Страница 33: ...hot surfaces Allow machine to cool before servicing Explosion Burn Hazard Fuel and fumes can explode and burn resulting in death or serious injury No smoking Keep all open flames and sparks away Stop...

Страница 34: ...gns Do not use solvent based cleaners because they may damage the safety sign material The graphics on the following pages illustrate the location and give you examples of each safety decal located on...

Страница 35: ...pting to lift 7 The operator must understand crane signals and take signals only from designated signal people However the operator must obey the stop signal from anyone OPERATOR S RESPONSIBILITIES 1...

Страница 36: ...t speeds that will keep the load under control 16 Keep at least two full wraps of wire rope on drum when operating 17 Use tag lines to keep loads under control when feasible 18 Keep the load as close...

Страница 37: ...sor 6 Supply the weight and the characteristics of all loads to be lifted to the operator 7 Verify that all crew members are familiar with OSHA ANSI B30 5 requirements state and local jobsite requirem...

Страница 38: ...must be in place 2 Check machine log book to see if periodic maintenance and inspections have been performed 3 Ensure that necessary repairs have been completed 4 Inspect wire rope for damage kinks br...

Страница 39: ...owing whether it is within the rated capacity 7 Never operate with anything other than recommended counterweight Unauthorized reduction or additions of counterweight constitute a safety hazard 8 Do no...

Страница 40: ...ve materials from under powerlines with a crane if the boom or machine is capable of contacting them 3 No part of crane or load must come in contact with or violate the minimum allowable clearance req...

Страница 41: ...red professional engineer who is a qualified person with respect to electrical power transmission and distribution per OSHA regulation 1926 1408 TRAVEL 1 Care must be taken when cranes are driven trav...

Страница 42: ...n a boom length indicator is inoperative or malfunctioning the designated person responsible for supervising the lifting operations shall establish the boom length at which the lift will be made by ac...

Страница 43: ...erecting the equipment it must be ensured that the anemometer is fully functional If the values on the display change when the rotor is rotated the unit is functioning To verify functionality during...

Страница 44: ...ally 1 Very Light 1 3 1 5 Wind direction indicated by the smoke and not by the banner 2 Light Breeze 4 7 6 11 The wind can be felt on the face the leaves rustle the banner moves 3 Gentle Breeze 8 12 1...

Страница 45: ...er or attempting to get onto the carrier superstructure or boom assembly If on the machine do not try to get off the machine If you are in the operator s cab upper or lower during an electrical storm...

Страница 46: ...place to prevent unauthorized use or unintended movement Make sure that the batteries are recharged The parking brake of the crane chassis shall be applied Transmission gear shall be set to neutral Th...

Страница 47: ...nfiguration of a crane when it is to be left unattended The crane boom should be lowered before wind speeds exceed the permitted values This may not be possible depending on job site and crane setup I...

Страница 48: ...systems e g due to changes in ambient and oil temperature leakage Vandalism Any or a combination of the above may result in the following events The crane may topple over The crane may move Unsafe ope...

Страница 49: ...ane being unattended the operator is required to check the condition of the crane its location and safety devices Danger of Accident Whenever the operator has left the cab the operating mode settings...

Страница 50: ...site crane boom all the way down and disassembled if necessary 4 _________ Is master control level to the centered 0 position 5 _________ Is parking brake on crane chassis set 6 _________ Is crane eng...

Страница 51: ...areas into which he will be travelling a guide who is in communication with the driver at all times must be used who can see those areas the driver cannot An acoustical back up warning device does no...

Страница 52: ...on which the crane is parked must be on even solid ground with sufficient load bearing capacity Mobile cranes can roll away if not properly prepared causing injury or property damage Under the followi...

Страница 53: ...vent absolutely the unexpected or accidental startup of equipment and to alert all workers whenever it is unsafe to operate any piece of equipment When used as intended Lock Out Tag Out also protects...

Страница 54: ...place 2 All work is complete and tools are put away 3 All workers are notified that a lock is being removed 4 All workers are positioned safely for startup 5 Controls are positioned for safe startup 6...

Страница 55: ...e crane Terex provides a number of steps ladders and handrails allowing three point access to all areas of the crane where it is necessary for the operator to be when moving from the ground to the ope...

Страница 56: ...Do not use item 1 as a grab handle Only use grab handles for access or egress of the operator s cab that are marked in the illustrations Carrier Cab Access Egress 55 P N 12261 683 REVISED January 2015...

Страница 57: ...Rear LH Side Access Egress Carrier Access Egress LH Side T300 1_T500 1_T780 Safety 56 P N 12261 683 REVISED January 2015...

Страница 58: ...tag with the name of the individual doing the work 5 After ensuring that no personnel are exposed and to ensure that energy sources are disconnected try to start the machine and engage operating contr...

Страница 59: ...the tool box 5 Replace all broken ladders or other access system components 6 Keep non slip surfaces in good condition 7 Never jump off the machine Instead use the hand holds and step designed for ent...

Страница 60: ...dry in the shade 5 Do not bleach or re dye because such processing may severely weaken the assembly 6 Inspect seat belt assemble frequently Anytime it does not operate properly or if there are any def...

Страница 61: ...the oil temperature change within the cylinder The rate at which the oil in a cylinder cools is dependent upon several factors These factors include the differential temperature between the oil and am...

Страница 62: ...Length Extend Cylinder Oil Temperature Drop F 50 Max Boom Length 6 Each Section RT130 Load Drop Due to Temperature 2 Part of Line 3 Different Boom Extensions 60 Boom angle Load Drop inches 100 Max Bo...

Страница 63: ...s less than 60 and slightly more for boom angles greater than 60 in comparison to the values in the graphs provided herein 2 Load drift due to thermal contraction of the hydraulic oil can be mistaken...

Страница 64: ...rear outriggers till boom head can be reached from ground level 5 Install the upper and lower jib mounting pins in the right side of the boom head 6 Attach a guide rope to the eye on the bottom tip o...

Страница 65: ...ng jib to boom Install the left upper and lower jib mounting pins 12 Remove the guide rope 13 Disconnect the anti two block plug from the jib anti two block socket and connect it to the socket on the...

Страница 66: ...tach hoist line dead end 4 30 Offset Hole 2 0 Offset Hole 5 Sheave Shaft 3 15 Offset Hole 6 Cap Screws INCREASING OFFSET 1 Retract the boom and set the outriggers 2 Boom down to minimum boom angle 65...

Страница 67: ...ib offset pins 6 Remove the jib offset pins from the 0 offset hole and place in the 15 hole or if you are using 30 offset then place pins in tool box 7 With the engine at idle slowly winch down to pay...

Страница 68: ...Socket 2 Attach Dead end Of Rope 5 Anti Two block Retracted Socket 3 Pull Out Retaining Pin Hole 6 Pull out Anti Two block Plug NOTE The jib must be erected before extending the pullout section Do not...

Страница 69: ...be actuated in the cab and the boom down boom extend and winch up controls should disconnect RETRACTING THE PULLOUT SECTION 1 Retract the boom completely and boom down to minimum boom angle 2 Unplug t...

Страница 70: ...utsized drum and excessive undercutting at the base of the flange also indicate that repair or replacement of the drum is necessary Check the bearings for excessive wear and play After correcting any...

Страница 71: ...and route back to the winch drum 2 Position the winch drum with the cable anchor slot on top 3 Insert cable through slot and position around the cable wedge 4 Position the anchor wedge in the drum slo...

Страница 72: ...ight winding on the drum is absolutely essential Never use a steel hammer or pry bar to move the rope over on the drum These tools can easily damage the rope After the wire rope is wound onto the winc...

Страница 73: ...e wedge is accomplished by making lifts of gradually increasing loads Avoid imposing shock loading on the rope until the wedge is firmly in place 5 After the wedge has been firmly seated a short lengt...

Страница 74: ...ARY WINCH 2 MAIN WINCH 3 5 SHEAVE 4 4 SHEAVE 5 DEAD END FOR EVEN PARTS OF LINE 6 DEAD END FOR ODD PARTS OF LINE 7 WINCH DEAD END 8 IDLER SHEAVE 9 LOAD SHEAVE 10 BLOCK SHEAVE 11 CABLE SOCKET 73 P N 122...

Страница 75: ...emoval of the wedge and socket from the rope in order to change the reeving Removal of two pins in the boom head and three in the hook block will allow the wedge and socket to pass through Never use l...

Страница 76: ...nd winch up controls should disconnect As shipped from the factory the crane has sufficient wire rope provided to allow the hook to reach ground level with any boom length and elevation when reeved wi...

Страница 77: ...he winch to the counterweight 3E Using a suitable lifting device lift the Aux winch off of the crane and place it aside 4 Attach a suitable lifting device to the counterweight and support the weight o...

Страница 78: ...77 P N 12261 683 REVISED January 2015...

Страница 79: ...he cranes configuration in the operator s cab 14 Verify that all functions of the crane and RLI are working properly and that the programmed load chart matches the configuration of the crane T300 1_T5...

Страница 80: ...CATION ON CRANE FASTENER SIZE TORQUE VALUE FT LBS AUX WINCH to C WT 1 8 NC X 8 GRD 5 640 DRY C WT to SUPERSTRUCTURE 1 25 NC X 19 50 GRD 5 1120 DRY C WT to C WT add on weight 75 NC X 4 50 GRD 5 270 DRY...

Страница 81: ......

Страница 82: ...ed Sections 1 and 3 are especially important with respect to machine operation Diagrams of the various carrier and upper controls are illustrated on the following pages A list of these controls and in...

Страница 83: ...ST ENGINE DIAGNOSTIC IGNITION SLOW INCR IDLE ADJ INCREASE ENGINE STOP AXLE DISENGAGE RANGE SHIFT INCR IDLE ADJ DECREASE AIR SUSPENSION FILL KEY ACC ENGINE STOP T300 1_T500 1_T780 Description Of Machin...

Страница 84: ...AIR SUSPENSION DUMP KEY OFF DIFF LOCK OFF HIGH SPEED REAR AXLE KEY ON KEYSWITCH LOW SPEED REAR AXLE KEY START PTO OUT DIFF LOCK ON PTO IN ENGINE WARN 83 P N 12261 683 REVISED January 2015...

Страница 85: ...DPF LAMP HEST LAMP CHECK ENGINE ABS DIAGNOSTIC T300 1_T500 1_T780 Description Of Machine and Controls 84 P N 12261 683 REVISED January 2015...

Страница 86: ...Carrier Controls and Instruments EPA 2013 Engines 85 P N 12261 683 REVISED January 2015...

Страница 87: ...t be stopped curbside at idle transmission in neutral park brake set to initiate the regeneration process See Maintenence Section 6 WIPER SWITCH Press for windshield wiper 22 WAIT TO START Red colored...

Страница 88: ...the machine become stuck a spinning wheel will receive all power transmitted by the drivetrain causing the wheel to spin faster and worsen the condition Use of the lockout divides the available power...

Страница 89: ...nu select deselect button See UNIDECK Manual 35 ENGINE STOP Red colored Warning Light ON when Engine should be shutdown 47 SPEEEDOMETER GUAGE MPH 0 80 Kph 0 120 36 ENGINE CHECK Amber colored Warning L...

Страница 90: ...3 MENU NAVIGATION BUTTON LCD Display screen menu See UNIDECK Operations Instructions 42 DIFFERENTIAL LOCK Amber colored Warning Light ON Differential is locked 54 MIL MALFUNCTION INDICATOR LIGHT The M...

Страница 91: ...point toward base of flame and depress black handle to discharge fire suppressant 57 WINDSHIELD WASHER RESERVOIR Use only over the counter washer fluid made specifically for automotive windshields T30...

Страница 92: ...58 HEATER UNIT Engine hot water supplied to carrier cab heater unit 59 TRANSMISSION SHIFTER Eaton Fuller transmission See Trans Operations Instructions 91 P N 12261 683 REVISED January 2015...

Страница 93: ...Manual Automatic Transmission T300 1_T500 1_T780 Description Of Machine and Controls 92 P N 12261 683 REVISED January 2015...

Страница 94: ...ps engaged for example pick and carry work With the PTO switch in the upper position pumps are engaged and throttle and gauges operate from the upper cab The PTO light 43 will come on once the engine...

Страница 95: ...work While damage to the pump disconnect splines will not result from making this change with the engine running it is recommended stopping the engine before making any change to the PTO switch 13 T50...

Страница 96: ...l to spin for an extended period of time Never engage the differential locking switch when any axle is revolving Engage only when all axles are stopped TRANSMISSION OPERATIONS INSTRUCTIONS 95 P N 1226...

Страница 97: ...T300 1_T500 1_T780 Description Of Machine and Controls 96 P N 12261 683 REVISED January 2015...

Страница 98: ...97 P N 12261 683 REVISED January 2015...

Страница 99: ...T300 1_T500 1_T780 Description Of Machine and Controls 98 P N 12261 683 REVISED January 2015...

Страница 100: ...99 P N 12261 683 REVISED January 2015...

Страница 101: ...T300 1_T500 1_T780 Description Of Machine and Controls 100 P N 12261 683 REVISED January 2015...

Страница 102: ...101 P N 12261 683 REVISED January 2015...

Страница 103: ...T300 1_T500 1_T780 Description Of Machine and Controls 102 P N 12261 683 REVISED January 2015...

Страница 104: ...103 P N 12261 683 REVISED January 2015...

Страница 105: ...T300 1_T500 1_T780 Description Of Machine and Controls 104 P N 12261 683 REVISED January 2015...

Страница 106: ...105 P N 12261 683 REVISED January 2015...

Страница 107: ...T300 1_T500 1_T780 Description Of Machine and Controls 106 P N 12261 683 REVISED January 2015...

Страница 108: ...107 P N 12261 683 REVISED January 2015...

Страница 109: ...UNIDECK Operation Instructions T300 1_T500 1_T780 Description Of Machine and Controls 108 P N 12261 683 REVISED January 2015...

Страница 110: ...109 P N 12261 683 REVISED January 2015...

Страница 111: ...T300 1_T500 1_T780 Description Of Machine and Controls 110 P N 12261 683 REVISED January 2015...

Страница 112: ...111 P N 12261 683 REVISED January 2015...

Страница 113: ...T300 1_T500 1_T780 Description Of Machine and Controls 112 P N 12261 683 REVISED January 2015...

Страница 114: ...113 P N 12261 683 REVISED January 2015...

Страница 115: ...T300 1_T500 1_T780 Description Of Machine and Controls 114 P N 12261 683 REVISED January 2015...

Страница 116: ...115 P N 12261 683 REVISED January 2015...

Страница 117: ...T300 1_T500 1_T780 Description Of Machine and Controls 116 P N 12261 683 REVISED January 2015...

Страница 118: ...117 P N 12261 683 REVISED January 2015...

Страница 119: ...T300 1_T500 1_T780 Description Of Machine and Controls 118 P N 12261 683 REVISED January 2015...

Страница 120: ...119 P N 12261 683 REVISED January 2015...

Страница 121: ...T300 1_T500 1_T780 Description Of Machine and Controls 120 P N 12261 683 REVISED January 2015...

Страница 122: ...Carrier Controls and Instruments EXPORT 121 P N 12261 683 REVISED January 2015...

Страница 123: ...SWITCH Press for windshield wiper 22 OPEN 7 CRUISE CONTROL On Off Press to toggle cruise on and off 23 WARNING LIGHTS GUAGE DISPLAY PANEL Refer to items 32 thru 53 for I D and function 8 CRUISE Set R...

Страница 124: ...of the lockout divides the available power between the two axles of the rear tandem With the lockout engaged the stuck wheel may continue to spin but the other side of the tandem will begin driving th...

Страница 125: ...ISPLAY Readouts Terex Logo Clock Total Engine Machine Hours Engine Oil Pressure Total Odometer Partial Odometer Languages menu Engine Fault See UNIDECK Operation Instructions on 2010 Tier 4 section 39...

Страница 126: ...nd Instruments UPPER CONTROLS INSTRUMENTS 1 DEFROSTER FAN SWITCH 18 CHECK ENGINE Red light ON indicates check Engine condition 18A STOP ENGINE Red light ON indicates stop engine 125 P N 12261 683 REVI...

Страница 127: ...er for OFF windshield wiper 21 OUTGRIGGER SWITCH RR Switch controls Right Rear jack cylinder Push right side of switch to run beam in conjunction with 27 Master Switch Push left side of switch to run...

Страница 128: ...overheating 28 IGNITION SWITCH A All circuits off B Circuits other than ignition on C All circuits including ignition on D Engine start 12 SWING LOCKED INDICATOR Red light ON indicates the superstuctu...

Страница 129: ...rior to lifting a load 33 SWING LOCK SWITCH Push right to engage the swing lock left to disengage the swing lock Alway engage the lock when exiting the cab or transporting the machine T780 Swing Lock...

Страница 130: ...129 P N 12261 683 REVISED January 2015...

Страница 131: ...istribute grease 41 MODE SELECTOR SWITCH Allows the operator to set the unit to fan only AC or heat mode 37 ACCESSORY PLUG 12 VDC power 42 SWING SENSE SWITCH In OFF position shuts off AC compressor to...

Страница 132: ...ructure will rotate CCW proportional in speed to throttle setting and movement of joystick 2 SWING RIGHT CW CONTROL Move joystick to right and upper structure will rotate CW proportional in speed to t...

Страница 133: ...e Speed of wire rope is proportional to throttle setting and movement of joystick lowering the load 5 AUXILIARY WINCH DISABLE SWITCH Depress switch LED green light will come ON winch function will be...

Страница 134: ...DOWN CONTROL Move joystick to right will lower the boom proportional in speed to throttle setting and movement of joystick 9 BOOM UP CONTROL Move joystick to left will raise the boom proportional in...

Страница 135: ...H TWO SPEED SWITCH Depress switch LED red light will come ON Main winch wire rope take in and payout speed will be in HIGH speed mode 13 MAIN WINCH DISABLE SWITCH Depress switch LED green light will c...

Страница 136: ...1 Heater AC Unit See Kenway Operations Maintenence Manual on your Manual Pack Shop Manual CD 135 P N 12261 683 REVISED January 2015...

Страница 137: ...and hold Use switch 5 to extned or retract the jack cylinder Move toggle switch Left for LR beam enable Use swtich 5 to extend or retract the beam 2 Right Rear Outrigger Jack Move toggle switch UP or...

Страница 138: ...o provide additional boom reach which is a 33 57 ft 10 05 17 37 m side stow swing on lattice type jib The jib is extendible to 57 ft 17 37 m by means of a 25ft 7 62 m manual pullout tip section The 33...

Страница 139: ......

Страница 140: ...orm the daily lubrication as required in the Lubrication Recommendations Lubricate cylinder mounting bushings and pins LINES AND BLOCKS Inspect the hoist lines hoist block and ball hook and the crane...

Страница 141: ...tem on the control linkages A check of this system should be made prior to lifting Hoist the hook block to the boom point so that actual contact between block and anti two block counterweight is made...

Страница 142: ...ECTED CHECKED INSPECTION CODE SATISFACTORY ADJUST REPAIR VISUAL INSPECTION H Complete Machine D OVERALL CLEANLINESS D HYDRAULIC SYSTEM See Hydraulic Hose topic in Maintenance section Leaks or Damage D...

Страница 143: ...GAUGES D CLUTCHES BRAKES D WIRE ROPE SHEAVES GUARDS D TWO BLOCK DAMAGE PREVENTION SYSTEM D LOAD SUPPORTING COMPONENTS CONDITION D FIRE EXTINGUISHER D BACKUP ALARM D BOOM ANGLE INDICATOR D HEAD TAIL B...

Страница 144: ...FLUID LEVEL W DRIVE SHAFTS U JOINTS W TIRE WHEEL CONDITION INFLATION PRESSURE W AIR REGULATORS W AIR CLEANER ELEMENT W CLUTCH BRAKE LINKAGE PINS W WHEEL LUG NUT TORQUE W FAN BELT TENSION W STRUCTURAL...

Страница 145: ...weld separation leaks damage vandalism INSPECTION CODE INTERVALS D DAILY W WEEKLY M MONTHLY A ANNUALLY P PERIODIC NOTES 1 Indicate inspection result by checking in the satisfactory adjust or repair b...

Страница 146: ...145 P N 12261 683 REVISED January 2015...

Страница 147: ...on Oil Level __ Drain Fuel Filters or Water Separator __ Check Boom Front Slider Pads __ Check Boom Chains And Ends __ Drain Air Tanks __ Check Wire Rope And Related Components __ Check Air Cleaner __...

Страница 148: ...heck Torque On Wheel Lug Nuts __ Check Hydraulic Cylinders And Rods __ Make Thorough Inspection Of Wire Rope __ Visually Inspect All Structural Members And Welds For Cracks Alignment and Wear __ Check...

Страница 149: ...gine Belts __ Check Hydraulic Reservoir For Moisture __ Check All Slider Pads __ Have Hydraulic Oil Sample Analyzed __ Clean Radiator Oil Cooler Exterior __ Check Engine Manufacturer s Manual For Addi...

Страница 150: ...Wear Condition __ Change Transmission Oil And Shift Air Filter __ Change Hydraulic Return Line Filters __ Replenish Cooling System Corrosion Inhibitor refer to engine manufactures manual __ Check Engi...

Страница 151: ...t For Signs Of Oil Accumulation __ Change Power Steering Filter Element __ Check Hydraulic Relief Valve Pressure Settings __ Torque Swing Bearing Bolts 725 ft lbs according to tightening sequence __ C...

Страница 152: ...n __ Disassemble Winch And Inspect __ Drain And Clean Hydraulic Reservoir __ Change Hydraulic Fluid unless checked by oil analysis __ Drain and Refill The Winch Lubricant __ Change Axle Oil __ Check t...

Страница 153: ...ATE DESCRIPTION OF CRANE Make Model Serial No Type and arrangement of attachments Date of Last Rope Inspection Hours and Time of Service Since Last Inspection Results of Inspection Rope Inspected Type...

Страница 154: ...ile cranes satisfies all applicable international standards EN ISO FEM etc and does not provide for continuous operation The cranes therefore have a service life which is defined by the permitted numb...

Страница 155: ...g the safety equipment and can necessitate non destructive inspections such as magnetic particle or ultrasonic inspections Any malfunction or irregularity discovered during the inspection must be eval...

Страница 156: ...due to national laws the test conditions must correspond with the conditions during the scheduled lift It is acceptable for Terex to carry out a load test for a given crane configuration with reduced...

Страница 157: ......

Страница 158: ...e two components burn off collected particulate matter in a process called regeneration The key to successful regeneration is high exhaust temperatures for an extended period of time Without adequate...

Страница 159: ...r Red Stop Light are indications of a system problem Illumination of the yellow light indicates that a parked regeneration is required There is a need to periodically remove accumulated ash derived fr...

Страница 160: ...generation Light will be illuminated prior to any engine protection measures being taken Once the light is lit the parked regeneration process should be initiated 2 If no regeneration occurs after the...

Страница 161: ...F Regeneration Light starts flashing in the lower cab 3 If the flashing DPF is still ignored the AWL Check Engine Red Light light will illuminate This will be accompanied by the 25 engine torque reduc...

Страница 162: ...engine and ATD from damage up to and including engine shutdown which will require the engine dealer to reset the regeneration sequence NOTE If the DDEC Vl electronics have not requested the initiatio...

Страница 163: ...the regeneration process NOTE The procedure will take up to 1 hr Times could be less or more dependent on engine type and the amount of soot accumulated in the filter To initiate a parked regeneratio...

Страница 164: ...ssociated warning lights If any of the above requirements are not met the engine will return to idle To cancel the parked regeneration the operator can toggle the REGEN switch to ON for five seconds T...

Страница 165: ...Cummins 2013 Engine Overview of Operation Fuel Warning T300 1_T500 1_T780 Operating Instructions 164 P N 12261 683 REVISED January 2015...

Страница 166: ...Aftertreatment Regeneration Lamp Behaviors 165 P N 12261 683 REVISED January 2015...

Страница 167: ...T300 1_T500 1_T780 Operating Instructions 166 P N 12261 683 REVISED January 2015...

Страница 168: ...167 P N 12261 683 REVISED January 2015...

Страница 169: ...Regeneration Modes T300 1_T500 1_T780 Operating Instructions 168 P N 12261 683 REVISED January 2015...

Страница 170: ...cally take anywhere from 45 minutes to 1 5 hours to complete A manual regeneration can be initiated with the Regeneration Switch The manual regeneration switch will only initiate a regeneration when t...

Страница 171: ...e tire During regeneration exhaust gas temperature could reach 1500 degrees F and exhaust system surface temperature could exceed 1300 degrees F which is hot enough to ignite or melt common materials...

Страница 172: ...Operating the Unit Operating the Engine 171 P N 12261 683 REVISED January 2015...

Страница 173: ...T300 1_T500 1_T780 Operating Instructions 172 P N 12261 683 REVISED January 2015...

Страница 174: ...173 P N 12261 683 REVISED January 2015...

Страница 175: ...at the Emergency Stop Button is pulled out This will allow starting of the engine The engine may require the use of a cold weather starting aid if the ambient temperature is below 40 F 4 C T300 1_T500...

Страница 176: ...175 P N 12261 683 REVISED January 2015...

Страница 177: ...T300 1_T500 1_T780 Operating Instructions 176 P N 12261 683 REVISED January 2015...

Страница 178: ...177 P N 12261 683 REVISED January 2015...

Страница 179: ...he oil pressure gauge immediately after starting the engine A good indicator that all of the moving parts are getting lubrication is when the oil pressure gauge registers pressure 5 psi 34 5 kPa at id...

Страница 180: ...gine until the cause of the concern has been investigated and corrected Avoid unnecessary Idling During long engine idling periods with the transmission in neutral the engine coolant temperature may f...

Страница 181: ...Engine Cold Weather Operation T300 1_T500 1_T780 Operating Instructions 180 P N 12261 683 REVISED January 2015...

Страница 182: ...181 P N 12261 683 REVISED January 2015...

Страница 183: ...T300 1_T500 1_T780 Operating Instructions 182 P N 12261 683 REVISED January 2015...

Страница 184: ...t both ends of one cable to positive terminals of each battery 5 Connect one end of the other cable to negative terminal of the booster battery 6 Connect other end of cable away from battery to engine...

Страница 185: ...he coolant contains ethylene glycol Use only non chromate base inhibitors Chromate base inhibitors reacting with ethylene glycol can produce chromium hydroxide commonly known as green slime This subst...

Страница 186: ...being engaged and running the engine at low speed Continue warming the oil and slowly cycle all crane functions actuating all cylinders in turn swinging the upper and operating the winches in both di...

Страница 187: ...ating in sand or dust on a regular basis 1 Increase frequency of lubrication and service per lube chart The increased frequency of lubrication and service discussed above should be determined by obser...

Страница 188: ...ve 10 000 the engine fuel injectors may have to be changed to ensure proper performance Consult engine manufacturer should this problem arise Keeping the air cleaner clean and free of obstructions wil...

Страница 189: ...rane is leveled The red light on the dash will be on if the front jack is not fully retracted It will remain on any time the front outrigger jack is extended NOTE When setting front outrigger run the...

Страница 190: ...e determining factors are lifted load radius boom angle working position hoist line reeving tire pressure travel data and use of a jib The examples given in this section are given for your interpretat...

Страница 191: ...nd retract cylinders have reached the limits of their travel This can cause overheating of the hydraulic oil if it is run over relief for prolonged periods 5 Swing the boom over the load Upper structu...

Страница 192: ...d 7 Lower the hook block to the load and fasten the hook Before making any crane lift make sure the hook is properly engaged with the slings or lifting device employed to make the lift Be certain the...

Страница 193: ...deposited 10 Lower the load and unfasten the hook When spotting the load it may be necessary to alter the boom length or boom angle In making these adjustments the operator must guard against exceedi...

Страница 194: ...on the cable drum Loose cable can slip and then bind suddenly causing jerky lowering and shock loading of the boom Loose wraps may form loops which can be overlain when the cable is wound onto the win...

Страница 195: ...extended fingers closed thumb pointing downward MOVE SLOWLY Use one hand to give any motion signal and place other hand motionless in front of hand giving the motion signal Hoist slowly shown as exam...

Страница 196: ...sed fist Travel opposite track in direction indicated by circular motion of other fist rotated in front of body land cranes only EXTEND BOOM Telescoping Booms Both fists in front of body with thumbs p...

Страница 197: ...operating radius Freely Suspended Load Load hanging free with no direct external force applied except by the hoist rope Side Load Horizontal force applied to the lifted load either on the ground or i...

Страница 198: ...Outriggers Extended Areas measured in a circular arc about the centerline of rotation as shown in the diagram below 1 Boom over front working area 2 Boom over side working area 3 Boom over rear workin...

Страница 199: ...one because the effects of wind pendulum action jerking etc can cause a tip over Extending the boom or boom and jib combination into unrated areas of the chart can cause tip over Do not operate at a l...

Страница 200: ...00 25 6 0 18600 18600 30 0 28 5 16600 14500 30 0 47 0 17200 15100 34 3 0 13500 10700 35 0 38 4 13900 11200 40 0 27 6 11200 8400 45 0 7 6 8900 6400 45 3 0 8700 8200 Example Hook Block 660 lbs Slings 21...

Страница 201: ...unused with jib pullout extension retracted or not present on outriggers fully extended lifting off main boom with jib erected but unused with pullout extension extended on outriggers fully extended...

Страница 202: ...ary boom head is not erected add 100 lbs to the chart rated capacity 7 Compare load weight with chart rated capacity from the boom length radius and boom angle 8 The lifted load must not exceed the ch...

Страница 203: ...ed crane The travel surface must also be free of holes or debris that can cause crane instability 9 If equipped with rear air suspension the rear air should be dumped before lifting or travelling with...

Страница 204: ...Ensure that the tires are inflated as shown in the recommended tire pressure chart Refer to tire chart in cab of crane or to section on Vehicular Operation 203 P N 12261 683 REVISED January 2015...

Страница 205: ...FT MAX BOOM LENGTH FT BOOM STRAIGHT OVER REAR 0 TO 2 1 2 MPH 10 30 13 900 12 30 12 600 15 39 10 600 20 39 7 400 25 50 5 100 30 50 3 300 35 50 1 900 40 50 1 000 T300 1_T500 1_T780 Operating Instructio...

Страница 206: ...osening clamp 1 This will allow the bar to slide so that the trailing arm can be rotated relative to the frame Adjust the suspension member so that its surface 2 is parallel to the frame surface 3 Pas...

Страница 207: ...4 Air Yoke 5 Switch T300 1_T500 1_T780 Operating Instructions 206 P N 12261 683 REVISED January 2015...

Страница 208: ...o the upper crane cab 2 Start the crane engine If the red Low Air light is ON run the crane engine for a few minutes to allow air pressure to build up before moving the carrier 3 Turn ON the Remote Po...

Страница 209: ...switch as necessary to position the crane as desired 8 To stop depress the service brakes shift the Transmission switch to N neutral and engage the parking brakes with the parking brake switch 9 Turn...

Страница 210: ...rweight supports on the deck of the crane in order to equalize the axle loading 1 Lower the outrigger jacks to support the weight of the crane 2 Rotate the upper to a position straight over the rear o...

Страница 211: ...be necessary to slightly lower one side of the slabs and raise the other to get the first pin removed then slightly lower the side still pinned and pull the other side up tightly to remove the second...

Страница 212: ...e locking pins into the top slab 8 Remove the locking pins and long horizontal pins from the lower most slab that you wish to attach to the counterweight 9 Lift both control levers to raise the counte...

Страница 213: ...10 Install horizontal pins and locking pins on each side to attach the stack to the counterweight T300 1_T500 1_T780 Operating Instructions 212 P N 12261 683 REVISED January 2015...

Страница 214: ...ent On Board Diagnostics monitors all emissions related engine systems during operation If the system detects any emissions related malfunctions it will alert the operator to these detected malfunctio...

Страница 215: ...uge reads zero and the engine has been shut down has idled for one hour after the DEF tank has been run dry or if the vehicle s diesel fuel tank is refilled without refilling the DEF tank the Stop Eng...

Страница 216: ...ast 20 minutes to increase exhaust temperatures OR b Perform a parked regeneration Flashing If a regeneration is not performed in a timely manner after the DPF Lamp is illuminated the DPF Lamp will be...

Страница 217: ...crease and there may be a noticeable change to the sound of the turbocharger during the regeneration process Once the DPF is regenerated the engine will automatically return to the normal idle speed M...

Страница 218: ...cessive and you also notice white vapor have the exhaust system inspected for leaks Tips for Efficient Driving 1 Lower drive speeds At interstate speeds each 1 0 mph 1 6 kph increase equals a 0 1 mpg...

Страница 219: ...lock up to the head when traveling or to secure it to the bumper ring will result in excessive swinging of the hook block and possible damage to machine Continuing to pull the block up after contact h...

Страница 220: ...dicated in the following table The inflation pressures shown below are for those taken with the tires at the prevailing atmospheric temperatures and do not include any inflation pressure build up due...

Страница 221: ...ral minutes at idle the engine may be shut off by pushing the engine stop button or turn the ignition switch to the OFF position T300 1_T500 1_T780 Operating Instructions 220 P N 12261 683 REVISED Jan...

Страница 222: ...Button mounted on the shift lever When operation in ratios from LO to 8th the Deep Reduction Button should be in the REARWARD position Move the Deep Reduction Button into the FORWARD position to selec...

Страница 223: ...cted the crane will be moving in LL1 6 To upshift from LL1 to LO in the same gear shift lever position move the Deep Reduction Button to the REARWARD position and IMMEDIATELY release accelerator Depre...

Страница 224: ...s no control over the engine speed when it its being pushed by a load When the engine speed exceeds the rated governed speed while descending a grade or downshifting at the high end of the operating r...

Страница 225: ...ions ranges available and when to select them will make vehicle control and your job even easier It is recommended to select lower ranges when descending long grades to reduce wear on service brakes B...

Страница 226: ...rane around a job site NOTE See the ON TIRES LIFT instructions found in the Operating Instructions section for Information on moving the crane with a load Carry the boom over the front only Lock the s...

Страница 227: ...ore traveling Stow the boom in the boom rack Watch for overhead obstructions such as trees power lines or bridges If the terrain is rough or uneven it may be necessary to travel at a reduced speed to...

Страница 228: ...ich could damage the engine or transmission The operator must be very careful on steep side slopes to avoid tipping the crane NOTE This machine can travel on 15 side slopes which have a firm level pre...

Страница 229: ...Towing or Pushing Vehicle The engine cannot be started by pushing or towing T300 1_T500 1_T780 Operating Instructions 228 P N 12261 683 REVISED January 2015...

Страница 230: ...outriggers 2 Rotate the upper structure to the over rear position 3 Make sure the stinger is in the stowed position and the jib offset is at 0 offset 4 Boom down to minimum boom angle 5 Remove the hoi...

Страница 231: ...t idle slowly retract the boom completely The jib will engage the jib storage brackets as the boom is retracted 13 Remove the guide rope from the tip of the jib 1 Bracket mounted to boom 2 Bracket mou...

Страница 232: ...ill not hold the sections against the hard breaking jolts while the crane is being transported Restrain the boom extend sections by snugging the hook block against the boom head or secure the boom hea...

Страница 233: ...utral position 2 Put the parking brake switch in the ON position 3 Turn the ignition switch to the ON position Wait to start light goes off 4 Turn the ignition switch to the START position to start th...

Страница 234: ...e starting procedure below 1 Move the transmission shift lever to the neutral position 2 Put the parking brake switch in the ON position 3 Turn the ignition switch to the ON position Wait to start lig...

Страница 235: ......

Страница 236: ...895 CONTROL MODULE CM850 CYLINDERS 6 T340 07 EXPORT 2007 DESCRIPTION TRANSMISSION AUTO ENGINE MODEL QSC8 3 Tier 3 TEREX ENGINE NUMBER T122717 HP RPM 275 2200 MAX RPM 2200 PEAK TORQUE Lb Ft 895 CONTRO...

Страница 237: ...560 EXPORT DESCRIPTION TRANSMISSION AUTO ENGINE MODEL DD Series 60 14L TEREX ENGINE NUMBER 717 1278 HP RPM 455 1800 MAX RPM 2175 PEAK TORQUE Lb Ft 1550 CONTROL MODULE NA CYLINDERS 6 T560 2013 DESCRIPT...

Страница 238: ...PM 2175 PEAK TORQUE Lb Ft 1650 CONTROL MODULE NA CYLINDERS 6 T780 EXPORT DESCRIPTION TRANSMISSION AUTO ENGINE MODEL DD Series 60 TEREX ENGINE NUMBER T122719 HP RPM 515 1800 MAX RPM 2175 PEAK TORQUE Lb...

Страница 239: ...NE MODEL ISX 2013 TEREX ENGINE NUMBER T125882 HP RPM 500 1800 MAX RPM 2100 PEAK TORQUE Lb Ft 1650 CONTROL MODULE CM2350 CYLINDERS 6 T300 1 T500 1 T780 Engine DEF Control Unit T300 1_T500 1_T780 Mainte...

Страница 240: ...DESCRIPTION TEREX PART NO 1 DEF SUPPLY MODULE 222725 2 Dosing Control Unit Not Used for 2013 Engine NA 3 RELAY 40A 222727 4 COOLANT MANIFOLD 222728 239 P N 12261 683 REVISED January 2015...

Страница 241: ...ol detecting problem areas and reanalyzing maintenance requirements The items in each check interval on the check chart are grouped under their respective headings and covered in detail over the cours...

Страница 242: ...Crane Maintenence Specification Acronyms and Abbreviations 241 P N 12261 683 REVISED January 2015...

Страница 243: ...T300 1_T500 1_T780 Maintenance 242 P N 12261 683 REVISED January 2015...

Страница 244: ...General Safety Instructions 243 P N 12261 683 REVISED January 2015...

Страница 245: ...T300 1_T500 1_T780 Maintenance 244 P N 12261 683 REVISED January 2015...

Страница 246: ...Flow Diagram Exhaust System 245 P N 12261 683 REVISED January 2015...

Страница 247: ...T300 1_T500 1_T780 Maintenance 246 P N 12261 683 REVISED January 2015...

Страница 248: ...6 Aftertreatment Diesel Particulate Filter DPF 10 Decomposition Reactor 13 Aftertreatment SCR Catalyst 247 P N 12261 683 REVISED January 2015...

Страница 249: ...T300 1_T500 1_T780 Maintenance 248 P N 12261 683 REVISED January 2015...

Страница 250: ...Engine Cooling System Maintenence Schedule 249 P N 12261 683 REVISED January 2015...

Страница 251: ...T300 1_T500 1_T780 Maintenance 250 P N 12261 683 REVISED January 2015...

Страница 252: ...251 P N 12261 683 REVISED January 2015...

Страница 253: ...T300 1_T500 1_T780 Maintenance 252 P N 12261 683 REVISED January 2015...

Страница 254: ...Aftertreatment Diesel Exhaust Fluid Dosing Unit Filter 253 P N 12261 683 REVISED January 2015...

Страница 255: ...T300 1_T500 1_T780 Maintenance 254 P N 12261 683 REVISED January 2015...

Страница 256: ...255 P N 12261 683 REVISED January 2015...

Страница 257: ...T300 1_T500 1_T780 Maintenance 256 P N 12261 683 REVISED January 2015...

Страница 258: ...257 P N 12261 683 REVISED January 2015...

Страница 259: ...Engine Indicator Lamps T300 1_T500 1_T780 Maintenance 258 P N 12261 683 REVISED January 2015...

Страница 260: ...259 P N 12261 683 REVISED January 2015...

Страница 261: ...T300 1_T500 1_T780 Maintenance 260 P N 12261 683 REVISED January 2015...

Страница 262: ...261 P N 12261 683 REVISED January 2015...

Страница 263: ...T300 1_T500 1_T780 Maintenance 262 P N 12261 683 REVISED January 2015...

Страница 264: ...263 P N 12261 683 REVISED January 2015...

Страница 265: ...Aftertreatment Switch The stationary parked regeneration switch used to initiate regeneration with the aftertreatment system T300 1_T500 1_T780 Maintenance 264 P N 12261 683 REVISED January 2015...

Страница 266: ...Operating Characteristics with Aftertreatment Particulate Filter 265 P N 12261 683 REVISED January 2015...

Страница 267: ...T300 1_T500 1_T780 Maintenance 266 P N 12261 683 REVISED January 2015...

Страница 268: ...267 P N 12261 683 REVISED January 2015...

Страница 269: ...T300 1_T500 1_T780 Maintenance 268 P N 12261 683 REVISED January 2015...

Страница 270: ...269 P N 12261 683 REVISED January 2015...

Страница 271: ...Engine Indentification T300 1_T500 1_T780 Maintenance 270 P N 12261 683 REVISED January 2015...

Страница 272: ...271 P N 12261 683 REVISED January 2015...

Страница 273: ...T300 1_T500 1_T780 Maintenance 272 P N 12261 683 REVISED January 2015...

Страница 274: ...273 P N 12261 683 REVISED January 2015...

Страница 275: ...T300 1_T500 1_T780 Maintenance 274 P N 12261 683 REVISED January 2015...

Страница 276: ...275 P N 12261 683 REVISED January 2015...

Страница 277: ...Diesel Exhaust Fluid Specification T300 1_T500 1_T780 Maintenance 276 P N 12261 683 REVISED January 2015...

Страница 278: ...277 P N 12261 683 REVISED January 2015...

Страница 279: ...T300 1_T500 1_T780 Maintenance 278 P N 12261 683 REVISED January 2015...

Страница 280: ...279 P N 12261 683 REVISED January 2015...

Страница 281: ...T300 1_T500 1_T780 Maintenance 280 P N 12261 683 REVISED January 2015...

Страница 282: ...13 AUTO 218027 219903 219902 222678 222679 T340 20 13 ROW MANUAL 222644 222645 222646 222647 222648 T560 20 13 MANUAL 222680 222681 NA 222682 222679 T560 20 13 AUTO 222680 222681 NA 222682 222679 T78...

Страница 283: ...0 10 AUTO 219905 Oil Filter 218624 219949 219317 NA 216699 T780 Pre 20 10 MANUAL 218624 219949 219317 NA 216699 T780 Pre 20 10 AUTO 218624 219949 219317 NA 216699 NOTE A Change air cleaner element acc...

Страница 284: ...Lubrication Charts 283 P N 12261 683 REVISED January 2015...

Страница 285: ...T300 1_T500 1_T780 Maintenance 284 P N 12261 683 REVISED January 2015...

Страница 286: ...285 P N 12261 683 REVISED January 2015...

Страница 287: ...tension and wear Coolant level Oil level Transmission oil level Air cleaner sight gauge Air intake Muffler and exhaust DEF fluid level Check battery box For battery condition Crane boom Check for Hook...

Страница 288: ...0 HOURS Make initial replacement of hydraulic return line filter 40 HOURS Perform initial axle oil change at approximately 3 000 5 000 miles 100 HOURS After one hundred hours drain and change the winc...

Страница 289: ...eck DEF Urea Fluid Level in Reservoir ___Drain Water from Air Tanks WEEKLY CHECK 40 HOURS ___ Perform The Daily Check ___ Check Torque On Wheel Lug Nuts ___ Perform Weekly Lubrication ___ Check Hydrau...

Страница 290: ...kly Monthly And Quarterly Checks ___ Change Power Steering Filter Element T300 1 only ___ Perform Semiannual Lubrication ___ Check Hydraulic Relief Valve Pressure Settings ___ Clean Crankcase Breather...

Страница 291: ...lic Reservoir ___See Transmission Maintenence Section ___See Engine Maintenence Section ___ Hydraulic Hoses See Hydraulic Hose topic in Maintenance section T300 1_T500 1_T780 Maintenance 290 P N 12261...

Страница 292: ...ensures that basic preventive maintenance requirements will be met under average operating conditions Conditions which impose greater wear loads or strain on the crane may dictate reduced check interv...

Страница 293: ...ooling on winch Cylinder pin connections for wear Check tires axles and drive lines for wear or damage Check in the cab for Instruments functioning properly Control operation Glass for good visibility...

Страница 294: ...perated with hydraulic reservoir temperatures in excess of 200 F 87 C due to possible excessive damage to the hydraulic oil and rubber components hoses seals shaft seals motor seals etc If overheating...

Страница 295: ...stem running at normal operating temperature It is important to use good technique in obtaining an oil sample The exact same procedure should be followed each time an oil sample is taken Most fluid su...

Страница 296: ...on This number should normally be less than 100 A high copper particle count indicates that a gear pump or motor is rapidly deteriorating A count of 200 or more would be cause for concern The most imp...

Страница 297: ...m Test ASTM D892 Sequence I Sequence II Sequence III Foam Tendency 25 ml Max 50 ml Max 25 ml Max Foam Stability Nil 10 ml Max Nil I Demulsibility ASTM D1401 to 40 37 3 point 30 Min Max J Aniline Point...

Страница 298: ...d year round in most machines in temperature climates Multi Viscosity 0 F 17 8 C 130 F 54 C 190 F 88 C Cold Climate Year Round Must Be Changed More Frequently Than Straight Grades 22 0 F 17 8 C 105 F...

Страница 299: ...U S 68 30 F 1 1 C 160 F 71 C 200 F 93 C 100 35 F 1 1 C 175 F 80 C 200 F 93 C Especially Suited For Regions With Ambient Temp Range From 100 F To 120 F Minimum temperature for starting without extende...

Страница 300: ...46 Duro AW 68 Duro AW 100 Conoco 32 46 68 100 Conoco DN 600 Artic Conoco Super Hyd 5W 20 Multi Viscosity Conoco Super Hyd 32 Conoco Super Hyd 46 Conoco Super Hyd 68 Conoco Super Hyd 100 D A Lubricant...

Страница 301: ...l Limited Canada 32 46 68 80 100 Nuto H 32 Nuto H 46 Nuto H 68 Nuto H 80 Nuto H 100 Kendll Refining Co USA 32 46 68 100 Kenoil R O AW 32 Kenoil R O AW 46 Kenoil R O AW 68 Kenoil R O AW 100 Mobil Oil C...

Страница 302: ...3 32 46 68 100 Tellus 23 Tellus 32 Tellus 46 XSL 9101 Tellus 68 Tellus 100 Sun Oil Co USA 32 46 68 100 Sunvis 816 WR Sunvis 821 WR Sunvis 831 WR Sunvis 851 WR Texaco Inc USA 32 46 68 Rando Oil HD A2 5...

Страница 303: ...he rope is passed through the hot lubrication over sheaves and a center guide wheel Hot oils or greases have excellent penetrating qualities and upon cooling have high adhesive and film strength aroun...

Страница 304: ...a spigot Sheaves are the best location for lubricating operating wire ropes because the wires and strands open somewhat as they bend along the groove POURING Lubricant can be poured on The rope shoul...

Страница 305: ...ubricant containing solvents can be applied to a wire rope by a properly directed spray nozzle AEROSOL SPRAYING Installations requiring only small amounts of lubricants or only occasional applications...

Страница 306: ...305 P N 12261 683 REVISED January 2015...

Страница 307: ...otate machine back and forth as far as possible Under extremely dirty or dusty conditions sufficient grease should be added to flush out contaminated grease Under less severe conditions add grease unt...

Страница 308: ...EP1 Mutifak EP1 Prestige 742EP Amolith EP1 Beacon EP1 GEAR Mobiltac 375NC Crater 2X 407 Compound B Amovis 8 X Surett Fluid 4k NOTE Refer to Kaydon Installation Maintenence Catalog 390 supplied with c...

Страница 309: ...ed lubricant is AGMA 4EP Gear Oil or equivalent 2 All swing drive gearboxes from Terex are shipped with an additive to the gear oil of 5 oz 148 ml of ethylene glycol for cold weather protection If gea...

Страница 310: ...two holes in the housing 180 degrees apart These capscrews will align the pressure plate and steel discs when they are installed Apply an oil soluble grease or petroleum jelly to the other thrust wash...

Страница 311: ...If they are clamped in place and immovable the thrust washer between the pressure plate and actuating mechanism may be out of position ITEM DESCRIPTION PART NO QTY 1 O RING 216064 2 2 O RING 216091 1...

Страница 312: ...ower steering pump reservoir must be kept filled to the proper indicator level and free of air When filling the reservoir start the engine and turn the steering wheel from left to right and continue f...

Страница 313: ...rally in all four directions and pull or push on the drive shaft in the direction opposite to the journal cross seal not relieving while lube gun pressure is being applied to the alemite fitting It is...

Страница 314: ...to lubrication zerk 2 until lubricant appears at pressure relief hole 1 in welch plug at the sleeve yoke end of spline Cover pressure relief hole with finger and continue to apply pressure until grea...

Страница 315: ...haft universal joints and slip splines will vary with service requirements and operating conditions OPERATING CONDITION RE LUBE CYCLE Miles Hours NORMAL SEVERE 6000 8000 2000 3000 150 200 50 75 For ap...

Страница 316: ...the brackets and slack adjusters An application of lubricant should be applied to the grease fittings each time weekly a general lubrication of chassis components is required Use synthetic grease per...

Страница 317: ...T300 1_T500 1_T780 Maintenance 316 P N 12261 683 REVISED January 2015...

Страница 318: ...the slack adjuster The slack adjuster should be filled until grease becomes visible around the camshaft NOTE Camshaft brackets with metal plugs instead of grease fittings are fitted with special seal...

Страница 319: ...is recommended that the desiccant cartridge be replaced approximately every 2 years If system performance is reduced desiccant cartridge replacement is necessary It is also recommended that the desicc...

Страница 320: ...accumulated sediment There are five 5 tanks in the air system all having drain cocks on the bottom of the tank The accessory tank is located at the front of the machine behind the front outrigger The...

Страница 321: ...h circumstances NEVER BLEED THE TIRES Instead slow down or stop until the tires cool The energy stored in a tire and rim assembly under pressure makes changing truck and off road tires hazardous Speci...

Страница 322: ...ilure will result UNDERINFLATION Too little air pressure increases deflection causes the tread to wipe and scuff over the road results in extra strain on the tire and increases the chance for bruising...

Страница 323: ...r driving axle Such tire mounting will cause an inter axle fight unusually high axle lubricant breakdown and possible costly axle service In addition to matching individual tire rolling radius or roll...

Страница 324: ...re wear pads contact is evident The inside of the top plate of all sections except the tip section also require grease This can be applied through the holes in the side plates and piled on top of the...

Страница 325: ...e operator when the zerks are aligned to holes A stable working platform is required for this procedure 3 Use MPG multi purpose grease 4 To lubricate the upper rear wear pads of the boom that ride on...

Страница 326: ...ole in the base boom will line up with the zerk when the second section is fully extended as shown in photo below 1 Extend the second section for the 1st zerk hole in the second section of the boom to...

Страница 327: ...rd section is extended Lining up the zerk and applying the grease 2 With the 2nd section fully extended use a roller or brush to grease the bottom section of boom on surfaces that you see wear pad con...

Страница 328: ...access to the internal wear pad contact areas thru the large circular openings in the side plates of each section 2 WARNING ENGINE MUST BE SHUT DOWN When performing lubrication internal to the boom se...

Страница 329: ...bottom as shown in photo below 2 Use a 3 to 4 wide roller to apply the grease to the wear pad contact areas top and bottom See photo below 3 Apply grease to approximately the center 12 of the floor o...

Страница 330: ...on 2 Apply a fist sized portion of grease in the center of the bottom plate on the inside through each of the holes in the boom on the path where the cylinder slides 3 No greasing of the 4th section t...

Страница 331: ...grease starts to protrude from bearing sides 2 Base Boom Pin lubrication lubricate with MPG until grease starts protruding from side of tube on each side See image below for zerk locations 2 T300 1_T...

Страница 332: ...ylinder Rod end pin lubrication Raise boom up about 20 degrees then SHUTDOWN ENGINE 1 zerk lubricate until grease starts protruding from sides of rod eye See below photo 331 P N 12261 683 REVISED Janu...

Страница 333: ...retracted boom lowered and hook block on the ground then SHUTDOWN ENGINE 2 All sheaves require lubrication The top set of sheaves 1 zerk per sheave 3 three to 4 four shots of grease per sheave is req...

Страница 334: ...found properly torqued Thereafter checks should be performed quarterly MODEL 4 1 TORQUE MULTIPIER NO TORQUE MULTIPLIER T300 1 DRY 181 FT LBS 245 NM DRY 725 FT LBS 983 NM T500 1 DRY 180 FT LBS 244 NM...

Страница 335: ...ur outside must be checked This includes a total of sixtyfour 64 capscrews to be checked If ANY are found to have loosened ALL sixty four 64 must be retorqued Remember it is important to perform perio...

Страница 336: ...1 special wrench pn 706F8697 1 4 to 1 torque multiplier 1 1 12 pt socket 3 4 drive 335 P N 12261 683 REVISED January 2015...

Страница 337: ...and flushing water over the entire area of the core in the reverse direction of normal air flow QUARTERLY CORROSION INHIBITOR FILTER Replenish the cooling system corrosion inhibitor filter every 250h...

Страница 338: ...from the radiator cooling fins and through core cooling passages by directing compressed air and flushing water over the total area of the core in the reverse direction of normal flow 337 P N 12261 6...

Страница 339: ...it flows out the low oil level plug hole install the low oil level plug Start and run the engine at idle speed to prime the converter oil cooler and lines Recheck the oil level with the engine running...

Страница 340: ...erature range cold band under 120 F hot band between 180 and 220 F Total oil quantity needed at this time should be approximately 10 gallons this varies depending on the cooling system 3 Increase the...

Страница 341: ...d on the dipstick Total quantity added at this time should be approximately 10 gallons 9 With the transmission still in neutral increase the engine idle speed t 1500 rpm and retain at this speed for 5...

Страница 342: ...ts hydraulic power it is important that the proper fluid level be maintained at all times If the fluid level is too low the converter and clutches do not receive an adequiate supply of fluid If the fl...

Страница 343: ...ge is met 3 The vehicle has been stationary for approximately two minutes to allow the fluid to settle 4 Lever Shift Selector Press the Display Mode Diagnostic button once 5 The delayed fluid level ch...

Страница 344: ...SELECT MONITOR Description o L Represents Fluid oil Level Check Mode o K Fluid level is within the correct fluid level zone 343 P N 12261 683 REVISED January 2015...

Страница 345: ...T300 1_T500 1_T780 Maintenance 344 P N 12261 683 REVISED January 2015...

Страница 346: ...24449 2 Gasket Filter Cover 4 29548953 2 O Ring Low Temp Rd edge See note A below 5 29501469 2 Seal Ring Sq cut 6 29507437 2 O Ring Packing 7 29545780 2 Filter NOTE A Only one style of item 4 5 is use...

Страница 347: ...ing properly run the engine at 1200 1500 rpm with the transmission in N Neutral This should reduce the transmission and engine temperatures to normal operating levels in 2 to 3 minutes If temperatures...

Страница 348: ...Recommeded Fluid Filter Change Intervals 347 P N 12261 683 REVISED January 2015...

Страница 349: ...T300 1_T500 1_T780 Maintenance 348 P N 12261 683 REVISED January 2015...

Страница 350: ...nsmission On vehicles equipped with two transmission oil temperature gauges one gauge required senses torque converter oil as mentioned above while the other gauge optional reads oil temperature from...

Страница 351: ...gs to 14 20 Lbf ft of torque 5 Capscrews and Gaskets Check all capscrews especially those on PTO covers and rear bearing covers for looseness which would cause oil leakage Check PTO opening oil sump s...

Страница 352: ...positioned for checking the oil 1 Lubricant Level 3 Drain Plug Rotates to Bottom 2 Check Plug 4 Horizontal Oil Fill Level Remove the oil level plug in the planet cover and add oil as necessary to bri...

Страница 353: ...oving the drain plug at the bottom of the differential housing Replace the plug and refill the differential with the lubricant specified on the lubrication chart To the level specified above T300 1_T5...

Страница 354: ...353 P N 12261 683 REVISED January 2015...

Страница 355: ...is at the extreme low position After draining rotate the hub until the hole is at the check position Refill the hub with the lubricant specified on the lubrication chart Refill to the level of the bot...

Страница 356: ...IRES Instead slow down or stop until the tires cool Inflation pressure should be checked when tires are cool using an accurate tire pressure gauge Check pressures at regular intervals Bleeding the air...

Страница 357: ...at has been run flat or seriously underinflated without first demounting and inspecting the tire and rim assembly 3 Inflate tires in a safety cage 4 Inspect wheel nuts periodically for excessive wear...

Страница 358: ...e of starting fluid ether or gasoline or any other flammable material to lubricate seal or seat the beads of a tubeless tire can cause the tire to explode or can cause the explosive separtion of the t...

Страница 359: ...accordance with the MAINTENANCE CHECK LIST Consideration of severe working conditions may dictate a revision in scheduling periodic checks DAILY HYDRAULIC FLUID LEVEL The hydraulic reservoir fluid le...

Страница 360: ...lic reservoir return line filters after the first 40 hours of the break in period thereafter follow the quarterly check recommendation MONTHLY HYDRAULIC RESERVOIR Drain any accumulated moisture from t...

Страница 361: ...type filter is located inside the reservoir on the intake to the pump manifold Access to the filter is accomplished by removing the cover with filler neck and filter holding device from the top of the...

Страница 362: ...manent screen type filter is located inside the reservoir on the intake to the pump manifold Access to this filter is gained by removing the cover with the filter holding device from the top of the re...

Страница 363: ...the hydraulic system that should be taken care of immediately In addition to these daily checks Terex recommends annual inspections of all hose assemblies as a minimum maintenance of the crane Older c...

Страница 364: ...raulic hose assemblies If replacement of hydraulic hose assemblies is required it is recommended to use original spare parts from the OEM or hose assemblies according to the OEM specification which in...

Страница 365: ...T300 1_T500 1_T780 Maintenance 364 P N 12261 683 REVISED January 2015...

Страница 366: ...size The wrong rope will not function properly and may even be dangerous THE USE OF NON ROTATING 18 x 7 CLASS WIRE ROPE IS NOT RECOMMENDED IN MULTIPLE REEVING APPLICATIONS AND IF USED FOR APPLICATION...

Страница 367: ...NOTE IF A SOCKET IS CHANGED OR REPLACED OR IF YOU ARE CHANGING HOOK BLOCK WEIGHTS IT IS IMPORTANT TO USE THE CORRECT SOCKET T300 1_T500 1_T780 Maintenance 366 P N 12261 683 REVISED January 2015...

Страница 368: ...below or in similar application on jib Check the plug and socket connection at boom head and on lib if erected and reeved for connection The jib connector must be plugged into the boom head receptacle...

Страница 369: ...his may require lowering the hook block away from the trip mechanism at the boom head to enable the latching of controls THROTTLE CONTROL The throttle control consists of cables and clevis ends Adjust...

Страница 370: ...oat unpainted metal surfaces with multipurpose grease after removing any rust accumulations The ENGINE should be prepared as prescribed in the topic Engine Storage The TRANSMISSION should be prepared...

Страница 371: ...sion Inhibitor This can be removed with CRC HD Degreaser The ENGINE should be prepared as prescribed in the topic Engine Storage The TRANSMISSION should be prepared as prescribed in the topic Transmis...

Страница 372: ...Fill the crankcase to the proper level with the recommended viscosity and grade of oil 3 Fill the fuel tank with the recommended grade of fuel oil Operate the engine for two minutes at 1200 rpm and no...

Страница 373: ...rating temperature is reached 160 F to 185 F 8 Stop the engine 9 Remove the drain plug and completely drain the engine crankcase Reinstall and tighten the drain plug Install new lubricating oil filter...

Страница 374: ...ase if so desired If the oil is drained reinstall and tighten the drain plug tag cap 21 Remove and clean the battery and battery cables with a baking soda solution and rinse them with fresh water Stor...

Страница 375: ...dditional information STORAGE 30 DAYS TO 1 YEAR WITHOUT OIL 1 Drain Oil 2 Seal all openings and breathers except oil drain hole with moisture proof cover or tape 3 Coat all exposed unpainted surfaces...

Страница 376: ...following procedure 1 Remove preservative lubricants from all surfaces 2 Check all fluid levels adding or draining as required 3 Lubricate the machine according to Section 9 making certain that all p...

Страница 377: ...fications 9 Close all of the drain cocks and fill the engine cooling system with clean soft water and a rust inhibitor If the engine is to be exposed to freezing temperatures add a high boiling point...

Страница 378: ...Nox Rust or equivalent was not used in preparing the transmission for storage use the following procedures to restore the unit to service 6 Remove the tape from openings and breathers 7 Wash off all t...

Страница 379: ...at the equipment dealership before it is sold During these times a protective barrier must be applied to the exposed cylinder rod This protective barrier will preserve the integrity of the chrome plat...

Страница 380: ...d NOTE Caution must be used when cleaning equipment in service with high pressure washes Soaps or chemicals containing chlorines or other corrosive elements should be avoided Cylinders should be clean...

Страница 381: ......

Страница 382: ...BREAKING STRENGTH 17 9 TONS OPT 5 8 ROTATION RESISTANT COMPACTED STRAND 18X19 OR 19X19 MINIMUM BREAKING STRENGTH 22 7 TONS Main Winch T780 STD 3 4 dia 6X19 OR 6X25 CLASS IWRC REG LAY WIRE ROPE MINIMUM...

Страница 383: ...ROTATION RESISTANT COMPACTED STRAND BRIDON DYFORM 34LR 1960 MINIMUM BREAKING STRENGTH 34 51 TONS T300 1_T500 1_T780 Specifications 382 P N 12261 683 REVISED January 2015...

Страница 384: ...basic preventive maintenance requirements will be met under average operating conditions Conditions which impose greater wear loads or strain on the crane may dictate reduced check intervals Before al...

Страница 385: ...ling on winch Cylinder pin connections for wear Check tires axles and drive lines for wear or damage Check in the cab for Instruments functioning properly Control operation Glass for good visibility S...

Страница 386: ...to cause the failure Consider the most obvious first 6 TEST YOUR CONCLUSION Test your conclusions in order of obviousness until the source of the failure is found The machine can then be repaired at...

Страница 387: ...s If in spite of these precautions improper operation does occur the cause can generally be traced to one of the following 1 Use of the wrong viscosity or type of oil 2 Insufficient fluid in the syste...

Страница 388: ...e outrigger extend retract and function valves by pushing the pins in prior to activating the functions Check to see if the appropriate pin has been pushed back out as the functions are activated If t...

Страница 389: ...sis by DEFINING THE COMPLAINT a Talk to and question the driver b Drive the vehicle VISUAL INSPECTION a Look for poor loading practices b Check tires for mismatch and proper air pressure c Check suspe...

Страница 390: ...ication intervals and procedures Severely contaminative environment Clean and lubricate more often BENT OR BROKEN TIE ROD STEERING ARM TIE ROD ARM OR BALL STUD CAUSE REMEDY Excessive power steering pr...

Страница 391: ...ubrication intervals and procedures Increase lubrication frequency when operating in extreme conditions FRONT AXLE SHIMMY OR VIBRATION CAUSE REMEDY Incorrect caster setting Adjust caster Wheels and or...

Страница 392: ...g in seal area OIL LEAKING AT ACTUATING SHAFT OF STEERING GEAR CAUSE REMEDY Worn or damaged oil seal Replace seals Damaged actuating seal surface Replace damaged parts Lube bearing cap more often OIL...

Страница 393: ...oil change frequency Incorrect lubricant used Drain flush and refill with 10W 40 motor oil OIL IN RESERVOIR FOAMING CAUSE REMEDY Air leak in suction side of supply pump Refer to pump servicing instru...

Страница 394: ...en load or install larger steering gear Fatigued by pass valve spring in pump Replace with flow control valve assembly Refer to pump servicing instructions Low oil level in steering system Fill oil re...

Страница 395: ...ear Remove bracket Clean frame and bracket Check radius of frame making sure bracket is not bearing on radius surface Check bracket for wear from working Replace bracket and tighten to recommended tor...

Страница 396: ...to 6 positive caster Steering column bind Check and repair U joints and support bearings Steering gear mounting distorted Shim mounting pads to correct piston to bore interference Linkage ball socket...

Страница 397: ...g rollers worn Replace bearing Always replace both cups and cones EXCESSIVE VIBRATION CAUSE REMEDY Twisted or broken axle shaft Replace axle shaft Fractured axle shaft at flange Replace axle shaft Exa...

Страница 398: ...RNATOR ELECTRICAL OUTPUT CAUSE REMEDY Alternator regulator out of adjustment Replace regulator Field leads shorted Replace or repair alternator Alternator regulator shorted Replace regulator ALTERNATO...

Страница 399: ...belt or pulley Adjust belt or replace worn belt or pulleys Misalignment Inspect mounting brackets and tension adjusting arm for looseness Tighten or replace parts as required T300 1_T500 1_T780 Troubl...

Страница 400: ...r dirty Clean commutator Brushes worn Replace brushes Starter relay malfunctioning Repair or replace relay Pinion spring broken or weak Replace or repair starter Frame housing defective Replace or rep...

Страница 401: ...eak in procedure CLUTCH DRAG HARD SHIFTING CAUSE REMEDY Linkage blocked from full travel Remove blockage Linkage incorrectly adjusted Adjust clutch linkage Linkage worn damaged Replace faulty linkage...

Страница 402: ...clutch disc splines Clean clutch disc and input shaft splines or replace clutch disc as necessary Flywheel housing to clutch housing excessive misalignment Replace faulty housing Grease or oil contami...

Страница 403: ...eplace brake valve Relay or quick release valve exhaust ports obstructed Clean or replace faulty unit ONE BRAKE DRAGS WITH PEDAL RELEASED CAUSE REMEDY Insufficient brake shoe clearance Adjust brake sh...

Страница 404: ...rvice reservoir CAUSE REMEDY Restricted hose or tube Remove restriction or replace Defective spring brake valve Repair or replace spring brake valve MAXI BRAKES WON T RELEASE CAUSE REMEDY Control valv...

Страница 405: ...Repair leaks Frozen lines Thaw out lines Defective compressor Inspect for sticking unloader valve replace if necessary Reservoir leaking Replace Tank to compressor supply line damaged Replace T300 1_T...

Страница 406: ...king internally Reseal rotary manifold Swing pump faulty See section on Pumps SWING MOTION SLUGGISH CAUSE REMEDY Main relief valve stuck in open position Replace Faulty swing pump Repair or replace sw...

Страница 407: ...oil level Add oil as required Hose plugged or liner collapsed Replace hose Air in cylinder Bleed cylinder BOOM DROPS SLIGHTLY AS RAISE CONTROL IS RELEASED CAUSE REMEDY Air in cylinder Bleed cylinder...

Страница 408: ...himmed to boom too tight Reshim wear pads Faulty counter balance valve Replace counter balance valve Loose chain system Adjust chains as required TELESCOPE CYLINDER EXTENDS BUT WILL NOT RETRACT CAUSE...

Страница 409: ...OWER CAUSE REMEDY The winch hold valve is mounted on the winch motor incorrectly Be certain that the winch is assembled properly The winch hold valve spool is sticking Repair or replace The winch brak...

Страница 410: ...The winch hold valve is set wrong or is malfunctioning Check the hold valve setting If the winch continues to chatter the holding valve is sticking Inspect it for worn or damaged seals or contaminati...

Страница 411: ...replace Line plugged or collapsed between outrigger valve and cylinder Replace hose Beam wedged in extended position Extend jack far enough to pick up end of beam and retract Replace slider pad block...

Страница 412: ...M CAUSE REMEDY Pumps not engaged Engage pumps Pump not delivering oil for any of the reasons listed previously Follow remedies given previously Relief valve not functioning due to Valve setting not hi...

Страница 413: ...Rag paper etc pulled into suction line or pump Remove Worn or broken parts Replace EXTERNAL OIL LEAKAGE AROUND PUMP CAUSE REMEDY Shaft seal worn causing oil to leak into gear drive housing Replace Lo...

Страница 414: ...rating Check relief valve setting Seizure due to lack of oil Check reservoir level oil filter and possibility of restriction in suction line more often Solid matter being wedged in pump Check suction...

Страница 415: ...thermal equilibrium Let system warm up LEAKING SEALS CAUSE REMEDY Paint on or under seal Remove and clean Excessive back pressure Open or enlarge line to reservoir Dirt under seal Remove and clean Sc...

Страница 416: ...Dirt in relief valve Disassemble and clean Relief valve defective See section on Relief Valves Load too heavy Check line pressure Internal valve crack Replace valve Plunger not at full stroke Check mo...

Страница 417: ...damaged parts Clean dirt and remove surface marks for free movement PRESSURE SETTING NOT CORRECT CAUSE REMEDY Wear due to dirt Lock nut adj screw loose See section on Valve Adjustments LEAK CAUSE REME...

Страница 418: ...rotary manifold Worn pump Repair or replace pump Extremely high fluid temperatures causing pump and motor to slip temperature increases as pump and motor wear Add heat exchangers Relief setting too lo...

Страница 419: ...se Clean mating surfaces and tighten nuts to appropriate value Pinched O ring seal Replace LEAK AT OIL PORTS CAUSE REMEDY Damaged seal or O ring Replace O ring or seal Poor fittings Replace fittings c...

Страница 420: ...loose Check cylinder heads and tighten if loose Misalignment Check mounting pins and bushings Tighten rod eyes ERRATIC ACTION OF CYLINDERS CAUSE REMEDY Air in system Oil level is too low Add or chang...

Страница 421: ...Y A DEFECTIVE HOLD VALVE in the cylinder which drifts excessively by interchanging the hold valve cartridge with one removed from a cylinder that is not drifting or by replacement with a new cartridge...

Страница 422: ...own the cause is within the hold valve IF CYLINDER LEAK DOWN OCCURS with no oil leak from the hold valve ports the cause is within the cylinder OUTRIGGER JACK CYLINDER The suggested procedure for iden...

Страница 423: ...mps assembled after overhaul may be assembled too tightly This reduces clearances and increases rubbing friction Follow instructions when reassembling Leaking relief valves Repair Improper functioning...

Страница 424: ...rcuit breakers Reset breaker Disconnected or broken wires Replace or repair Open circuit Check with test light Repair or replace Low voltage Check wires and grounds Poor engine solenoid connection Cle...

Страница 425: ...the igniter wire completely and remove the igniter Try to start the heater and listen for the solenoid click Check for the odor of propane in the burner If propane odor is present at bulkhead fitting...

Страница 426: ...he igniter and the burner tube It should be 1 16 to 1 8 With the burner head grounded move the STARTRUN OFF switch to the START position and check the gap for spark If no spark is produced the igniter...

Страница 427: ...switch is in the RUN position the solenoid should produce an audible click and remain open until heater cycles off In extremely cold weather the regulator may become frosted As it thaws and freezes t...

Страница 428: ...ow charge Charge then turn on high beam head lamps or 15 amp load for 15 seconds Proceed to load test Stabilized voltage above 12 4 volts or indicator indicates charged Perform load test LOAD TEST Per...

Страница 429: ...8 7 0 18 C 8 5 NOTE IF WATER CAN BE ADDED TO A BATTERY A HYDROMETER READING OF 1 225 80 F 27 C CAN BE USED INSTEAD OF THE 12 4 VOLTAGE READING T300 1_T500 1_T780 Troubleshooting 428 P N 12261 683 REV...

Страница 430: ...boom head Plug in Boom head weight wire rope broken or hung up Check that weight is attached to wire and hanging freely If rope is caught up on something correct Jib or auxiliary boom head switch plug...

Страница 431: ...sconnect terminals If 12 volts check override key switch in control panel If 0 volts repair or replace disconnect Check other disconnects for condition To operate the crane the solenoid must have 12 v...

Страница 432: ...p If not the solenoid must be replaced If the solenoid engages but the disconnect breaks under load the spool ball and case should be replaced Contaminated function disconnect 1 Ensure that a drain ho...

Страница 433: ......

Страница 434: ...lace parts until the trouble is found Once the cause of a problem or malfunction has been diagnosed take the corrective action specified in this manual Follow the procedures given for the specific pro...

Страница 435: ...should be placed into their respective holes when removing guards cases etc so that proper bolt will be on hand when reassembling these parts T300 1_T500 1_T780 Service Parts 434 P N 12261 683 REVISE...

Страница 436: ...Capacity Indicator RCI or Rated Capacity Limiter RCL Visually inspect sensors for damage the condition of related wiring harness connections and dirt debris that could inhibit the sensor signal or pro...

Страница 437: ...1 Proximity Sensor Outrigger Position T300 1_T500 1_T780 Service Parts 436 P N 12261 683 REVISED January 2015...

Страница 438: ...mmercially made or fabricated by the user When using an extension it must be remembered that the wrench torque the actual torque reading or setting of the wrench and the wrench force the force applied...

Страница 439: ...T300 1_T500 1_T780 Service Parts 438 P N 12261 683 REVISED January 2015...

Страница 440: ...d and all persons in the welding area should have protection for their eyes Follow instructions for welding and cutting on paint AWS CLASS E7018 Low hydrogenrod for normal repairs on low alloy to medi...

Страница 441: ...he cut or weld is to be made Remove the paint far enough from the weld to prevent any remaining paint from becoming heated and bubbling If this happens continue to brush or grind the paint away A toxi...

Страница 442: ...T300 1 T500 1 Use single beam outriggers as shown below 1 Hose Disconnects 2 Wear Pad 3 Outrigger Extend Cylinder Deadend T780 Use a double beam outrigger as shown below 441 P N 12261 683 REVISED Jan...

Страница 443: ...r pad 2 can be replaced by removing one bolt BEAM REMOVAL AND REPLACEMENT The outrigger beams must be removed to service the outrigger extend cylinder The beams are removed by the following procedure...

Страница 444: ...s form the jack cylinder and remove the extend cylinder live end pin Remove the cylinder from the back end of the beam DISASSEMBLY Disassemble the extend cylinder by means of the following procedure 1...

Страница 445: ...n place before proceeding to the next step See Group 3 of the parts book for a complete listing of cylinder parts JACK CYLINDERS The jack cylinders on this crane can be removed without removing the ou...

Страница 446: ...in any serviceable parts If the hold valve cartridge is broken replace the entire hold valve cartridge Replace O rings wear rings seals or other components as required ASSEMBLY Assemble the jack cylin...

Страница 447: ...ngine RPM The relief setting should be 2500 psi 50 psi If necessary adjust the relief valve 1 T300 1 T500 1 OUTRIGGER RELIEF VALVE ADJUSTMENT Adjust this relief using the following procedure NOTE Ther...

Страница 448: ...1 T780 Relief Valve 2 Test Port 3 Relief Pressure Adjustment NOTE Relief is pre set at 600 PSI 447 P N 12261 683 REVISED January 2015...

Страница 449: ...S Both center and end bushings 4 are replaceable The beams 1 must be removed prior to servicing the bushings 4 Remove the beams 1 by the following procedure 1 Remove the capscrews and saddle caps from...

Страница 450: ...rse the beam removal procedure to reinstall the beam Torque the center pin saddle clamp capscrews to 225 275 ft lbs and beam end through bolt nuts to 210 240 ft lbs 449 P N 12261 683 REVISED January 2...

Страница 451: ...or checking Outriggers can be used when jacks of a capacity to raise the vehicle are unavailable If an adjustment is found necessary we recommend consulting your local distributor Check the toe in usi...

Страница 452: ...adjust pointers to line up with scribe lines and lock in place Repeat for front of tires 6 Read toe in or toe out from scale The recommended loaded toe in is 1 32 1 16 NOTE Set radial tires from 0 to...

Страница 453: ...in the power divider If the oil level is up to the bottom of the rear filler hole the power divider is also adequately lubricated If the oil level is low add oil as necessary If the axles have been dr...

Страница 454: ...he forward filler hole at the right top portion of the differential carrier Refer to Section 9 for the recommended lubricant WHEEL BEARING ADJUSTMENT Remove the lock nut 1 from the hub spindle prior t...

Страница 455: ...1 Lock Nut 2 Adjusting Nut T300 1_T500 1_T780 Service Parts 454 P N 12261 683 REVISED January 2015...

Страница 456: ...om the forward driving axle to the rear axle End yokes are used at all shaft ends and all couplings use bearing cap type cross journal retainers 1 Flange Yoke 6 Stub Yoke 2 Journal and Bearing Kit 7 E...

Страница 457: ...nit SLIP JOINT REMOVAL Before removing the slip joint be certain there are arrow marks stamped on the shaft and sleeve yoke If the arrow marks are not readily seen mark both members so that when reass...

Страница 458: ...trunnion of the journal cross into the bearing hole in the yoke lug from the inside between the lugs and tilt until the trunnion of the journal cross will clear hole in opposite yoke lug NEEDLE BEARIN...

Страница 459: ...sirable due to the resulting unbalance 4 Mounting flanges and pilots should be free from burrs paint and foreign substances which would not allow proper seating at assembly SLIP JOINT ASSEMBLY Lubrica...

Страница 460: ...d and second shafts between the transmission and the intermediate axle must be assembled In Phase 2 The inter axle drive shaft yokes at the third shaft must be assembled In Phase 3 When drive shafts a...

Страница 461: ...ht hand Hub piloted wheels are straight through bolt holes with no ball seat which provides a visual way of identifying them See figure below A 10 Hole 11 25 Bolt Circle DCN Mounting 1 Inflate tire pr...

Страница 462: ...ub and drum Tighten nuts to 450 500 ft lbs item 1 dry using the same criss cross sequence 1 Torque each nut to 450 500 ft lbs dry 2 Install 1222 356 Cover Lug Nut 10 b Dual Rear Wheels Slide the inner...

Страница 463: ...proper torque level Maintain nut torque at the recommended level through planned periodic checks If air wrenches are used they must be periodically calibrated for proper torque output Use a torque wr...

Страница 464: ...uds can be used with all types of wheels The use of improper nuts and studs can cause nut loosening stud failure or premature wheel failure which could cause an accident or injury 463 P N 12261 683 RE...

Страница 465: ...Engine Clutch Adjustment Repair T300 1_T500 1_T780 Service Parts 464 P N 12261 683 REVISED January 2015...

Страница 466: ...465 P N 12261 683 REVISED January 2015...

Страница 467: ...T300 1_T500 1_T780 Service Parts 466 P N 12261 683 REVISED January 2015...

Страница 468: ...lutch to slip before making adjustment It is too late then to make adjustment Facings quickly disintegrate once they become burned through slippage and have short life thereafter 467 P N 12261 683 REV...

Страница 469: ...sh or free travel may prevent complete clutch disengagement while insufficient clutch pedal lash or free travel will cause slippage and short clutch life T300 1_T500 1_T780 Service Parts 468 P N 12261...

Страница 470: ...pring DO NOT overcome the spring tension and shift to reverse The shift finger must remain in this position while you are making all the adjustments 1 REACH ROD 2 TURNBUCKLE 3 SELECTION LEVER 4 INNER...

Страница 471: ...splines of the two parts Disregard any movement of the gear shift lever at this point You will adjust the gear shift lever later Tighten capscrew B Re connect pivot link assembly ball joint to select...

Страница 472: ...kle capscrew D Move gear shift lever to desired left right neutral position Tighten second turnbuckle capscrew D Check for linkage obstructions in all gear positions 1 REACH ROD 2 TURNBUCKLE 3 SELECTI...

Страница 473: ...1 SELECTION LEVER 2 SHIFT ARM T300 1_T500 1_T780 Service Parts 472 P N 12261 683 REVISED January 2015...

Страница 474: ...ut 2 b Adjust the power steering unit to stop approximately 1 16 to 1 8 before axle steering stops 3 contact maximum turning angle 1 The adjustment of both axle steering stops and power steering unit...

Страница 475: ...Examine thrust bushings located between input gear and lower planet drive gear Replace if necessary 6 The lower planet carrier is splines to the output shaft Remove the cap and shims to disassemble th...

Страница 476: ...1 Swing Reducer Dipstick 2 Shim 3 Thrust Bushings 475 P N 12261 683 REVISED January 2015...

Страница 477: ...g tension on the adjusting screw is relieved This will avoid the possibility of immediate damage to the replacement unit in the event that the relief valve setting had been increased beyond the recomm...

Страница 478: ...y new parts have been used When rebuilding the pump with parts from the original pump which while worn appear satisfactory for re use a 10 or 15 lower reading may be permitted depending on the perform...

Страница 479: ...good quality 5000 psi gauge in the designated test port locations and proceed with pressure check and adjustment as follows THIS MACHINE USES A PRESSURIZED HYDRAULIC RESERVOIR THE PRESSURE MUST BE REL...

Страница 480: ...g procedure First retract the boom completely and continue to retract over relief with the engine running at full governed rpm Initially set the retract port relief valve located on spring cap end of...

Страница 481: ...to swing test port 2 Set the swing brake and attempt to swing against the brake with the engine running at maximum governed rpm Adjust the swing relief valve if necessary per the chart below 3 The T7...

Страница 482: ...F VALVE PRESSURES ON SWING VALVE Attach the pressure gauge on the swing valve test port and follow these steps Remove acorn nut and loosen jam nut make sure several threads on adjusting screw are enga...

Страница 483: ...ilot poppet and its seat provides positive seating and very seldom requires any maintenance The pilot section can be removed from the cartridge housing without disturbing the setting With it will come...

Страница 484: ...MENT With the test gauge still attached to the test port remove the hex cap insert an allen wrench adjust to the proper setting while holding the outrigger in the retract position Turn in to increase...

Страница 485: ...D INTO OPERATION IT SHOULD BE SLOWLY ROTATED SEVERAL MINUTES TO ALLOW ANY ENTRAPPED AIR TO ESCAPE AND TO FACILITATE REFORMING OF SEALS THAT MAY HAVE TEMPORARILY DEFORMED DURING STORAGE All overhaul sh...

Страница 486: ...replaced without removing the spool Removing the top cover exposes the top O ring The spool will drop out of the case exposing the bottom O ring UPON REASSEMBLY INSTALL THE UPPER O RING AND BACK UP RI...

Страница 487: ...by loosening cable lock nuts at pedal anchor Increase tension by shifting cable out of the U shaped bracket with adjustment of the locking nuts SWING WINCH BOOM TELESCOPE BOOM HOIST VALVE CONTROL The...

Страница 488: ...nual Packet for the following Service Operations Manuals PART NO MANUFACTURER TXCR 325 326 Kenway AC HYD Heater Manual PRE 2010 Models OM TXCR406 Kenway AC HYD Heater Manual 2010 Models NT 20S TC Subu...

Страница 489: ...inal damage If obvious physical damage is found replace the battery If possible determine the cause of damage and correct Check the condition and size of the cables Are the cable clamps tight Check fo...

Страница 490: ...ied in the Voltage Chart see Maintenance Free Battery Testing Chart in Troubleshooting section replace the battery If the voltage meets or exceeds the specified minimum clean and return battery to ser...

Страница 491: ...ttery violent gassing or spewing of electrolyte occurs or the battery case feels hot 125 F 52 C reduce or temporarily halt charging to avoid damaging the battery Follow the manufacturers instructions...

Страница 492: ...emoved Carefully remove the brushes without over stretching the brush springs and arrange in order of removal with spacers Replace the damaged brush assembly and then reassemble the brushes and spacer...

Страница 493: ...NGINE STOP 9 WHITE 001AA O R EXTEND 33 RED 211AA WTS 10 BLACK 002AA O R RETRACT 34 RED 129AA THROTTLE 11 RED 003AA RIGHT REAR JACK 35 BLACK 130AA THROTTLE 5V 12 YELLOW 004AA LEFT REAR JACK 36 WHITE 13...

Страница 494: ...ATION CHART ROW EXPORT ENGINE CIRCUIT COLOR WIRE TAG FUNCTION CIRCUIT COLOR WIRE TAG FUNCTION 1 RED 0A HOT 25 RED 24 REMOTE STEER 2 RED 0B HOT 26 YELLOW 25 REMOTE STEER 3 RED 0C HOT 27 GREEN 26 REMOTE...

Страница 495: ...BLUE 13 FRONT JACK 44 YELLOW 176 TRANS SHIFT 21 BLACK 16B GROUND 45 BLACK 143 TRANS SHIFT 22 BLUE 20 E STOP 46 VIOLET 192 TRANS SHIFT 23 BROWN 21 E STOP 47 YELLOW 194 TRANS SHIFT 24 BLACK 23 SPARE 48...

Страница 496: ...indicates the condition of the battery alternator and voltage regulator and what to so to correct the condition ENGINE NOT RUNNING OR RUNNING AT SLOW IDLE Dead or disconnected battery Disconnected or...

Страница 497: ...y The pointer might remain in this position temporarily when the engine has been stopped after considerable use due to a surface charge in the battery To get a correct reading turn on lights for a few...

Страница 498: ...the last step but generally speaking any reading above 12 8 when the engine is stopped is not a true reading ENGINE RUNNING FAST ENOUGH TO MAKE ALTERNATOR PRODUCE CHARGE Disconnected voltmeter Engine...

Страница 499: ...voltage regulator is out of adjustment or that current being drawn from battery by lights heater fan or accessories exceeds alternator output When engine is started pointer may stay in this area tempo...

Страница 500: ...voltage regulator and battery are all in good condition and working properly When the pointer goes above 15 2 the voltage regulator is set too high or is jammed and continued operation of the engine w...

Страница 501: ...T300 1_T500 1_T780 Service Parts 500 P N 12261 683 REVISED January 2015...

Страница 502: ...assembly piston rod head gland and piston assembly 3 To remove piston remove the setscrews which secure the piston retaining ring to piston rod 4 Remove piston and gland which allows access to all se...

Страница 503: ...oil the piston ring or wear ring to aid in the installation MOST PISTON RING BREAKAGE IS DUE TO CARELESS OR HASTY ASSEMBLY AT THIS POINT BOOM LIFT CYLINDERS With the piston piston rod head gland reta...

Страница 504: ...r is ready to be placed in operation it should be slowly cycled under no load conditions for several minutes in order to allow the entrapped air within the cylinder to escape to the reservoir and also...

Страница 505: ...e second boom section the hole closer to the base section measure the sag of the retract chain This measurement must be taken from the bottom of the second section to the bottom of the chain This dime...

Страница 506: ...tract chain This measurement must be taken from the bottom of the third section to the bottom of the chain This dimension should be 2 75 inches 70 mm to 3 inches 76 mm 9 If the dimension is greater th...

Страница 507: ...hin its respective outer boom section 1 WEAR PAD 1 Remove the pad plate on both sides Add shims 1 until the pad plate will not touch the boom section Then remove one shim and tighten the inner two bol...

Страница 508: ...SHIM 2 After the pad plates are set adjust the lower tip pads of each section until they are within 1 16 of the inner section 3 Repeat this process on Sections 2 3 and 4 507 P N 12261 683 REVISED Jan...

Страница 509: ...ng the external cylinder Measure the distance from the sensor block to the outside of the mounting plate Set the distance from the face of the proximity switch to the inside of the plate to 3 8 less t...

Страница 510: ...509 P N 12261 683 REVISED January 2015...

Страница 511: ...Repairs Adjustments Remarks Log ITEM REQUIREMENT DATE T300 1_T500 1_T780 Service Parts 510 P N 12261 683 REVISED January 2015...

Страница 512: ...511 P N 12261 683 REVISED January 2015...

Страница 513: ......

Страница 514: ...0 0406 3 572 5 32 0 1563 3 969 11 64 0 1719 4 366 3 16 0 1875 4 762 13 64 0 2031 5 159 7 32 0 2188 5 556 15 64 0 2344 5 953 1 4 0 2500 6 350 17 64 0 2656 6 747 9 32 0 2813 7 144 19 64 0 2969 7 541 5 1...

Страница 515: ...085 11 16 0 6875 17 462 45 64 0 7031 17 859 23 32 0 7188 18 256 47 64 0 7344 18 653 3 4 0 7500 19 050 49 64 0 7656 19 447 25 32 0 7813 19 843 51 64 0 7969 20 240 13 16 0 8125 20 637 53 64 0 8281 21 0...

Страница 516: ...tre 61 023 cu in 1 litre 2 202 lbs of water 62oF 1 cu foot 28 32 litres 1 gallon 3 785 litres 1 cu inch 0 0164 litre MEASURES OF WEIGHTS U S 16 ounces 1 pound 2000 pounds 1 short ton 2240 pounds 1 lon...

Страница 517: ...ees 1 quadrant 360 degrees 1 circumference ELECTRICAL UNITS 1 kilowatt 1 34 H P 1 horsepower 746 watts SURVEYOR S MEASURE 7 92 inches 1 link 100 links 66 feet or 4 rods or 1 chain 80 chains 1 mile T30...

Страница 518: ...148 3996 Dolomite Crushed Fine 1521 90 95 2565 Dolomite Broken Lump 1521 90 95 2565 Earth Loamy Dry Loose 1201 50 75 2025 Earth Dry Packed 1521 90 95 2565 Earth Wet Mud 1762 20 110 2970 Flue Dust Bla...

Страница 519: ...ing Mill Wet 2114 64 132 3564 Shale Broken 1361 70 85 2295 Slag Blast Furnace Broken 2210 76 138 3726 Slag Open Hearth Crushed 1682 10 105 2835 Slag Granulated Dry 606 76 38 1026 Slag Granulated Wet 9...

Страница 520: ...Torque Specs SAE Metric 519 P N 12261 683 REVISED January 2015...

Страница 521: ...T300 1_T500 1_T780 Appendix 520 P N 12261 683 REVISED January 2015...

Страница 522: ...of California to cause cancer birth defects and other reproductive harm WARNING Battery posts terminals and related accessories contain lead and lead compounds chemicals known to the State of Califor...

Страница 523: ...rnia to cause cancer birth defects and other reproductive harm Battery posts terminals and related accesories contain lead and lead compounds chemicals known to the State of California to cause cancer...

Страница 524: ...tp www michelintruck com michelintruck toolbox reference material jsp Bridgestone Tire Warranty Maintenance and Safety Manual http www trucktires com bridgestone us eng load general pdf bridgestone li...

Страница 525: ...tion may deny you warranty coverage if your vehicle has failed due to abuse neglect improper maintenance or unapproved modifications You are responsible for initiating the warranty process Terex Corpo...

Страница 526: ...mpletely read the attached manual in the Appendix section before attempting to operate the crane For troubleshooting or calibrations refer to your SHOP MANUAL CD where you will find a Greer Troublesho...

Страница 527: ...Notes T300 1_T500 1_T780...

Страница 528: ...ons 106 12th Street S E Waverly IA 50677 USA Tel 1 319 352 3920 Fax 1 319 352 9378 P N 12261 683 Copyright Terex Corporation Terex is a registered trademark of Terex Corporation in the United States o...

Отзывы: