KRB-5368c
-33-
6-2. Parts Replacement Procedure
CAUTION
ACB maintenance, inspection and parts replacement must be performed by competent persons.
Do not touch ACB current carrying parts and ACB structural parts close to a current carrying part immediately after the ACB
trips open. Remaining heat may cause a burn.
Prior to commencing any work on the ACB, open an upstream circuit breaker or the like to isolate all sources of
power/voltage from the main and control circuits. Otherwise, electric shock may result.
Prior to commencing maintenance, inspection, or parts replacement, make sure that the closing springs are released and the
ACB is open. Otherwise, unintentional open/close operation may lead to fingers or tools to be pinched by the open/close
mechanism, resulting in injury.
Be sure to reinstall the arc chamber if removed. Failure to do so or incorrect installation of the arc chamber may result in a fire
or burn.
When replacing an auxiliary, do not damage the control wire for the auxiliary or pinch the wire between the auxiliary and the
breaker body. Doing so may cause a malfunction.
6-2-1. Preparation
Be sure to make the following preparations for parts replacement in order to ensure safety.
1) Open an upstream circuit breaker or the like to isolate all sources of power/voltage from the main and control circuits.
2) Discharge the closing springs and open the ACB. The procedure varies depending on whether or not the ACB is equipped with
the undervoltage trip device (UVT).
When the ACB is not equipped with the undervoltage trip device (UVT):
Perform manual closing/opening operation of the ACB. Refer to sections 4-1-2 and 4-1-3.
When the ACB is equipped with the undervoltage trip device (UVT):
(1)
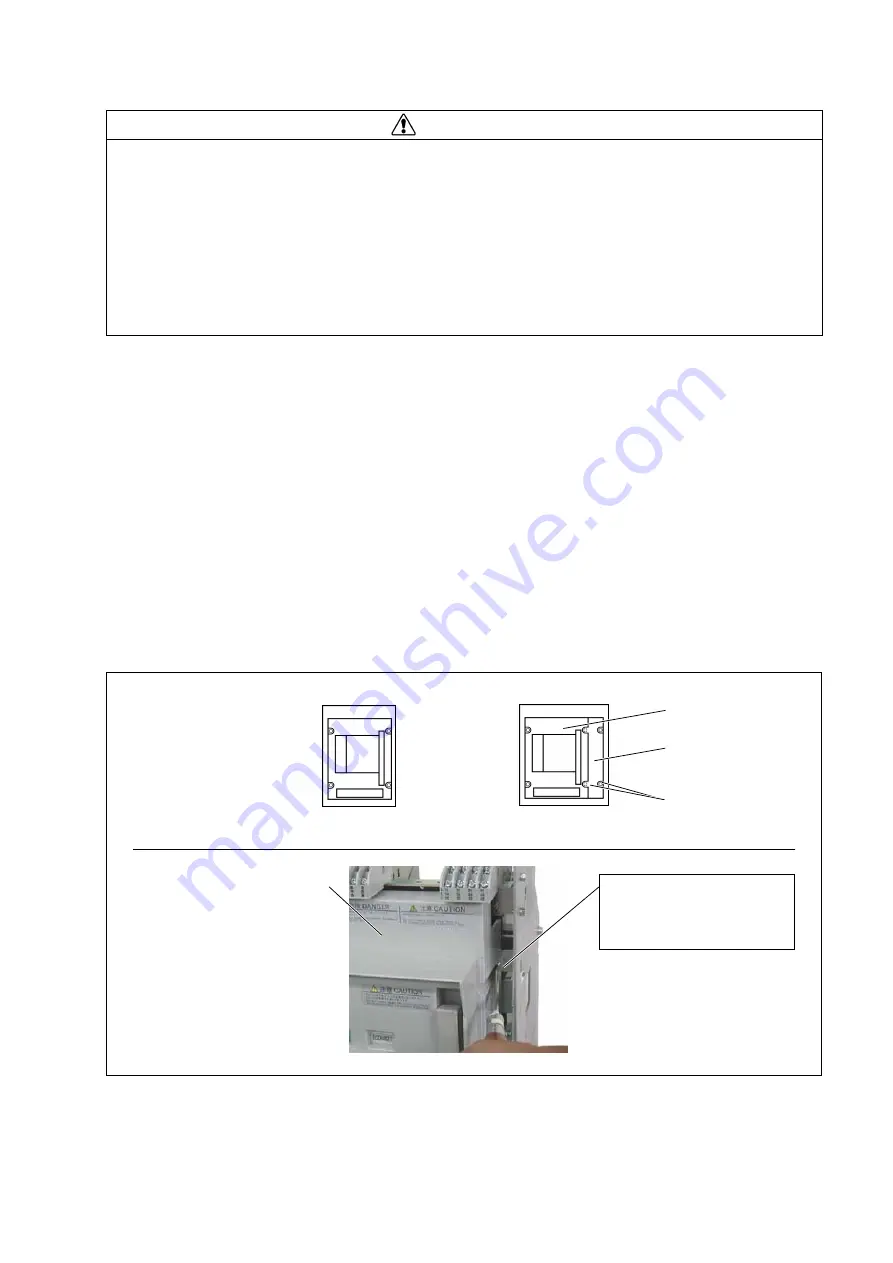
Turn the cover mounting screws five or six turns to loosen as shown in Fig. 23. If the ACB is equipped with side covers, first
remove the side covers and then loosen the front cover mounting screws. (The cover mounting screws are of captive type and
cannot be removed from the side and front covers.)
(2)
Pulling the charging handle down as shown in Fig. 10, remove the front cover.
Location of cover mounting screws
3 poles
4 poles
Fig. 23 Cover mounting screws
Front cover
Side covers
Cover mounting
screws
Cover mounting screw (captive),
Pan head M5 x 20 (4 - 6)
with spring and flat washers
Tightening torque: 2.7 - 3.5 N·m
Front cover
Содержание TemPower2 AR-E Series
Страница 2: ......
Страница 4: ...KRB 5368c 4...


