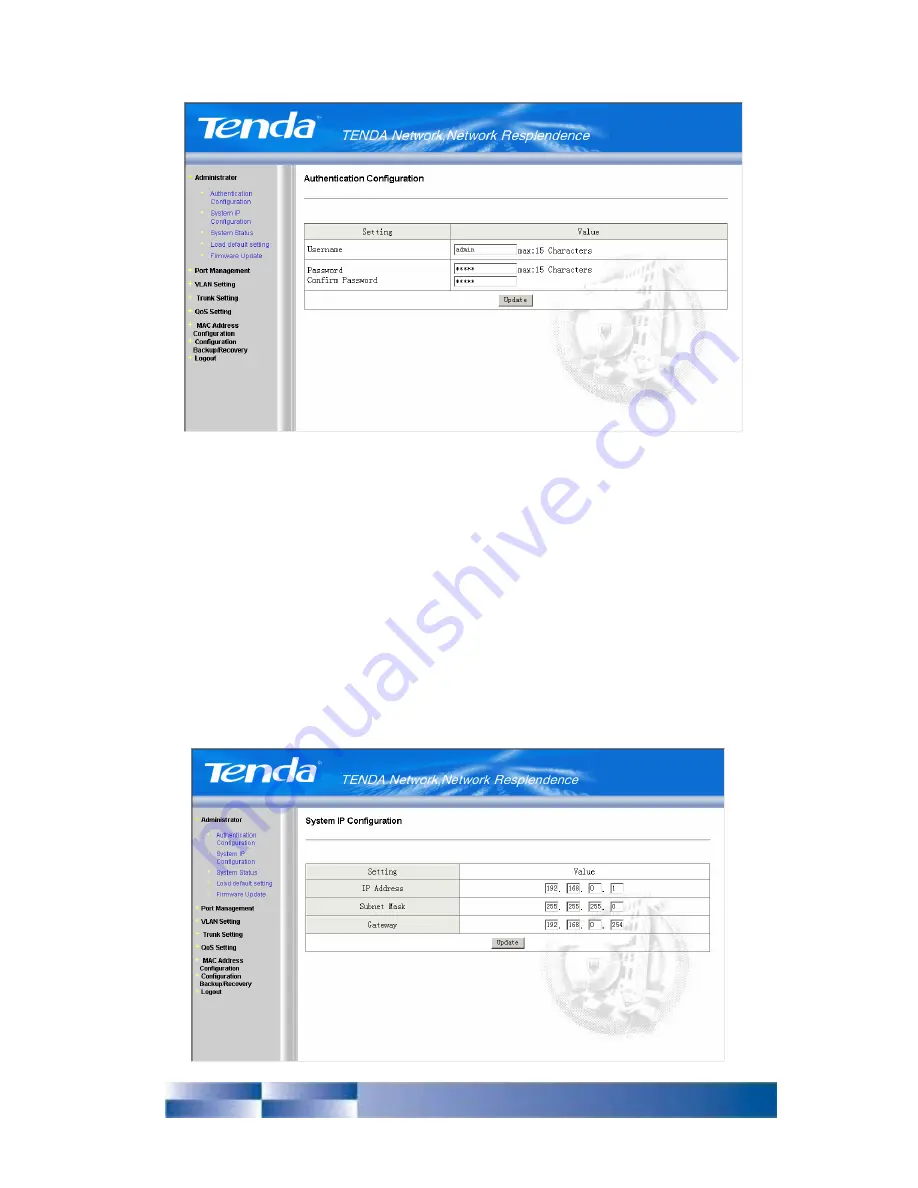
Tenda TEH1208 Скачать руководство пользователя страница 11


Figure 3 

¾


User Name: Input user name for logging in (Max. 15 characters) 

¾


New Password: Input password for logging in (Max. 15 characters) 

¾


Password Confirmation: Input password again for confirmation 


3.2.2

 System IP Configuration


To set the IP address of switch 


Содержание TEH1208

Страница 1: ......

Страница 2: ...stallation 7 Chapter Three Configuration Guide 3 1 Fast Log In 8 3 2 Administrator 9 3 2 1 Authentication Configuration 9 3 2 2 System IP Configuration 10 3 2 3 System Status 11 3 2 4 Load Default Set...

Страница 3: ...ing 18 3 4 2 Multi to 1 Setting 19 3 5 Trunk Setting 21 3 6 QoS Setting 23 3 6 1 Priority Mode 23 3 6 2 Class of Service Configuration 24 3 7 MAC Address Configuration 25 3 8 Configuration Backup Reco...

Страница 4: ...on operating interface It is a high quality low price product especially suitable for Net bar SMB Small and Medium size Business and Smart residential area Configuration of TEH1206 1216 1224 is simple...

Страница 5: ...le QoS application to prioritize mission critical data such as voice or video packets MAC Address Filtering MAC address learning control filtering of fixed MAC address Broadcast storm control broadcas...

Страница 6: ...One Power Line 3 One copy of User s Manual 4 One copy of Warranty Card Chapter Two Hardware Installation 2 1 Introduction of LED Indicators Indicator Introduction ON Power on POWER OFF Power Off pleas...

Страница 7: ...D will shrink for several times again this means that reset has been finished Please turn power off and then restart then switch will be restored to factory default setting Cautions Unless you require...

Страница 8: ...itch to Hub Through Uplink port MDI II Uplink port of Hub 10 100BASE TX is connectable to any port of switch through Catalogue 3 4 5 UTP STP straight or cross over cable Switch to Hub no Uplink port I...

Страница 9: ...16 TEH1224 You can login and configure the switch after setting the IP Address The default parameters of the switch are as follows Parameter Default Value Default IP Address 192 168 0 1 Default User s...

Страница 10: ...On the menu which is on the left hand side of the page there are totally 8 items Administrator Port Management VLAN Setting Trunk Setting QoS Setting MAC Address Configuration Configuration Backup Rec...

Страница 11: ...user name for logging in Max 15 characters New Password Input password for logging in Max 15 characters Password Confirmation Input password again for confirmation 3 2 2 System IP Configuration To set...

Страница 12: ...System Status To display the status of switch Figure 5 MAC Address of Switch Display MAC address of switch Port Quantity Display port number of switch Switch Description Display description of switch...

Страница 13: ...gure 6 Load Click Load and restore to default setting this function is similar to the function of the Reset button 3 2 5 Firmware Update Figure 7 Update Click Update and start to update the software o...

Страница 14: ...etailed operating guide for updating Please be careful in updating it is suggest that you should disconnect the network connectivity except the connectivity with the computer for updating and please a...

Страница 15: ...gotiation otherwise failure of communication will occur Flow control means that two connected devices will control data flow and avoid packet loss 802 3x mode is suitable for full duplex mode Backpres...

Страница 16: ...d actual working mode and configuration of each port 3 3 2 Port Mirroring The port mirroring function enables you to transfer packet from monitored port to monitoring port received packet sent packet...

Страница 17: ...bles you to control the transmission rate of each port including upstream and downstream and stop the user of a certain port from using too much bandwidth And user of other ports will have more stable...

Страница 18: ...etting Click and restore to default setting Bandwidth Control Status Display the Transmission Rate Receiving Rate and Connecting Rate of each port 10Mbps or 100Mbps 3 3 4 Broadcast Storm Control Broad...

Страница 19: ...7 3 4 VLAN Setting 3 4 1 Group VLAN Setting TEH1208 TEH1216 TEH1224 supports Port Based VLAN only the port set in the same VLAN group are able to communication with each other and VALN group descripti...

Страница 20: ...the selected VLAN group VLAN Group Description Give brief description to your VLAN group in 16 characters Restore to Factory Default Setting Click and restore to original function of VLAN group VLAN...

Страница 21: ...h other You can also use the port disable function the selected port will be disable in the VLAN it will neither be able to communicate with the Uplink port nor communicate with other ports of the swi...

Страница 22: ...lt tolerant in uplink pipeline between switches 4 Trunk Arithmetics Arithmetics based on source port ID value of port which is transmitting the packet Arithmetics based on source MAC address value of...

Страница 23: ...e the trunk group for uplink between switches please make sure that ports from another switch are also set in the same trunk group in that switch That is to say you must uplink multi ports between swi...

Страница 24: ...irst This mode is not recommended if Priority mode is set In absolutely Priority mode switch will forward data packets according to priority level strictly Only after the data packets in the queue wit...

Страница 25: ...h and low priority 3 types of priority configuration mode If you select port based priority and select a certain physical port as high priority then data packets entering this port will be mapped as h...

Страница 26: ...port 802 1p Tag Based Priority To select 802 1p Tag Based priority mode IP TOS DS Priority Mode To select IP TOS DS Priority mode 3 7 MAC Address Configuration To select port filtering as Disable Ena...

Страница 27: ...urce MAC address will be given up except the data packets from the static MAC address If you input the MAC address going to be filtered in the MAC Address Filter dialogue box all the data packets with...

Страница 28: ...configuration of switch Please do not change or submit the configuration casually otherwise this may cause the switch to fail to work normally If you require to backup the configuration please copy a...

Страница 29: ...Figure 18 Configuration Content Display current configuration or input forming data Password Input Administrator Password 3 9 Logout Quit current configuration and close the configuration page...

Отзывы: