background image

14

NOTE

If you do not press any button on the handset for 30 seconds the display will 

automatically return to standby. It will also return to standby when the handset is 

placed on the base or charger.

Menu layout

Phonebook

List Entry

When no entry is stored 

List 

empty

 is shown, if entries are 

stored scroll to the required 

entry and press 

OK

.

Edit
Delete

New Entry
Delete All
Direct Mem

Clock/Alarm

Date & Time
Set Alarm
Alarm Tone
Auto clock

Personal Set

Handset Tone

Ring Volume 
Ring Melody
Key Tone
Docking tone

Handset Name
Auto Pick-Up

Auto Hang-Up
Language
Backlight

Advanced Set

Call List
Conference
Auto prefix

Digit Detect
Prefix Num.

Recall Time
Register
Unregister
PIN
Reset
ECO Mode

Zero Emit
Range select

Colombo EN EU V2.indd   14

21/10/2015   08:51:07

Содержание COLOMBO NEUE

Страница 1: ...TELSTRA COLOMBO NEUE DECT CORDLESS PHONE USER GUIDE ...

Страница 2: ...eakerphone Make or answer a call Activate and deactivate hands free during a call Asterisk key Keypad lock For entering asterisks In standby mode press and hold to lock unlock the keypad Redial Open the redial list Earpiece Display Menu OK Navigation key Volume Calls list Talk key speaker phone Activating deactivating the key lock Redial key Microphone Back Clear Mute End Call Power key Navigation...

Страница 3: ...ling down Access to phonebook In call volume adjustment during calls z 9 Alphanumerical keypad For dialling telephone numbers H Hash key Press and hold down to switch handset ringer on off For entering the hash symbol When entering names switch between upper and lower case lettering Press and hold to use Recall feature when connected to a PABX and with some Telstra Calling Features e g Call Waitin...

Страница 4: ...set ringer is off Steady when the handset is registered and within range of the base Disappears when the handset is out of range and flashes when searching for the base Displays when Eco mode is on Not available if 2 or more handsets are registered to the base unit Displays when Zero emit is on The approximate power levels of your battery are indicated as below Battery is fully charged Battery is ...

Страница 5: ...tra supporting the service A subscription fee may be payable Overview of the base Symbol Function p Paging key Press pon the base all handsets ring Press pagain to cancel the paging call or press any key on the handset to stop the paging call Press and hold to enter registration mode Charging light Lights up when the handset is on the base Page Charging light ...

Страница 6: ...me 31 Registration 31 Register a handset 32 De register a handset 32 PIN 32 Reset WHAT S INSIDE 2 Getting to know your phone 8 Safety precautions 10 Getting started 15 Making and receiving calls 15 Make a call 15 Pre dial 15 Dial direct memory numbers 1 to 9 15 Call from the phonebook 15 Call from the Call list 15 Answer a call 16 Adjust volume 16 Mute 16 End a call 16 Switch handset on off 16 Int...

Страница 7: ...7 33 Eco mode 33 Zero emit 33 Default settings 34 Help 35 Appendix ...

Страница 8: ...from mains separate the plug from the wall socket first Rechargeable batteries Use the two supplied rechargeable batteries 1 2V AAA 550mAh by Sanik or High Power Using other rechargeable batteries or non rechargeable batteries primary cells can be dangerous and cause malfunctions in or damage to the telephone Product dimensions and weight Handset L 162 7 x W 51 4 x H 34 4 103 5g Base L 71 0 x W 73...

Страница 9: ...e metal objects can be picked up Environmental impact At the end of the product s life cycle the telephone must not be disposed of in normal domestic waste Please take it to a collection point for processing electrical and electronic equipment Some materials used in this product can be recycled if you take it to a recycling depot By recycling parts or raw materials from used products you will be m...

Страница 10: ... up to 300 metres outdoors when there is a clear line of sight between the base and handset Any obstruction between the base and handset will reduce the range significantly With the base indoors and the handset either indoors or outdoors the range will normally be up to 50 metres Thick concrete and stone walls can severely affect the range Signal strength The icon on your handset indicates that yo...

Страница 11: ...e base 2 Plug the power adaptor into the socket marked on the underside of the base and plug the other end into the mains power wall socket Switch on the mains power Handset Base Telephone line cord pre installed Mains power adaptor User guide 2 x AAA rechargeable batteries already in handset Charger Mains power adaptor Handset 2 x AAA rechargeable batteries already in handset ...

Страница 12: ...ver back into place 4 Place the handset on the base to charge see below Connecting the charger 1 Plug the power adaptor into the socket marked on the underside of the charger and plug the other end into the mains power wall socket Switch on the mains power Charging the batteries If the battery charge status has reached its lower limit the battery symbol flashes in the display and a warning signal ...

Страница 13: ...e subscribed to a Caller ID service and Auto Clock is set to on see Switch auto clock on off on page 26 the date and time is set automatically for all handsets when you receive your first call If Auto Clock is set to off the time and date does not set automatically If you do not have a Caller ID service you can set the date and time manually 1 Press m scroll dto Clock Alarm and press m 2 Date Time...

Страница 14: ...d List empty is shown if entries are stored scroll to the required entry and press OK Edit Delete New Entry Delete All Direct Mem Clock Alarm Date Time Set Alarm Alarm Tone Auto clock Personal Set Handset Tone Ring Volume Ring Melody KeyTone Docking tone Handset Name Auto Pick Up Auto Hang Up Language Backlight Advanced Set Call List Conference Auto prefix Digit Detect Prefix Num Recall Time Regis...

Страница 15: ...r 4 Press t again to dial over hands free NOTE Instead of scrolling to browse the phonebook entries press the numeric key corresponding to the first letter of the entry you wish to locate For example pressing 2 will show the entries starting with A Pressing 2 twice will show the entries starting with B etc Call from the Call list NOTE You need to subscribe to a Caller ID service to be able to see ...

Страница 16: ...hown in the handset display 2 During a hands free call press uor dto adjust the hands free volume The level is shown in the handset display Mute Mute the microphone so that you can talk to someone else in the room without your caller hearing you 1 During a call press b The microphone is muted and Mute On is displayed 2 Press bagain to turn the microphone back on End a call 1 Press e After you hang...

Страница 17: ...ndset answers announce the caller then press e to transfer the call If the other handset does not answer press i to talk to your caller again Three party conference call 1 During an external call press i Your caller is put on hold 2 Scroll dto the number of the handset you want to call and press mor press to ring all handsets If there are only two handsets the other handset is called automatically...

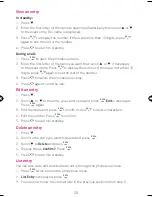
Страница 18: ...y beginning with N If required press uor d to scroll to the exact entry 3 Press t to dial the entry displayed Store an entry 1 Press m Phonebook is displayed 2 Press m Scroll dto New Entry 3 Press m Enter Name is displayed 4 Enter a name and press m 5 Enter a number Press mto save 6 Press e to return to standby NOTE Cancel storing an entry by pressing e at any time during the process Entering name...

Страница 19: ...Õ Ö 7 L p q r s 7 ß ş š Π Θ Σ U P Q R S 7 Ş Š Π Θ Σ 8 L t u v 8 ù ú ü ū ų μ U T U V 8 Ù Ú Ü Ū Ų 9 L w x y z 9 ø Ω Ξ Ψ ž U W X Y Z 9 Ø Ω Ξ Ψ Ž z L U Space 0 H L U Press and hold to switch between ABC abc Abc Enter a pause If your Colombo Neue is connected to a switchboard you may need to enter a pause in a stored number This gives the switchboard time to get an outside line A pause is normally stor...

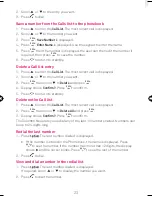
Страница 20: ...of the number 3 Press e to cancel the phonebook display 4 Press e again to end the call Edit an entry 1 Press d 2 Scroll uor dto the entry you want to edit and press m Edit is displayed Press magain 3 Edit the name and press mto confirm Use bto delete characters 4 Edit the number Press mto confirm 5 Press e to return to standby Delete an entry 1 Press d 2 Scroll to the entry you want to delete and...

Страница 21: ...Enter the first letter of the name to search alphabetically then scroll uor dto the exact entry then press m 7 Press e to return to standby NOTE Only numbers that have been stored in the phonebook can then be stored as direct memory numbers To dial direct memory numbers see Dial direct memory numbers 1 to 9 on page 15 Delete a direct memory number 1 Press mtwice 2 Scroll dto Direct Mem and press m...

Страница 22: ...he call Entries are displayed in chronological order with the most recent call at the top of the list NOTE When the Call list is full a new call replaces the oldest in the list The received and missed Call list holds details of up to 50 calls When you have missed calls incoming calls that you haven t answered the icon will flash on the display on all handsets registered to the base If one handset ...

Страница 23: ...ess m 4 Display shows Confirm Press mto confirm 5 Press e to return to standby Delete entire Call list 1 Press uto enter the Call List The most recent call is displayed 2 Press mthen scroll dto Delete All and press m 3 Display shows Confirm Press mto confirm The Colombo Neue lets you redial any of the last 10 numbers called Numbers can be up to 24 digits long Redial the last number 1 Press r The l...

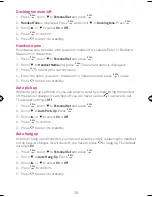
Страница 24: ...ber if required and press m 5 Press e to return to standby Delete a redial list entry 1 Press r Scroll uor dto display the number you want 2 Press mand scroll dto Delete then press m 3 Display shows Confirm Press mto confirm 4 Press e to return to standby Delete entire redial list 1 Press rthen press m 2 Scroll dto Delete All and press m 3 Display shows Confirm Press mto confirm ...

Страница 25: ...turn to standby Set alarm 1 Press m scroll dto Clock Alarm and press m 2 Scroll dto Set Alarm and press m 3 Scroll uor dto Off On Once or On Daily and press m 4 If you select On Once or On Daily enter the time using the 24 hour format HH MM e g 14 45 for 02 45pm and press m 5 Press e to return to standby When the alarm goes off press any key to stop the ring NOTE Once the alarm is set to on the ic...

Страница 26: ...e the date and time will be set on all your handsets whenever a call is received This feature can be set to On or Off 1 Press m scroll to Clock Alarm and press m 2 Scroll dto Auto clock and press m 3 Scroll dto On or Off then press mto confirm 4 Press eto return to standby ...

Страница 27: ... return to standby Ring melody Choose from 10 ringer melodies 1 Press m scroll dto Personal Set and press m 2 Handset Tone is displayed Press mand scroll dto Ring Melody Press m 3 Press uor dto select the melody A sample of the melody is played 4 Press mto confirm 5 Press e to return to standby Key tones on off When you press a key on the handset you hear a beep You can switch these beeps on or of...

Страница 28: ...e 5 Press e to return to standby Auto pick up With auto pick up switched on you can answer a call by simply lifting the handset off the base or charger If switched off you will have to press t to answer a call The default setting is Off 1 Press m scroll dto Personal Set and press m 2 Scroll dto Auto Pick Up Press m 3 Scroll uor dto select On or Off 4 Press mto confirm 5 Press e to return to standb...

Страница 29: ...by Backlight on off 1 Press m scroll dto Personal Set and press m 2 Scroll dto Backlight Press m 3 Press uor dto select On or Off 4 Press mto confirm 5 Press e to return to standby Keypad lock Prevent accidental dialling while carrying the handset by locking the keypad While the keypad is locked you can answer incoming calls as normal 1 Press and hold The display shows Keys Locked 2 To unlock the ...

Страница 30: ...ne and immediately join the call with handset 1 and the external caller 1 Press m scroll dto Advanced Set and press m 2 Scroll dto Conference Press m 3 Scroll uor dto Auto or Off 4 Press mto confirm 5 Press e to return to standby Auto prefix You can set the Colombo Neue to detect a dialling number and replace it with another number The number to be detected can be up to 5 digits long It can be rep...

Страница 31: ...ion Up to 4 handsets can be registered to one base station Additional handsets must be registered to the base before you can use them The Master PIN is required before you can register or unregister handsets The default PIN is 0000 Register a handset At the base 1 Press and hold the pbutton on the base for 5 seconds You have 120 seconds in which to register a handset On the handset 1 If the handse...

Страница 32: ... and press m 4 Re enter the new PIN and press mto confirm 5 Press e to return to standby NOTE Make a note of your PIN If you forget your PIN you will need to reset your product Reset This will reset your Colombo Neue to its default settings 1 Press m scroll dto Advanced Set and press m 2 Scroll dto Reset Press m 3 Confirm is displayed Press m NOTE Entries stored in the phonebook are retained Eco m...

Страница 33: ... activated and the unit has been idle for 1 minute the transmitted power between the handset and the base will stop an incoming call or pressing any key will activate the unit and it will revert back to the normal mode This feature is set to Off by default 1 Press m scroll dto Advanced Set and press m 2 Scroll dto ECO Mode and press m 3 Zero Emit is displayed press m 4 Press uor dto select On or O...

Страница 34: ...ast one metre away from any electrical appliances The icon is blinking or has disappeared Handset is not registered to the base register the handset to the base You are too far from the base move closer to the base No ring tone The ring tone is deactivated Increase the volume Caller ID service does not work Check your subscription with your network operator A phonebook entry cannot be stored The p...

Страница 35: ...cury Hg The batteries are labelled with symbols and information on their contents e g Warranty conditions Your Telstra Colombo Neue comes with a manufacturer s warranty of 24 months from the date of purchase Our goods come with guarantees that cannot be excluded under the Australian Consumer Law You are entitled to a replacement or refund for a major failure and compensation for any other reasonab...

Страница 36: ...crowdsupport telstra com au telstra com fix 13 22 00 ...

Отзывы: