background image

[Type some text] 

19


Non binding document, subject to modification in the 
event of misprint(s) – MKG0308

Digi

frame 

Digital photo frame 


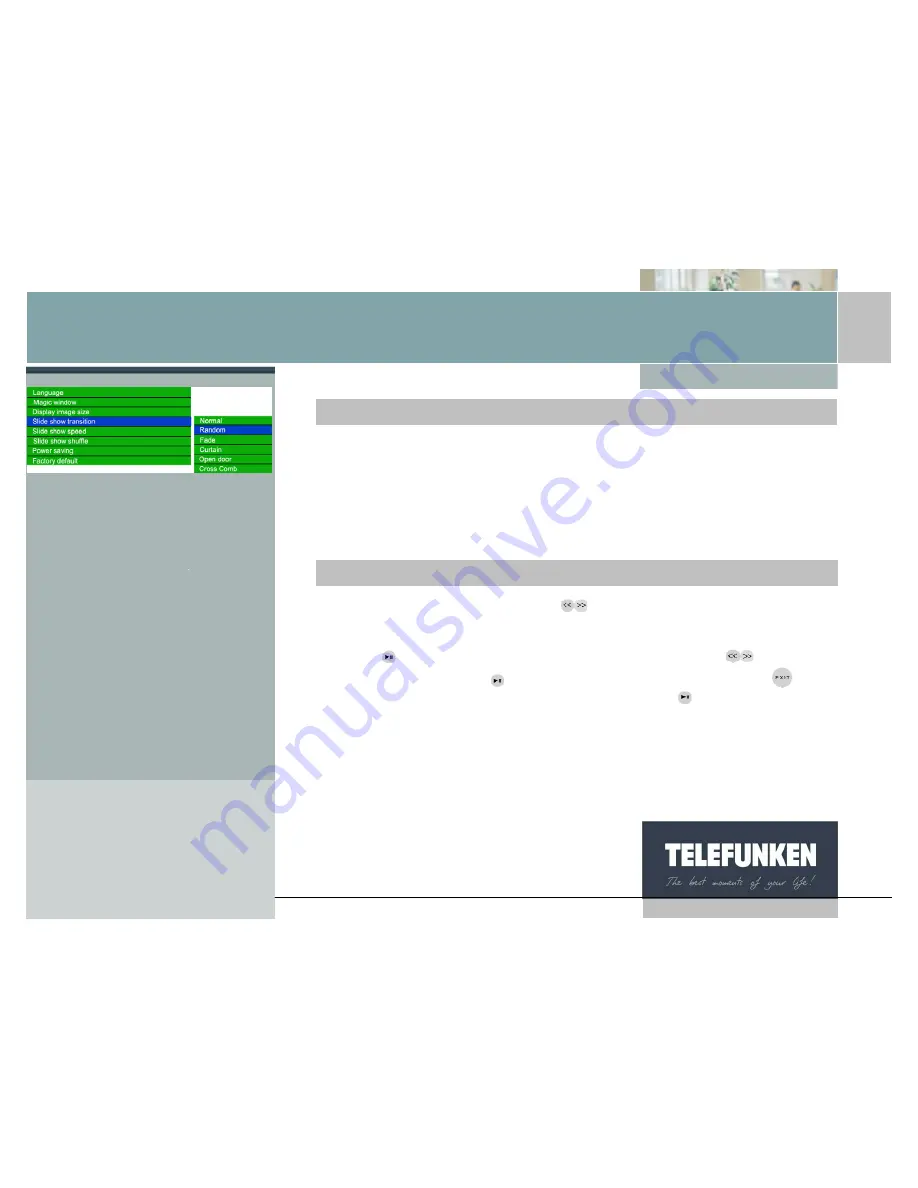
When the menu is displayed, use the "Up/Down" keys, until the "Image 
transitions" line (fig. 8) is highlighted in blue. 
Press the "Enter" key to display the options, then using the "Up/Down" arrows, 
select the transition you want. Press "Enter" to confirm your choice, then twice on 
the "Exit" key to exit the menu. Then press the "Slideshow" key to restart the 
slideshow. 


When the menu is displayed, use the 

 keys, until the "Image transitions" line 

(fig. 8) is highlighted in blue. 
 
Press the   key in order to display the options, then using the 

 keys, select 

the option you want. Press   to confirm your choice, then twice on the 

 key to 

exit the menu. Then press the "Enter" key. Press the   key for 5 seconds to 
restart the slideshow. 


With the remote control

With the frame


Fig.8 

Содержание DIGIFRAME 15001

Страница 1: ...User guide Digiframe User guide Digiframe Model 15001 ...

Страница 2: ...e 9 a Adjusting the stand 9 b Wall fixing 9 II USING YOUR DIGIFRAME 10 1 Inserting a card 10 2 Switching on the power 11 3 Selecting the picture source 11 4 Photo selection 12 5 Choosing a slideshow 13 6 Multiple display 14 III SETTINGS 16 1 Main menu 16 a Image size 17 b Transitions 18 c Display time 20 d Random slideshow 21 e Power saving 22 f Reset 23 2 Photo menu 24 a Thumbnails menu 25 b Imag...

Страница 3: ...sprint s MKG0308 Digiframe Digital photo frame 3 Files menu 36 a Selecting files 37 b Copying files 37 c Deleting files 38 4 Calendar Clock menu 40 IV CONNECTING TO A COMPUTER 42 V MAINTENANCE 44 VI F A Q 44 VII SAFETY AND GUARANTEE 45 VIII TECHNICAL SPECIFICATION 50 IX GLOSSARY 51 ...

Страница 4: ...and advice contained in this document carefully before using your digital photo frame Important keep the packaging and all the items it contains Also keep these instructions so that you can refer to them again if need be I INSTALLATION 1 Contents A digital photo frame A black acrylic front A mains adaptor A remote control A set of instructions A USB cable A cleaning cloth A CD Rom containing softw...

Страница 5: ...s MKG0308 Digiframe Digital photo frame 2 Description of the frame Your TELEFUNKEN DIGIFRAME is composed of a removable acrylic front a mains adaptor a remote control and an LCD screen equipped with 2 USB ports and a multi card reader that is compatible with most memory cards on the market ...

Страница 6: ...t subject to modification in the event of misprint s MKG0308 Digiframe Digital photo frame Card reader USB HOST port USB mini port Memory stick card slot 3 SD cards mini SD cards slot 1 CF cards slot 2 Mains voltage socket XD cards slot 4 ...

Страница 7: ... Type some text 6 Non binding document subject to modification in the event of misprint s MKG0308 Digiframe Digital photo frame Menu access buttons On off button Adjustable support Back of the frame ...

Страница 8: ...he event of misprint s MKG0308 Digiframe Digital photo frame Touche de validation Touches du cadre Touches de défilement Touche d échappement Accès au menu Bouton ON OFF Backward Forward buttons Menu access Exit button Confirmation button On off button Frame s buttons ...

Страница 9: ... Touche lecture Arrêt du Diaporama Touche de validation Touche Droite Touche Bas Lancement du Diaporama Touche Gauche Touche Haut Rotation Sortie Zoom Touche d accès au menu Touche de mise en fonction Zoom Exit Rotate Play Up Left Launch the Slide Show Stop the Slide Show Menu access On off button Confirmation button Right Down Description of the remote control ...

Страница 10: ...t levels fig 1 by pressing and holding the button located on the support and pulling the support down Set the black mark white circle in fig 1 to be facing marks numbered 1 or 2 To set the frame in the vertical portrait position unscrew the 4 thumb wheels that are found at the base and turn the support set one quarter of a revolution Screw the thumb wheels back on and set the support on the marks ...

Страница 11: ...or XD cards DIGIFRAME reads basis JPEG images that is to say images as taken by digital cameras If you use image editing software Photoshop Paint Shop Pro etc make sure you save your work in basic JPEG format only and not in progressive JPEG or any other JPEG format If you want to display black and white pictures on your DIGIFRAME make sure they are in RGB mode and not greyscale If they aren t you...

Страница 12: ...button located at the back of the frame the slideshow will start after a few seconds 3 Selecting the picture source When the frame is in slideshow mode and is displaying your photos point the remote control towards your DIGIFRAME and press the Exit key three times Using the Right Left keys select the desired medium Fig 3 then press the Enter key The mode selection screen is displayed Fig 4 Using t...

Страница 13: ... displayed Fig 4 Using the keys select the desired mode then press 4 Photo selection When the frame is in slideshow mode and is displaying your photos point the remote control towards the frame and press the Exit key twice The frame then displays the mode selection screen Fig 4 Select the mode you want using the Right Left keys on the remote control then press the Enter key A screen presenting a l...

Страница 14: ... selection screen Fig 4 Select the mode you want using the keys on the remote control then press the key A screen presenting a list of files or thumbnails photos is displayed Select the file to be played or displayed using the keys then press 5 Choosing a slideshow When the frame is in thumbnail display mode Fig 5 press the Slideshow key on the remote control once When the frame is in thumbnail di...

Страница 15: ...rol Fig 6 then press the Enter key Two lines appear Enable and None Using the Up Down arrows select the option you want If you choose the Enable option multiple display will be selected If you choose the None option standard full screen display will be enabled Press the Enter key to confirm your choice then twice on the Exit key to exit the menu Then press the Enter key then Slideshow to restart t...

Страница 16: ... Digiframe Digital photo frame If you choose the Enable option multiple display will be selected If you choose the None option standard full screen display will be enabled Press the key to confirm your choice then twice on the key to exit the menu Press the key for 5 seconds to restart the slideshow ...

Страница 17: ...deshow mode and is displaying your photos press the Exit key twice to display the mode selection screen Then press the Menu key this is then displayed When the frame is in slideshow mode and is displaying your photos press the key twice to display the mode selection screen Then press the key for one second in order to display the main menu With the remote control With the frame ...

Страница 18: ...will be displayed but with black bands at the sides Optimal the image will be resized so that it is displayed full screen but be careful the top and bottom of the image will be cropped Attention do not confuse resizing images with the zoom Resizing applies to all the images while zooming only applies to the image on the screen When the menu is displayed use the Up Down keys until the Image size li...

Страница 19: ...using the keys select the option you want Press to confirm your choice then twice on the key to exit the menu Then press the Enter key Press the key for 5 seconds to restart the slideshow b Transitions You have the option of choosing the type of transition used between each of the images in your slideshow There are 4 different transitions fade blind chequer aperture to which can be added no transi...

Страница 20: ...ion you want Press Enter to confirm your choice then twice on the Exit key to exit the menu Then press the Slideshow key to restart the slideshow When the menu is displayed use the keys until the Image transitions line fig 8 is highlighted in blue Press the key in order to display the options then using the keys select the option you want Press to confirm your choice then twice on the key to exit ...

Страница 21: ... default setting is Fast When the menu is displayed use the Up Down keys until the Slideshow speed line fig 9 is highlighted in blue Press the Enter key to display the options then using the Up Down arrows select the speed you want Press Enter to confirm your choice then twice on the Exit key to exit the menu Then press the Slideshow key to restart the slideshow When the menu is displayed use the ...

Страница 22: ...IFRAME displays the images in the order in which they were stored in its internal memory or saved on the memory card If you want to you have the option of selecting random slideshow mode in which the photos are displayed randomly When the menu is displayed use the Up Down keys until the Random slideshow line fig 10 is highlighted in blue Press the Enter key to display the options then using the Up...

Страница 23: ...nu Then press the Enter key Press the key for 5 seconds to restart the slideshow e Power saving In order to save energy you can programme your DIGIFRAME to switch itself off after 2 4 or 8 hours of use When the menu is displayed use the Up Down keys until the Energy saving line fig 11 is highlighted in blue Press the Enter key to display the options then using the Up Down arrows select the option ...

Страница 24: ...the key to exit the menu Then press the Enter key Press the key for 5 seconds to restart the slideshow f Reset This function allows you to reinitialise the frame In this way all the parameters you have entered will be replaced by the default parameters Multiple display disabled transitions random display time fast random slideshow enabled language French When the menu is displayed use the Up Down ...

Страница 25: ... 12 is highlighted in blue Press the key in order to display the options then using the keys select the option you want Press to confirm your choice Press the key for 5 seconds to restart the slideshow You can access a context sensitive menu in each of DIGIFRAME S play modes Photo Files and Clock 2 Photo menu The photo context sensitive menu can be accessed in both display modes provided With the ...

Страница 26: ...hen the screen displays images in the form of thumbnails press the key for 1 second to display the context sensitive menu Three options are available from this menu starting the slideshow copying photos deleting photos Warning When you are reading a removable medium memory card or USB memory stick deleting images is disabled in order to protect your original photos against accidental deletion In t...

Страница 27: ...slideshow starts When the context sensitive menu is displayed select the Start slideshow line Fig 13 using the keys then press the key the slideshow starts Copying photos When the menu is displayed first select the photo you want to copy using the Right Left Up Down keys the image selected is framed in blue then select the copying photos line Fig 14 using the Up Down keys then press Enter to confi...

Страница 28: ...ternal memory You just need to select the Copy all line When the menu is displayed first select the photo you want to copy using the keys the image selected is framed in blue then select the copying photos line Fig 14 using the keys then press to confirm your choice Select the Copy selected image line then press to confirm your choice The image is copied into your internal memory You also have the...

Страница 29: ...e selected image line then press Enter to confirm your choice The image is deleted from your internal memory You also have the option of deleting all the images from your internal memory You just need to select the Delete all line When the menu is displayed first select the photo you want to delete using the keys the image selected is framed in blue then select the delete photo line Fig 15 using t...

Страница 30: ...inding document subject to modification in the event of misprint s MKG0308 Digiframe Digital photo frame You also have the option of deleting all the images from your internal memory You just need to select the Delete all line ...

Страница 31: ...ve access to another context sensitive menu When the display is in thumbnail mode select the photo you want to display using the Right Left Up Down keys then press the Enter key to display the image in full screen When the display is in thumbnail mode select the photo you want to display using the keys then press the key to display the image in full screen With the remote control With the frame ...

Страница 32: ...isplay the image in the desired orientation Then press the Slideshow button to restart the slideshow When the image you have chosen is displayed in full screen mode press the key for one second to display the menu then select the Rotate image line Fig 16 using the keys Then press the key as many times as is required to display the image in the desired orientation Press the key to exit the menu the...

Страница 33: ...s is required to obtain the result you desire Then press the Slideshow button to restart the slideshow When the image you have chosen is displayed in full screen mode press the key for one second to display the menu then select the Zoom line Fig 17 using the keys Then press the key as many times as is required to obtain the desired result Press the key to exit the menu then the key to restart the ...

Страница 34: ...ry When the image you have chosen is displayed in full screen mode select the Copy photo line Fig 18 using the Up Down keys on your remote control then press the Enter key your image is copied into internal memory When the image you have chosen is displayed in full screen mode press the key for one second to display the menu then select the Copy photo line Fig 18 using the keys Then press the key ...

Страница 35: ...elect the Delete photo line Fig 19 using the Up Down keys on your remote control then press the Enter key your image is deleted from the internal memory When the image you have chosen is displayed in full screen mode press the key for one second to display the menu then select the Delete photo line Fig 19 using the keys Then press the key your image is deleted from the internal memory Press the ke...

Страница 36: ...ress the Setup button to display the menu Select the Screen settings line Fig 24 using the Up Down keys then confirm your choice by pressing the Enter key the 4 settings available are displayed Fig 25 Select the setting you want using the Up Down keys on the remote control then adjust the setting using the Right Left keys Once the setting has been made press the Exit key to exit the settings menu ...

Страница 37: ... twice to display the mode selection screen Using the Right Left keys select the Files icon then press the Enter key a list of all the files present on your medium is displayed When the frame is in slideshow mode and is displaying your photos press the key twice to display the mode selection screen Using the keys select the Files icon a list of files present on your medium is displayed With the re...

Страница 38: ...ect the one you want to play using the Up Down keys then press Enter the file starts to play When the list of files is displayed select the one you want to play using the keys then press the file starts to play b Copying files You have the option of copying a file from your removable medium memory card USB stick to your DIGIFRAME S internal memory With the remote control With the frame ...

Страница 39: ...y file list Fig 22 using the Up Down keys then press Enter your file is copied into internal memory When the list of files is displayed select the file you want to copy using the keys then press the key for one second to display the menu Select the Copy file list Fig 22 using the keys then press your file is copied into internal memory c Deleting files You also have the option of deleting a file f...

Страница 40: ...tup key to display the menu Select the Delete file list Fig 23 using the Up Down keys then press Enter your file is deleted from the internal memory When the list of files is displayed select the file you want to delete using the keys then press the key for one second to display the menu Select the Delete file list Fig 23 using the keys then press your file is deleted from the internal memory With...

Страница 41: ...laying your photos press the Exit key twice to display the mode selection screen Using the Right Left keys select the Clock icon then press Enter a screen showing the calendar and clock is displayed When the frame is in slideshow mode and is displaying your photos press the key twice to display the mode selection screen Using the keys select the Clock icon a screen showing the calendar and clock i...

Страница 42: ...ng This function can only be configured using the remote control When the calendar screen is displayed press the Setup key the menu is displayed Select the set time line Fig 24 using the Up Down keys then confirm your choice by pressing the Enter key Select the date and time using the Up Down Right Left keys then press Enter the date and time are now set Fig 24 ...

Страница 43: ...the Up Down keys then confirm your choice by pressing the Enter key Using the Up Down keys on the remote control now select the Internal memory line and confirm your choice by pressing the Enter key your slideshow now displays in the form of thumbnails to the right of the screen Press the Exit key twice if you want to return to the mode selection screen IV CONNECTING TO A COMPUTER The following op...

Страница 44: ... the best transfer speed but the DIGIFRAME will also work with a USB 1 1 port In this case the following message may appear when you connect the DIGIFRAME to the PC This device can operate more quickly This peripheral may operate at a higher speed if you connect it to a high speed USB port Ignore it Start the computer leaving the DIGIFRAME switched off Connect the small connector on the USB cable ...

Страница 45: ... screen Wipe the screen with the cloth provided to remove dust and other particles If the screen is still not clean use a glass cleaner ammonia and alcohol free on a clean soft cloth To clean the plastic casing use a dry soft cloth VI F A Q Q I inserted a memory card into my DIGIFRAME but the frame cannot read it What should I do A Make sure that the card format is compatible with the frame Then m...

Страница 46: ...isplay black and white images as long as they are in RGB mode and not greyscale To keep black and white images in RGB you just need to desaturate the colours using editing software Q Why do my images load more slowly with certain cards A There are various card technologies Some are slower than others when it comes to reading them If you load them into internal memory reading them will be quicker V...

Страница 47: ...or the power supply cable Make sure you don t plug the digital photo frame into a socket or cable with too powerful an electricity supply This may cause overheating fire or an electric shock Be careful how you route the power supply cable it should not be trodden on or be in contact with other objects Do not run the cable under a carpet Check the condition of the cable regularly to avoid damage If...

Страница 48: ...smell or makes a noise switch it off and unplug it immediately Contact your shop If you do not intend using the digital frame for some while make sure you unplug the power supply cable The guarantee covers the digital photo frame and not its accessories By accessories we mean The power supply unit The remote control depending on the model Guarantee period This digital frame comes with a 12 month g...

Страница 49: ... frame in whole or in part The initial purchase date determines the date the guarantee period starts The guarantee period is not extended if repairs are carried out or the digital frame is exchanged by our After Sales Department Exclusion Damage or faults caused by the improper use or handling of the digital frame or by the use of accessories other than the original ones or those not recommended i...

Страница 50: ...he guarantee if the digital frame has been repaired altered or modified by the purchaser or any other repairer who is not officially approved and qualified The manufacturer does not guarantee the technical properties described in this manual The equipment and accessories described in this manual are subject to modification without notice For this reason the manufacturer reserves the right to chang...

Страница 51: ...tick Pro SD Mini SD Compact Flash XD and MMC 128 MB internal memory Menu in 7 languages FR GB I P Nl D E Screen can be adjusted through 4 levels Brightness contrast colour hue are adjustable Settings buttons on the frame Slide transition effects Adjustable display time Storage temperature 25 C to 70 C Operating temperature 0 C to 55 C Display angle CR 5 Power supply Input 100V 240V AC 50 60 Hz Out...

Страница 52: ...re are various types of standard memory card Compact flash Smart media Multimedia Secure Digital Memory Stick XD Picture Card Compression An operation that consists of reducing the size of a file using a specific algorithm The compression rate is the relationship between the normal file size and the size of the same file when compressed It is expressed in terms of a percentage The main compression...

Страница 53: ...the quality of the image but the file is smaller JPEG does not give good results with images containing few colours a lot of tinted areas and geometric shapes For this type of image it would be better to use GIF format By contrast it reproduces colour graduations better and is therefore more suited to the compression of photographic images LCD LCD stands for Liquid Crystal Display This type of dis...

Страница 54: ...s or firewire ports Resolution This is the number of pixels displayed per inch about 25 4 mm in terms of dpi For example the value 400 dpi represents 400 pixels in the area of one inch The higher the number of pixels the finer the details in the image However this is accompanied by a corresponding increase in the volume of data and the time required to process it as well as the amount of memory re...

Страница 55: ...th all existing USB peripherals However even though it is possible to connect it to a USB 1 socket and vice versa it is the speed of the slowest that takes precedence Data transfer speed will be 480 Mbits s instead of the current 12 Mbits s which is useful for scanners high resolution printers and webcams Warning only the designation USB 2 High Speed designates true USB 2 0 Video mode For monitors...

Отзывы: