background image

English

   - 33 -

Using SatcoDX Feature

SatcoDX (optional):

  You  can  perform  SatcoDX 

operations using the Satelite Settings menu. In the 

SatcoDX menu, there are two options regarding to 

the SatcoDx.

You can download or upload SatcoDX data. In order 

to perform these functions a USB device must be 

connected to the TV.
You can upload current services and related satellites 

& transponders in TV, to a USB device.

Additionally you can download one of the SatcoDx 

files stored in USB device, to the TV. 
When you select one of these files, all services and 

related satellites and transponders in the selected 

file will be stored in the TV. If there are any installed 

terrestrial, cable and/or analog services, they will be 

kept and only satellite services will be removed. 
Afterwards, check your antenna settings and make 

changes if necessary. An error message stating “No 

Signal” may be displayed if the antenna settings are 

not configured properly.

Media Playback via USB Input

You can connect a 2.5” and 3.5” inch (hdd with external 

power supply) external hard disk drives or USB memory 

stick to your TV by using the USB inputs of the TV.

IMPORTANT!

  Back  up  your  files  before  making 

any connections to the TV. The Manufacturer will 

not be responsible for any file damage or data loss. 

Certain types of USB devices (e.g. MP3 Players) 

or USB hard disk drives/memory sticks may not be 

compatible with this TV. The TV supports FAT32 

and NTFS disk formatting. 

While formatting a USB hard disk that has 1TB (Tera 

Byte)  or  more  file  capacity,  you  can  experience 

problems with the formatting process. 
Quickly plugging and unplugging USB devices, is a 

very hazardous operation. This may cause physical 

damage to the USB player and the USB device itself. 

Do not pull out the USB module while playing a file.

You can use USB hubs with your TV’s USB inputs. 

External power supplied USB hubs are recommended 

in such a case. 
It is recommended to use the TV’s USB input(s) 

directly, if you are going to connect a USB hard disk. 

Note:

 When viewing image files the media browser menu 

can only display 1000 image files stored on the connected.

Media Browser Menu

You  can  play  photo,  music,  and  movie  files  stored 

on a USB disk by connecting it to your TV. Connect 

a USB disk to one of the USB inputs located on the 

side of the TV. Pressing the 

MENU

 button while in the 

Media Browser mode will access the 

Picture

Sound


and 

Settings

 menu options. Pressing the 

MENU

 button 

again will exit from this screen.


You can set your 

Media 

Browser

 preferences by using the 

Settings

 menu.

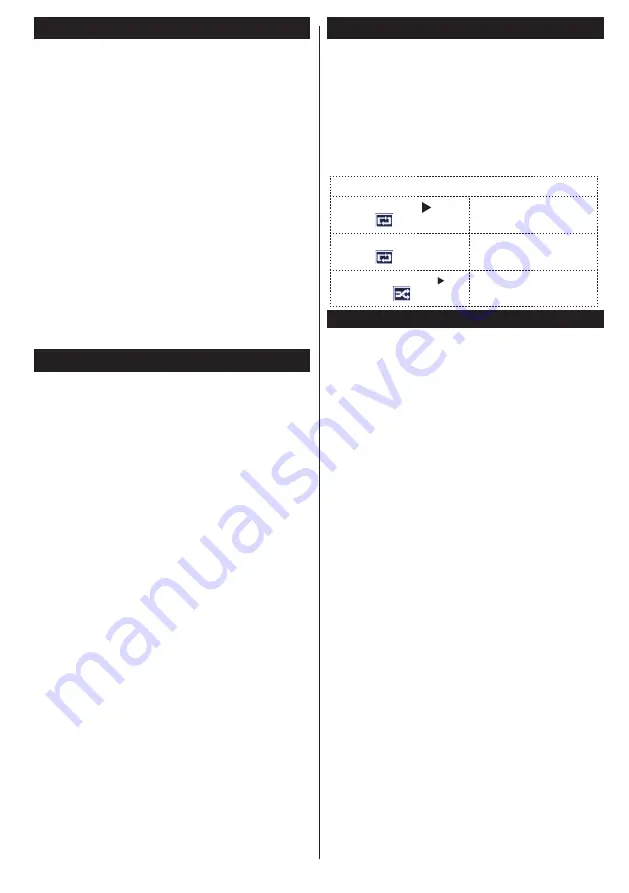
Loop/Shuffle Mode Operation

Start playback with


and 

activate 


TV plays next file and loop 

the list.

Start playback with


OK


and 

activate 


The same file will be 

played in a loop (repeat).

Start playback with


OK/


and activate  

The file will be played in a 

shuffle.

.

Quick Menu

Quick Settings menu allows you to access some 

options quickly. This menu includes 

Power Save 

Mode,  Picture Mode, Favourites, Sleep Timer, 

FollowMe TV (optional) 

and

 Information booklet 

(optional)

CEC RC Passthrough

 options. Press 

Q.MENU button on the remote control to view quick 

menu. See the following chapters for the details of 

the listed features. 

E-Manual (optional)

You  can  find  instructions  for  your TV’s  features  in 

the E-Manual. 

To use E-Manual, press to the 

Info 

button while main 

menu is displayed on the screen.

By using the navigation buttons select a desired 

category. Every category includes a different topics. 

Select a topic and press 

OK

 to read instructions.

To close the E-Manual screen press the 

Exit

 button.

Note:

 The contents of the E-Manual may vary according to the 

model.

Содержание D42F275X3C

Страница 1: ... non active pixels may appear on the screen as a fixed blue green or red point Please note that this does not affect the performance of your product Take care not to scratch the screen with fingernails or other hard objects Before cleaning unplug the TV from the wall socket Only use a soft dry cloth while cleaning Warning Serious injury or death risk Riskofelectricshock Dangerous voltage risk Caut...

Страница 2: ...o stand by mode automatically because there was no signal for a long time Press OK to continue 2 If the TV has been left on and not been operated for a while the TV will go into standby When you next switch on the following message will be displayed TV switched to stand by mode automatically because no operation was made for a long time Press OK to continue Features Remote controlled colour LCD TV...

Страница 3: ...d gently Install two AAA batteries Make sure to match the and ends of the batteries in the battery compartment observe the correct polarity Replace the cover Connect Power IMPORTANT The TV set is designed to operate on 220 240V AC 50 Hz socket After unpacking allow the TV set to reach the ambient room temperature before you connect the set to the mains Plug the power cable to the mains socket outl...

Страница 4: ...ompliant Number of Preset Channels 10 000 Channel Indicator On Screen Display RF Aerial Input 75 Ohm unbalanced Operating Voltage 220 240V AC 50Hz Audio German Nicam Stereo Audio Output Power WRMS 10 THD 2x8 W Power Consumption 75 W TV Dimensions DxLxH with foot 220 x 965 x 611 mm TV Dimensions DxLxH without foot 79 98 x 965 x 568 mm Operation temperature and operation humidity 0ºC up to 40ºC 85 h...

Страница 5: ...Image size 21 Info Reveal in TXT mode 22 My button 1 YouTube 23 My button 2 Switches between digital cable satellite broadcasts 24 Exit 25 Quick menu 26 Previous programme Now in EPG mode 27 Fast forward in media browser mode 28 Subtitle on off Subtitle in media browser mode 29 Stop in media browser mode 30 Pause in media browser mode 31 AV Source 4 7 8 9 P P V V 1 2 3 5 6 0 OK Q MENU EXIT BACK LA...

Страница 6: ...fer to the module instruction manual for details of the settings Each USB input of your TV supports devices up to 500mA Connecting devices that have current value above 500mA may damage your TV Connector Type Cables Device Scart Connection back VGA Connection back SIDE AV PC YPbPr Audio Connection side Side Audio Video Connection Cable Supplied PC Audio Cable Not supplied HDMI Connection back Coax...

Страница 7: ...he screen While the search continues a message will appear asking whether you want to sort channels according to the LCN Select Yes and press OK to confirm LCN is the Logical Channel Number system that organizes available broadcasts in accordance with a recognizable channel sequence if available Press MENU button to quit channel list and watch TV Cable Installation If you select Cable option and p...

Страница 8: ...er and the USB device itself Do not pull out the USB module while playing a file You can use USB hubs with your TV s USB inputs External power supplied USB hubs are recommended in such a case It is recommended to use the TV s USB input s directly if you are going to connect a USB hard disk Note When viewing image files the media browser menu can only display 1000 image files stored on the connecte...

Страница 9: ...V via the remote again press and hold the 0 Zero button on the remote control for 3 seconds Or press Q Menu button on the remote highlight the CEC RC Passthrough and set as Off by pressing Left or Right button This feature can also be enabled or disabled under the Settings Other Settings menu The TV supports also ARC Audio Return Channel feature This feature is an audio link meant to replace other...

Страница 10: ... HDMI True Black While watching from HDMI source this feature will be visible in the Picture Settings menu You can use this feature to enhance blackness in the picture Film Mode Films are recorded at a different number of frames per second to normal television programmes Turn this feature on when you are watching films to see the fast motion scenes clearly Skin Tone Skin tone can be changed betwee...

Страница 11: ...t audio type Settings Menu Contents Conditional Access Controls conditional access modules when available Language Configures language settings may change depending on the country selected Preferred and current settings will be available Current settings can be changed only if the broadcaster supports Parental Enter correct password to change parental settings You can easily adjust menu lock matur...

Страница 12: ...store you can activate this mode Whilst Store Mode is enabled some items in the TV menu may not be available Power Up Mode This setting confrigures the power up mode preference Biss Key Biss is a satellite signal scrambling system that is used for some broadcasts If you need to enter BISS key on a broadcast you can use Biss Key setting located in the Other Settings menu Highlight Biss Key and pres...

Страница 13: ...ptions Programme Options In EPG menu press the OK button to enter the Event Options menu Select Channel In EPG menu using this option you can switch to the selected channel Set Timer Delete Timer After you have selected a programme in the EPG menu press the OK button Select the Set Timer on Event option and press the OK button You can set a timer for future programmes To cancel an already set time...

Страница 14: ...d to a location with better signal quality Wireless feature of the TV supports 802 11 a b g n type modems It is highly recommended that you should use IEEE 802 11n communication protocol in order to avoid any possible problems while watching videos Use the other usb input if you experience problems with audio video performance You must change your modem s SSID when there are any other modems aroun...

Страница 15: ...work does not function properly try using the wired network in your home Refer to the Wired Connection section for more information on the process Check the modem router first If the router does not have a problem check the internet connection of your modem Try searching for wireless networks again using the Network Settings menu screen Connection is Slow See the instruction book of your wireless ...

Страница 16: ...ss USB dongle to TV first if the TV doesn t have internal WiFi feature Then press the Source button on the remote and switch to Wireless Display source A screen appears stating that the TV is ready for connection Open the sharing application on your mobile device These applications are named differently for each brand please refer to the instruction manual of your mobile device for detailed inform...

Страница 17: ...itch to another channel while an HbbTV application is active either in red button icon mode or full UI mode the following scenarios can occur The application can continue running The application can be terminated The application can be terminated and another autostart red button application can be launched HbbTV allows the applications to be retrieved both from broadband or broadcast The broadcast...

Страница 18: ...d to connect the antenna If you are in doubt consult your dealer No sound Has theTV been set to mute To cancel mute press the button or increase the volume level Sound is coming from only one speaker Is the balance set to one extreme See Sound Menu section Remote control does not operate The batteries may be exhausted Replace the bateries Input sources can not be selected If you cannot select an i...

Страница 19: ...search keywords by clicking the search button in the address dialog box or another way to navigate to pages is by clicking on links on web pages and these will take you to the appropriate pages When you scroll the pointer down to the middle of the screen the remote control s shortcuts will be shown Use the zoom shortcut buttons or the zoom menu to zoom in or zoom out You can clear cookies or clear...

Страница 20: ...he following table is an illustration of some of the typical video display modes Your TV may not support all resolutions Index Resolution Frequency 1 640x350 85Hz 2 640x400 70Hz 3 640x400 85Hz 4 640x480 60Hz 5 640x480 66Hz 6 640x480 72Hz 7 640x480 75Hz 8 640x480 85Hz 9 800x600 56Hz 10 800x600 60Hz 11 800x600 70Hz 12 800x600 72Hz 13 800x600 75Hz 14 800x600 85Hz 15 832x624 75Hz 16 1024x768 60Hz 17 1...

Страница 21: ...Kbps 384Kbps Bit rate 16KHz 48KHz Sampling rate Layer3 8Kbps 320Kbps Bit rate 16KHz 48KHz Sampling rate wav LPCM WMA ASF WMA WMA Pro WMA 128bps 320Kbps Bit rate 8KHz 48Khz Sampling rate WMA Pro 768kbps Bit rate 96KHz Sampling rate m4a aac AAC HEAAC Free Format Bit rate 8KHz 48KHz Sampling rate pcm PCM 8Kbps 320Kbps Bit rate 16KHz 48KHz Sampling rate works only with video files AC3 32Kbps 640Kbps B...

Страница 22: ...cable not supplied you can refer to the following resolution information 56Hz 60Hz 66Hz 70Hz 72Hz 75Hz 640x400 þ 640x480 þ þ þ þ 800x600 þ þ þ þ þ 832x624 þ 1024x768 þ þ þ þ þ 1152x864 þ þ þ 1152x870 þ 1280x768 þ þ 1360x768 þ 1280x960 þ þ 1280x1024 þ þ 1400x1050 þ þ 1440x900 þ þ 1600x1200 þ 1680x1050 þ 1920x1080 þ 1920x1200 þ ...

Отзывы: