


Installation (Continued)
NOTE:
This high pressure pump has a
closed type impeller and will clog
easily. Use a suction screen to keep
debris out of pump.
DISCHARGE CONNECTIONS
Your pump is equipped with a
multiple port discharge to run several
lines at one time. Select the
appropriate size for the application.
Pump output pressure will be reduced
as additional lines are connected. For
high pressure wash-downs or
firefighting, connect only one line. For
irrigation applications, connect up to 3
small lines or one large line.
Operation
NOTE:
Do not start or run pump dry or
damage to the mechanical seal will
result.
NOTE:
Add engine oil before startup.
Refer to engine owner/operator
manual supplied with pump before
startup.
PRIMING THE PUMP
A self priming pump only needs to be
manually primed at the first start-up.
Once primed, under normal conditions
the pump will reprime automatically at
each subsequent start-up. If the pump
is used in portable applications and the
water has been drained from the
pump case, reprime before start-up.
To prime, remove cap from top
discharge outlet and fill pump with
water. Replace cap and start pump.
The pump will require a few minutes
to evacuate air from the suction line.
After several minutes of operation,
pump will be fully primed and
pumping water. Priming time will vary
depending on length and diameter of
suction line.
RUNNING THE ENGINE
Refer to engine owner/operator
manual supplied with pump for
starting and operating instructions.
Pump performance varies depending
on engine R.P.M. Refer to engine
operator's manual to adjust engine
speed.
IMPORTANT:
Pump has the capability
of overloading engine if allowed to
run continuously at an RPM or flow
rate that is above specified hydraulic
performance.
It is important to check the engine
load setting when putting the pump
into operation, or after any speed
change. Do this as follows:
When operating under load it must be
possible to push the throttle to a full
open position and hear a noticeable
increase in engine RPM (Above 6%).
Upon release, throttle should return to
original position and a decrease in
engine speed should be noticed.
Under this condition, engine has
sufficient power reserve to safely
operate at continuous duty.
Maintenance
Rotating parts. Can
catch hands, feet,
or clothing. Stay clear of equipment
and keep shields in place while pump is
running. Stop motor or engine before
servicing pump. Read owner’s manual
before using equipment.
PUMP LUBRICATION
Pump liquid end does not require any
grease or oil for lubrication. The
mechanical seal is lubricated by water
when the pump is operating.
ENGINE
Refer to the engine manufacturer's
operating manual for complete
maintenance.
PUMP
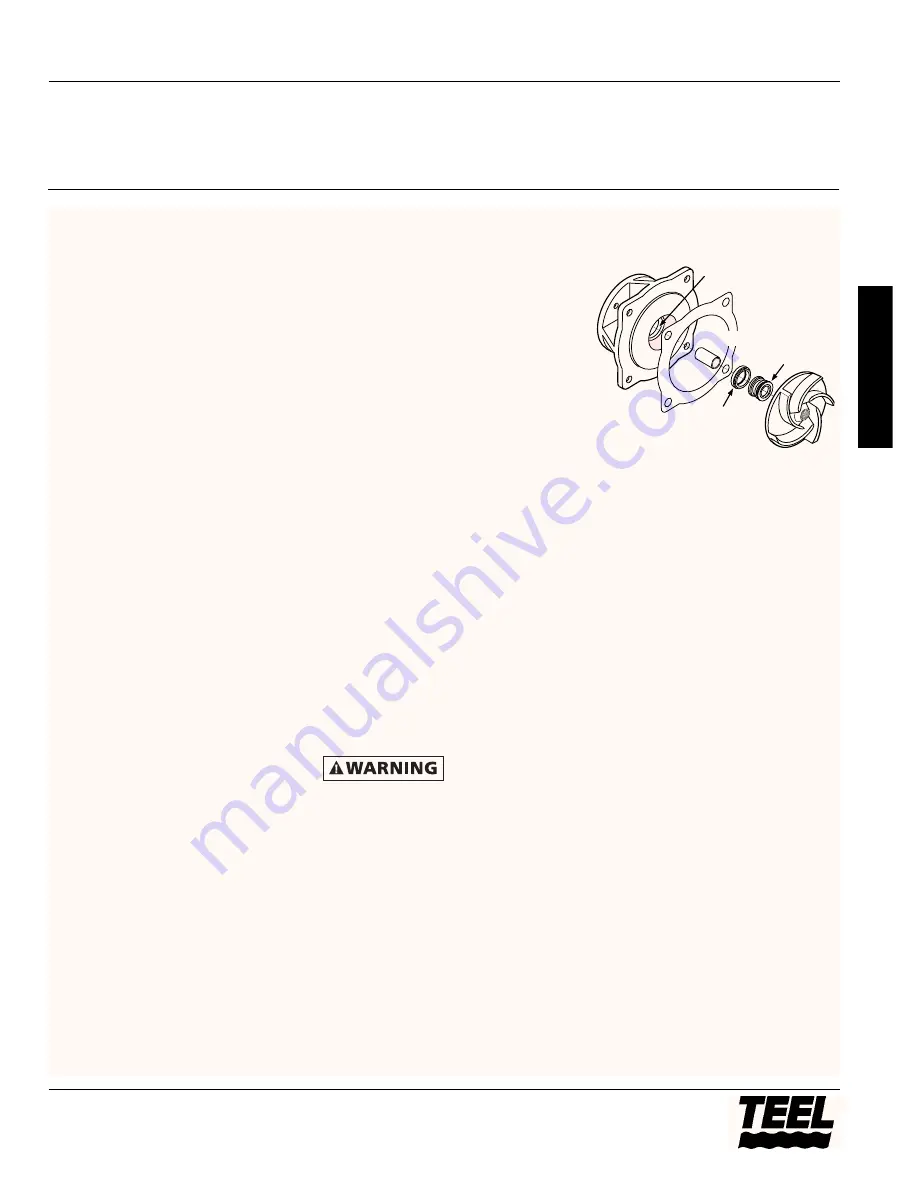
SEAL REPLACEMENT (SEE FIGURE 2)
1. Remove pump case from seal plate
to expose impeller and mechanical
seal.
NOTE:
O-Ring/gasket(s) may be
damaged during disassembly. Replace
with new gasket(s) at this time.
2. Hold engine shaft stationary and
unscrew impeller. Remove rotating
body of mechanical seal.
3. Remove seal plate from engine,
then push ceramic seat out of seal
plate from the back.
4. Clean ceramic seat cavity in seal
plate thoroughly before installing
new seal.
NOTE:
Make sure that seal faces are
clean; do not scratch or damage new
seal face during seal replacement.
5. Lubricate ceramic seat with mineral
oil and press into seal plate cavity.
6. Lubricate shaft sleeve with mineral
oil and slide seal body into place.
7. Screw impeller back on engine shaft
and re-install pump case.
Model 4RJ45
3
Teel Operating Instructions and Parts Manual
E
N
G
L
I
S
H
Impeller
Seal
Ceramic
Seat
Seal
Rotating
Body
Shaft Sleeve
Gasket
Seal Cavity
Seal Plate
Figure 2
®


