background image

BIKE FORMA: Service & Maintenance Manual - rev. 1.0 


Page 8.1 

8.  ADJUSTMENTS 

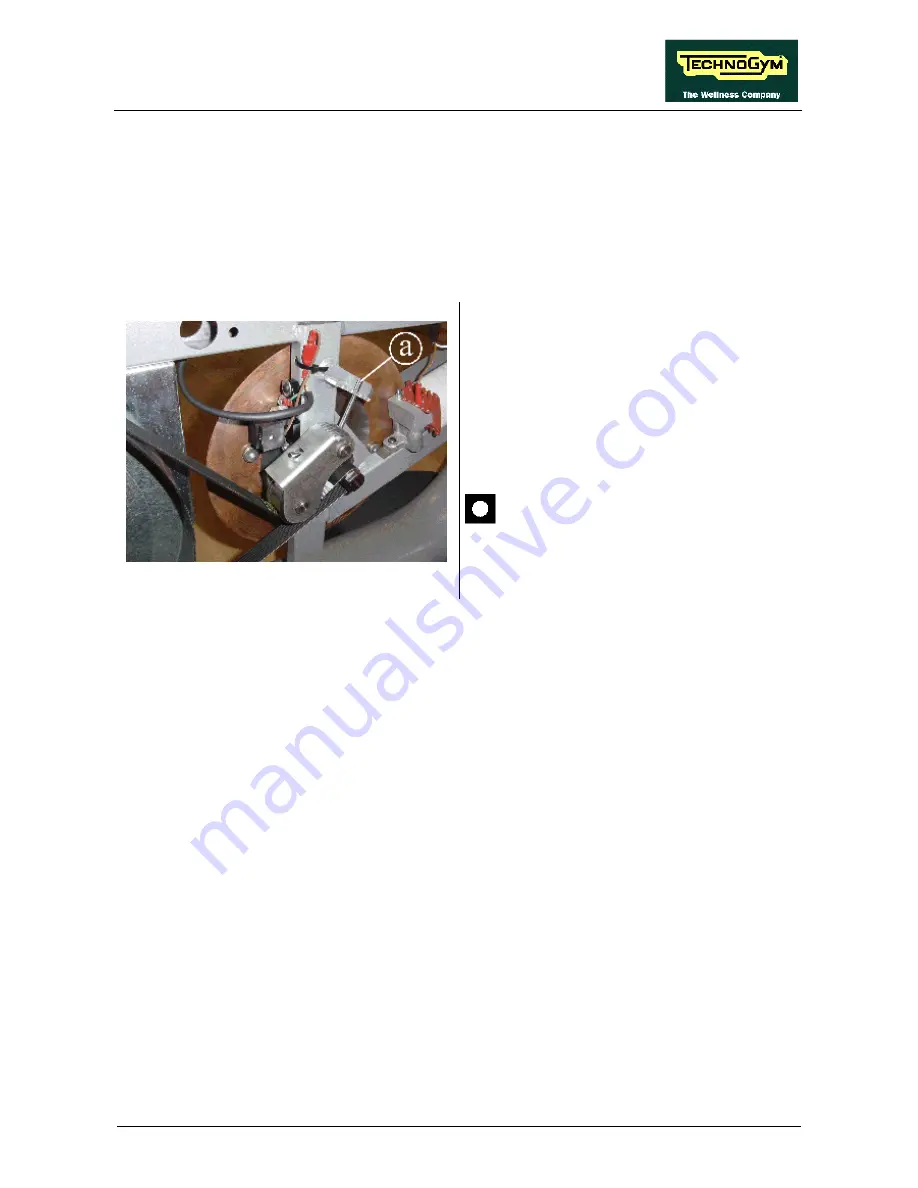
8.1.   BELT TENSION 


Figure 8.1-1 

Carry out the procedure described in paragraph 
7.6. “Disassembling the guards”. 
 
1.  To adjust the tension of the belt, simply 

select on of the various positions available 
for the spring 

a


  The correct belt tension is between 34 – 

40 lbs (15.9-18.1 kg). 


Содержание Bike Forma

Страница 1: ...SERVICE MAINTENANCE MANUAL REV 1 0...

Страница 2: ......

Страница 3: ...S PRESENT NOTE The information contained in this document is subject to change without notice Technogym does not guarantee this documentation in any way Technogym shall not be held responsible for any...

Страница 4: ......

Страница 5: ...3 3 3 1 6 Brake board 3 3 3 1 7 Brake 3 4 3 1 8 Speed sensor 3 4 3 1 9 Power entry module 3 4 3 2 BRAKE CONTROL 3 6 3 2 1 Mechanics 3 6 3 2 2 Control 3 6 3 2 3 The signals involved 3 7 4 ACCESSORIES...

Страница 6: ...L BOX 7 10 7 10 DISASSEMBLING THE BELT 7 11 7 11 DISASSEMBLING THE PEDALS AND THE PEDAL CRANKS 7 12 7 12 DISASSEMBLING THE PULLEY 7 13 7 13 DISASSEMBLING THE BRAKE WINDING 7 14 7 14 DISASSEMBLING THE...

Страница 7: ...7 High kit version 9 14 10 SCHEDULED MAINTENANCE 10 1 10 1 DAILY MAINTENANCE OPERATIONS 10 1 10 1 1 Setting up the operation 10 1 10 1 2 External cleaning operations 10 1 10 2 MONTHLY MAINTENANCE OPE...

Страница 8: ...BIKE FORMA Service Maintenance Manual rev 1 0 Page iv Page intentionally left blank...

Страница 9: ...on observance may cause damage to the machine Information about the operation in progress OBSERVE observation about the operation in progress 1 2 RECOMMENDATIONS Technogym recommends the following ste...

Страница 10: ...recommended brands 3 Use special tools where specified 4 Consult the Technical Newsletters which may contain more up to date information on adjustments and maintenance than those contained in this man...

Страница 11: ...S Cardio receiver HFU Training programs Quick start Goal CPR C HARACTERISTIC Test functions Fitness test 2 2 MECHANICAL CHARACTERISTICS Width 52 cm 20 5 in Length 110 cm 43 3 in Height 150 cm 59 1 in...

Страница 12: ...non condensing Humidity Storage from 5 to 85 non condensing 2 5 CONFORMITY TO REGULATIONS The machine conforms to the following standards Europe USA EMI EN 55014 1 EN 55014 2 EN 61000 3 2 EN 61000 3 3...

Страница 13: ...olor of the frame AL aluminum 10 11 Color of paddings AG gray M0 bordeaux 12 Guard color G gray 13 Type of TV model 0 none 14 15 Language IT Italian DE German FR French UK British English ES Spanish 1...

Страница 14: ...AM BRAKE POWER ENTRY MODULE VAC BRAKE BOARD CN3 CN4 CN1 CN2 SPEED SENSOR CB 0 Patch Conn CB 51 CB 4 CB 3 DISPLAY CPU BOARD CBQ 32 KEYBOARD 386 BOARD CN3 TGS SMART CARD BOARD CN1 CN2 CN7 CN9 CBQ 13 CSA...

Страница 15: ...Orange 3 4 sensing 5 Vdc digital Red 4 6 12 Vdc Black 6 7 5 Vdc Green 7 8 sensing 5 Vdc digital Blue 8 CB 4 Serial communication cable between upper and lower assemblies Brake board Digital plan board...

Страница 16: ...HFU receiver 1 5 Vdc power supply Red 2 7 Pulse beat to beat Blue 4 8 Gnd Black 1 CBQ 32 TGS smart card cable Digital Plan Board TGS Smart Card Board Digital Plan Board CN10 Signal Color TGS Smart Ca...

Страница 17: ...IPLES OF OPERATION 3 1 BLOCK DIAGRAM The machine block diagram is illustrated in the figure below POWER ENTRY MODULE DISPLAY DISPLAY BOARD CSAFE BOARD TGS SMART CARD BOARD BRAKE BOARD CARDIO RECEIVER...

Страница 18: ...e Power Supply Board houses the backup battery which maintains the RAM memory on the 386 board exchanges over the RS 485 serial link to the inverter and via the Download Board commands for controlling...

Страница 19: ...Digital Plan board to which it is connected by pulse signal outputs one pulse at each detected heart beat reset signal external signal received from the digital plan board at the beginning of each ex...

Страница 20: ...open JP2 open 3 1 7 BRAKE This is an eddy current brake consisting of a flywheel mass and a flat copper disk that rotates in the air gap of a winding to which it is connected Variations in the winding...

Страница 21: ...BIKE FORMA Service Maintenance Manual rev 1 0 Page 3 5 WARNING If other types of machines are connected together the maximum number is determined by their current draw...

Страница 22: ...system as a whole The mechanical friction has been measured in the laboratory and is determined by a specific SW function of the upper kit electrical resistance produced by the brake To obtain a given...

Страница 23: ...rogress the machine will not produce any resistance During the movement the brake board checks for possible malfunctions The errors which can occur are Error Code Description 1 OVERHEATING this condit...

Страница 24: ...ed effort level and the speed of the exercise Pulses This is the signal produced by the speed sensor and has the waveform shown below Figure 3 2 1 The signal enters the brake board pins 3 4 on connect...

Страница 25: ...BIKE FORMA Service Maintenance Manual rev 1 0 Page 3 9 Page intentionally left blank...

Страница 26: ......

Страница 27: ...trated below pin 1 is the farthest right when the locking tab is facing upward The remaining pins are not connected 4 2 PC LINK FOR PROGRAMMING The machine can be connected to a PC for programming by...

Страница 28: ...BIKE FORMA Service Maintenance Manual rev 1 0 Page 4 2 Page intentionally left blank...

Страница 29: ...lay 6 The mains voltage must match the value specified on the machine rating plate 7 The electrical system must be correctly earthed 8 The wall outlet used should be reserved for the machine and have...

Страница 30: ...upper and lower assemblies At the end of this the machine goes into standby awaiting a keyboard command To check the correct operation of the machine get on the machine begin exercising check that the...

Страница 31: ...nse This type of box is a step in the troubleshooting procedure where an ACTION must be carried out It typically contains a description of the ACTION necessary to resolve the problem Therefore after e...

Страница 32: ...in the figure below MAN KEYBOARD TEST TROUBLESHOOTING I2C Devices Test AUTOMATIC TEST MANUAL TEST LED Test SERIAL PORTS TEST CSafe COM Test TGS COM Test Low Kit COM Test To scroll through the list of...

Страница 33: ...communications on the port for connecting to CSafe COM test Low Kit COM Test TGS COM test Using the and effort level keys select the desired test item and confirm by pressing ENTER The test can have t...

Страница 34: ...e of the brake board causing the upper assembly to switch off Does the wall outlet supply the correct v oltage Is the mains lead OK Is the v oltage at the output of the machine s power entry module co...

Страница 35: ...utput of the brake board short circuited NO 4 Is the brake winding short circuited YES YES Replace the brake winding 5 Replace the brake board Is cable CB 51 ok Replace cable CB 51 YES NO YES Replace...

Страница 36: ...ly 220 VAC or 110 VAC depending on the mains voltage 2 As for step 1 but across pins 3 and 1 of connector CN3 on the brake board 3 Using a tester check that all the output voltages on connector CN1 of...

Страница 37: ...between the upper and lower assemblies NO THE EQUIPMENT IS BLOCKED MESSAGE ON THE DISPLAY 1 Carry out the Brake board Error troubleshooting procedure YES 2 Follow the procedure step by step to correct...

Страница 38: ...8 Error 16 32 Error 2 Error 128 The following paragraphs describe the troubleshooting procedures for these three cases 6 4 1 ERROR 1 ON BRAKE BOARD This code indicates an overheating error this condit...

Страница 39: ...tput by the power supply section of the brake board as a result of defective components If the error persists or recurs frequently replace the brake board 6 4 5 ERROR 16 OR 32 ON THE BRAKE BOARD This...

Страница 40: ...ut the RPM value is incorrect troubleshooting procedure Replace the brake board YES Does the brake winding receive current f rom the brake board NO Replace the brake winding YES Replace cable CB 51 NO...

Страница 41: ...ndition Has the brake board generated error 128 Does the brake board output the correct current to the brake winding 3 Replace the brake board NO Replace the brake winding YES THE RESISTANCE IS INCORR...

Страница 42: ...usually high friction or resistance 2 Refer to paragraph 9 2 4 Errors log 3 Measure the voltage supplied by the brake board to the winding In constant power mode custom time pedaling at 80 RPM and wit...

Страница 43: ...ixed to the f ly wheel THE SPEED IS INCORRECT 1 Fix it correctly NO YES Follow the procedure step by step to correctly diagnose the problem Take particular care with the checks highlighted by circled...

Страница 44: ...o the digital plan board correct Replace cable CBQ 32 1 2 YES NO YES Replace the digital plan board NO A Is the serial communication link between the digital plan board and the TGS Smart Card reader O...

Страница 45: ...obes across pins 1 and 3 of connector CN1 of the TGS Smart Card reader The measured value should be 12 Vdc 2 As for step 1 but across pins 1 and 9 of connector CN10 on the digital plan board 3 Use the...

Страница 46: ...supply v oltage correct at the output of the digital plan board Replace the receiv er Replace CBQ 28 cable 1 2 YES NO YES Replace digital plan board NO Follow the procedure step by step to correctly d...

Страница 47: ...e Is the receiv er correctly positioned and are the connecting cables properly routed Are there sources of electromagnetic noise near the receiv er Reposition the machines so they are adequately space...

Страница 48: ...bers which are described in detail below 1 To check for electromagnetic noise near the machine use a frequency signal monitor constructed as shown in the diagram below The circuit lights the LED for e...

Страница 49: ...the mains lead from the wall outlet 2 Back off the 6 screws a using a medium Phillips screwdriver Figure 7 1 2 3 Unplug the 3 connectors indicated in the figure at left 4 Remove the display Figure 7...

Страница 50: ...s five circuit boards The 386 board a The CPU board b The CSafe board c Figure 7 2 2 386 board a 1 Push open the clip fasteners The 386 board will lift up 2 Remove it from the connector on the digital...

Страница 51: ...o assemble a new keyboard with the display on a work bench 1 Remove the backing film which protects the adhesive 2 Apply the adhesive part starting from the left and working toward the right without b...

Страница 52: ...Page 7 4 7 4 DISASSEMBLING THE CARDIO RECEIVER Figure 7 4 1 1 Back off the 2 screws a using a 3 mm Allen wrench Figure 7 4 2 2 Unplug the connector b 3 Remove the receiver To assemble the new receive...

Страница 53: ...cedure described in paragraph 7 1 Disassembling the display 1 Back off the 3 screws a using a 6 mm Allen wrench Support the handlebar before backing off the last screw To assemble the new handlebar ca...

Страница 54: ...pushing the pedal back as shown in the figure and then removing the guard as indicated by the arrows Figure 7 6 3 3 Remove the rubber footrest b 4 Remove the six pins c from the left guard 5 Push the...

Страница 55: ...m the hole at the base of the saddle column 3 Remove the saddle from the top Figure 7 7 2 Disassembling the adjustable bushing 1 Back off the two screws b using a 3 mm Allen wrench 2 Remove the bushin...

Страница 56: ...BIKE FORMA Service Maintenance Manual rev 1 0 Page 7 8 Figure 7 7 4 If the machine saddle was disassembled during reassembly lock down the screw e using a torque wrench set for 24 Nm...

Страница 57: ...the knob b pulling from the opposite side of the frame and being careful to prevent the pin from dropping inside the frame Figure 7 8 2 4 Remove the rubber o ring c from the pin d and pull the pin out...

Страница 58: ...e screws a using a medium Phillips screwdriver 2 Remove the cover from the box Figure 7 9 2 3 Unplug the connectors indicated in the figure 4 Back off the two screws b shown in figure 7 9 1 using a 4...

Страница 59: ...re described in paragraph 7 6 Disassembling the guards 1 Release the spring a of the belt tensioning mechanism 2 Remove the belt from the pulley To reassemble the belt follow the disassembly instructi...

Страница 60: ...sembly lock down the screws b using a torque wrench set for 35 Nm Figure 7 11 2 2 Remove the plastic caps b from both pedal cranks 3 Use a 14 mm socket wrench to back off the screw underneath Figure 7...

Страница 61: ...On the left side of the machine remove the plastic cover a Figure 7 12 2 2 Remove the snap ring b Be careful with the various spacer rings on the pulley shaft Figure 7 12 3 3 Remove the pulley c from...

Страница 62: ...e machine frame using a 3 mm Allen wrench Figure 7 13 2 3 Place the winding assembly on a work bench 4 Back off the two nuts c using a 7 mm wrench locking down the 2 through screws from the opposite s...

Страница 63: ...nding 1 Remove the snap ring a on the left side of the machine Be careful with the various spacer rings on the pulley shaft Figure 7 14 2 2 Remove the brake assembly 3 Place the brake assembly on a wo...

Страница 64: ...ide To reassemble the brake carry out the above steps in reverse order Remember to fully lock down all the screws b in a cross pattern as they may knock against the speed sensor if left loose Lock dow...

Страница 65: ...Phillips screwdriver 2 Remove the speed sensor 3 If it proves difficult to back off the screws a in their current position back off the screws b using a 3 mm T Allen wrench and remove the sensor toge...

Страница 66: ...platform on the right in the figure Power entry module rear platform on the left in the figure 1 To access the connectors turn the machine over on one side 2 Back off the screws a of the platform whic...

Страница 67: ...latforms this procedure applies for both platforms 5 To disassemble the platforms back off the 3 screws d using a 17 mm wrench To reassemble the platforms and connectors carry out the above steps in r...

Страница 68: ...BIKE FORMA Service Maintenance Manual rev 1 0 Page 7 20 Page intentionally left blank...

Страница 69: ...8 1 BELT TENSION Figure 8 1 1 Carry out the procedure described in paragraph 7 6 Disassembling the guards 1 To adjust the tension of the belt simply select on of the various positions available for th...

Страница 70: ...nce Manual rev 1 0 Page 8 2 8 2 PLAY OF SADDLE STEM Figure 8 2 1 1 Raise the machine saddle to be able to access the 2 screws a on the bushing 2 Turn the screws a to adjust the play of the saddle stem...

Страница 71: ...D SENSOR POSITION Figure 8 3 1 Carry out the procedure described in paragraph 7 6 Disassembling the guards 1 Back off the 2 screws a and shift the speed sensor support to the side so that it is 0 7 mm...

Страница 72: ...rocedure described in paragraph 7 6 Disassembling the guards 1 Back off the 2 screws a and shift the brake winding support to the side so that it is 0 6 mm from the disk 2 Lock the screws back down WA...

Страница 73: ...on structured as in the diagram below USER CONFIG Language Pause time MAX time Distance Default age Default weight Default time Default distance HR Custom mess Tgs Keys Format tgs key P P Default conf...

Страница 74: ...xx Press the ENTER key to modify the value when the current parameter value starts to blink press the CLEAR key to erase the current value and then use the number keys to enter the desired new value P...

Страница 75: ...s the current setting DEFAULT WEIGHT KG xxx Press the ENTER key to modify the value when the current parameter value starts to blink press the CLEAR key to erase the current value and then use the num...

Страница 76: ...xercise in Km with values ranging from 1 to 999 To change the setting when the LED matrix shows the current setting DEFAULT DISTANCE KM xxx Press the ENTER key to modify the value when the current par...

Страница 77: ...tant heart rate exercise To change the selection when the LED matrix shows the current setting HR xxx Press the GOAL number keys to select the desired option out of those listed in the table below HR...

Страница 78: ...press ENTER to confirm or cancel by pressing the CLEAR key for a few seconds At the end of the configuration procedure hold down the CLEAR key for a few seconds to exit The CLEAR key can be pressed a...

Страница 79: ...s in the diagram below TECHNICAL CONFIGURATION OPERATING DATA LOW KIT MENU TIME AND DATE LOW KIT PARAM HIGH KIT VERSION STANDARD SETTINGS ERRORS LOG To scroll through the list of parameters press the...

Страница 80: ...Month This parameter sets the month of the internal clock 9 2 1 5 Year This parameter sets the year of the internal clock 9 2 1 6 Set Clock This item is used for programming the internal clock chip w...

Страница 81: ...press ENTER to read the errors from the low kit and return to the upper menu level by pressing CLEAR for a few seconds 9 2 2 2 Write to low kit To write the values of the currently displayed parameter...

Страница 82: ...15 Par 07 125 Par 08 30 Par 09 1 Par 10 30 Par 11 0 Par 12 5 Par 13 0 9 2 3 OPERATING DATA This function makes it possible to access the machine usage data stored in the low kit To access this menu w...

Страница 83: ...display is updated every 10 minutes This means that whenever the machine is switched off any data modified after the last memory update will be lost MESSAGE ON DISPLAY DESCRIPTION Life Brake Minutes x...

Страница 84: ...o the upper menu level by pressing CLEAR for a few seconds 9 2 4 2 Reset Errors To clear the error history in both the low and high kit memory scroll using the keys until the LED display shows RESET E...

Страница 85: ...d is incorrect Use the speed key to advance to the next error otherwise the message with the details of the current error will continue to reappear 9 2 5 STANDARD SETTINGS This function simultaneously...

Страница 86: ...L x B x Which identifies the firmware version 9 2 6 2 Low Kit fault code This function accesses the lower electronics error log To access this menu when the LED display shows LOW KIT FAULT CODE press...

Страница 87: ...mended procedures 10 1 DAILY MAINTENANCE OPERATIONS These operations can be carried out by the machine owner and do not require any special skills The daily machine maintenance consists of simple exte...

Страница 88: ...body weight backward and forward and from right to left Check whether the saddle stem follows these shifts in weight exhibiting play Adjust the amount of play if necessary 10 2 2 CHECK WEAR OF FOOT ST...

Страница 89: ...tch in position 0 OFF 2 Unplug the mains lead from the wall outlet 10 3 3 CLEANING OPERATIONS 1 Use a vacuum cleaner to clean the interior paying particular attention to the brake WARNING when carryin...

Страница 90: ...BIKE FORMA Service Maintenance Manual rev 1 0 Page 10 4 Isolation of the individual wires toward ground Repair and or replace any non conforming wires 2 Check the condition of the fuses using a tester...

Страница 91: ...it is necessary to change the contents of the FLASH EPROM on the 386 board by means of an external PC connected to the CSAFE port on the machine situated on the lower part of the display panel The PC...

Страница 92: ...tment and maintenance action on the machine Small Phillips screwdriver Medium Phillips screwdriver 7 mm wrench 15 mm wrench 17 mm wrench 3 mm Allen T wrench 4 mm Allen T wrench 6 mm Allen T wrench 14...

Страница 93: ......

Страница 94: ...0SM00280AA UK TECHNOGYM S p A Via G Perticari 20 47035 Gambettola FC ITALIA Tel 39 0547 650438 Fax 39 0547 650150 e mail service technogym com...

Отзывы: