English
- 17 -
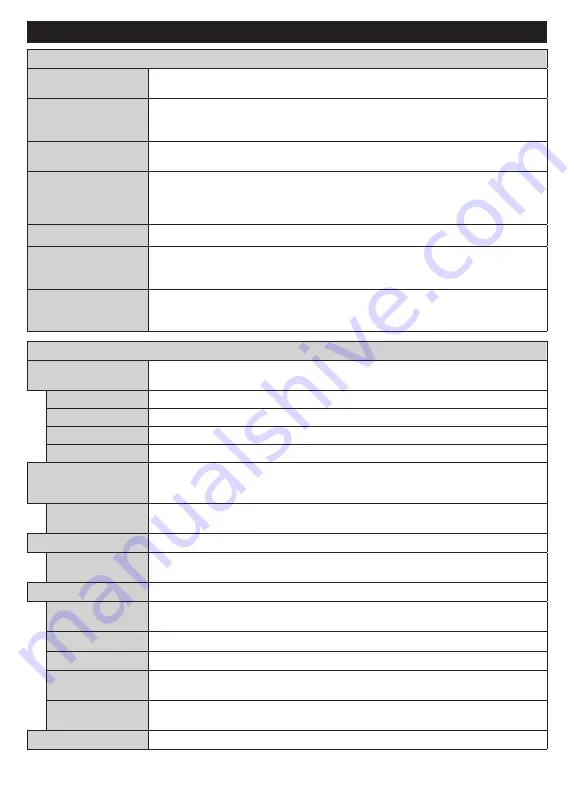
Settings Menu Content
Devices Menu Content
CEC
With this setting you can enable and disable CEC functionality completely. Press Left
or Right button to enable or disable the feature.
CEC Auto Power On
This function allows the connected HDMI-CEC compatible device to turn on the TV
and switch to its input source automatically. Press
Left
or
Right
button to enable or
disable the feature.
Audio Link
Press
OK
to open the Audio Link menu screen. Using this screen you can discover and
connect the sound devices to your TV wirelessly.
Input Device
Press
OK
to open the Input Device menu screen. Using this screen you can discover
and connect keyboards and mice to your TV wirelessly.
Note:
Your TV may not be compatible with all keyboard and mouse models in the market. For more information
contact your local dealer or retail outlet where you bought your TV.
Virtual Remote
Enable or disable the virtual remote feature.
Audio Video Sharing
This feature allows you to share files stored on your smartphone or tablet pc. If you have
a compatible smartphone or tablet pc and the appropriate software is installed, you can
share/play photos on your TV. See instructions of your sharing software for more information.
Timer of No Signal
If your TV does not receive any input signal (e.g. from an aerial or HDMI source) for
3 minutes, it will go into standby mode. You can enable or disable this functionality by
setting this option accordingly.
Picture Menu Content
Mode
You can change the picture mode to suit your preference or requirements. Picture mode can
be set to one of these options:
Cinema
,
Game
(optional),
Sports
,
Dynamic
and
Natural
.
Contrast
Adjusts the light and dark values on the screen.
Brightness
Adjusts the brightness values on the screen.
Sharpness
Sets the sharpness value for the objects displayed on the screen.
Colour
Sets the colour value, adjusting the colours.
Energy Saving
For setting the
Energy Saving
to
Custom
,
Minimum
,
Medium
,
Maximum
,
Auto
,
Screen Off
or
Off
.
Note:
Available options may differ depending on the selected
Mode
.
Backlight
This setting controls the backlight level. The backlight function will be inactive if the
Energy Saving
is set to an option other than
Custom
.
Picture Zoom
Sets the desired image size format.
Picture Shift
This option may be available depending on the
Picture Zoom
setting. Highlight and
press
OK
, then use directional buttons to shift the picture upwards or downwards.
PC Position
Appears only when the input source is set to VGA/PC.
Autoposition
If the image is not centered in VGA mode use this option to automatically adjust the
position of the image. Press
OK
to start the auto adjustment.
H Position
This item shifts the image horizontally to the right hand side or left hand side of the screen.
V Position
This item shifts the image vertically towards the top or bottom of the screen.
Dot Clock
Dot Clock adjustments correct the interference that appear as vertical banding in dot
intensive presentations like spreadsheets or paragraphs or text in smaller fonts.
Phase
Depending on the input source(computer etc.) you may see a hazy or noisy picture on
the screen. You can use phase to get a clearer picture by trial and error.
Advanced Settings
Содержание TECHNIVISION HD24A
Страница 1: ......
Страница 29: ...Deutsch 28...
Страница 47: ...Deutsch 46 Stromverbrauchswerte TECHNIVISION HD24A...
Страница 65: ...English 18...
Страница 87: ...English 40 Power consumption values TECHNIVISION HD24A...
Страница 130: ...Fran ais 43 Valeurs de consommation d nergie TECHNIVISION HD24A...
Страница 131: ......


