background image


Figure 3-11 


12. 

 Windows


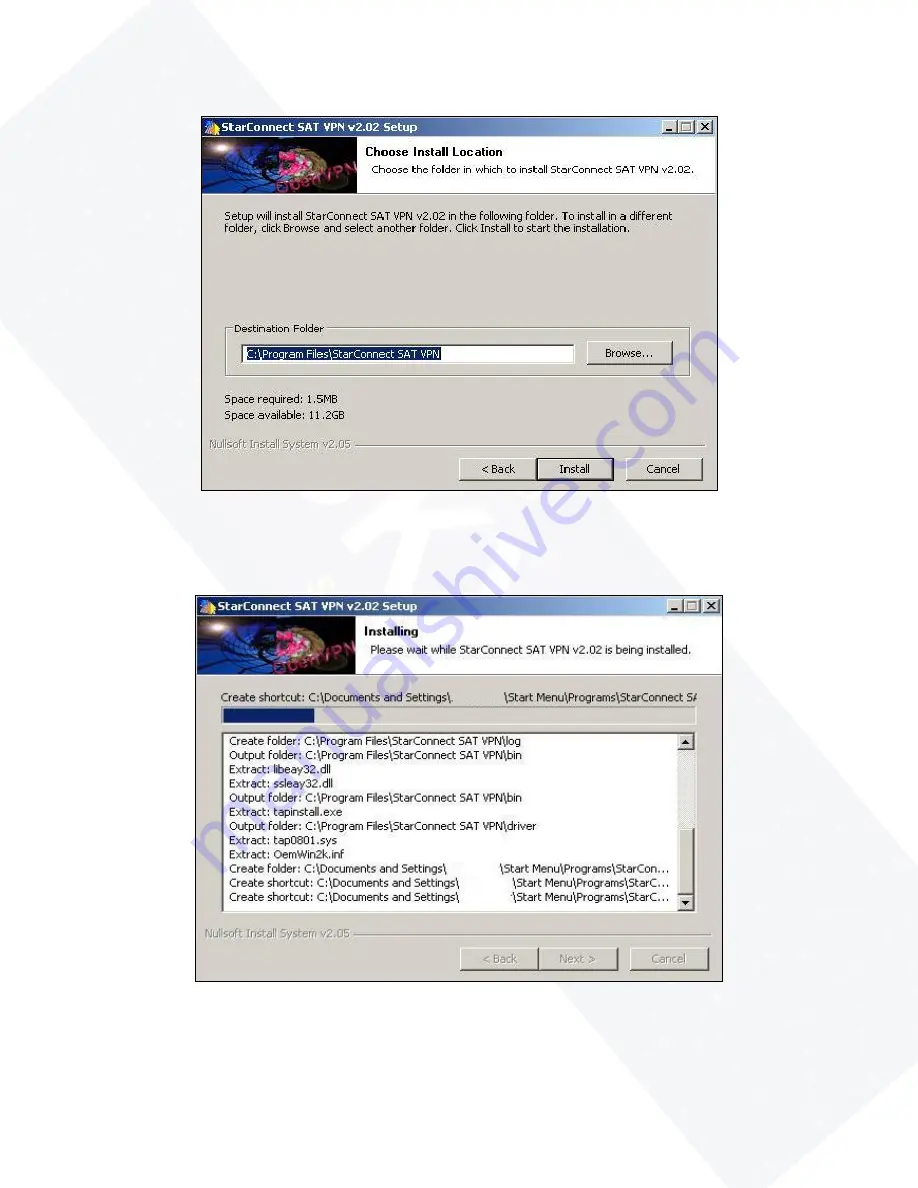
XP will now install the StarConnect Satellite VPN software into the appropriate 

locations on your computer (Figure 3-12).


Figure 3-12 


13.  

Select 

Continue Anyway 

when reported that the StarConnect Satellite VPN software has not 

passed Windows Logo testing as shown below in Figure 3-13

.


14 

Содержание AMC-6

Страница 1: ...radio communications However there is no guarantee that interference will not occur in a particular installation However if this equipment does cause interference to radio or television equipment rece...

Страница 2: ...r 4 Entering Settings 4 1 Changing Transponder Frequencies 4 1 Editing User Information 4 2 Editing User Settings 4 3 Chapter 5 Dial up Setup 5 1 Windows XP 5 1 Creating the Dial up Icon 5 2 Editing N...

Страница 3: ...customers PC is very much intrusive in nature as it does not like to operate with any other Internet Service Provider other than AOL The AOL application tends to cause conflicts with other Internet ba...

Страница 4: ...er is turned off Following your PC manufacturer s instructions do the following 1 Turn the PC off and unplug the power supply 2 Open the side panel or rear cover of your computer to expose the PCI slo...

Страница 5: ...CD supplied with your B2C2 satellite modem It is necessary to install the modem and drivers prior to installing the satellite software Our drivers support Windows XP and Windows 2000 Professional The...

Страница 6: ...e bottom radio button to select No not this time If this window does not appear on your system skip to Step 3 Then click Next to continue Figure 2 2 3 Select the radio button to install the software a...

Страница 7: ...appropriate drivers Figure 2 4 Figure 2 4 5 Select Continue Anyway when reported that the TechniSat modem has not passed Windows Logo testing as shown below in Figure 2 5 Figure 2 5 6 Windows XP cont...

Страница 8: ...6 7 After Windows XP finds and installs the appropriate drivers click Finish Figure 2 7 Figure 2 7 8 Windows XP will then display that the new hardware was found is installed and is ready to use Figu...

Страница 9: ...talling the Software The application used to configure and maintain the TechniSat modem is located on the installation CD provided with the B2C2 PCI or USB modem To install it you ll need to insert th...

Страница 10: ...3 2 3 The software License Agreement will be displayed next as shown in Figure 3 3 below Click Yes to continue with the software installation If you select No the software will not be installed Figure...

Страница 11: ...Next to continue Figure 3 4 Figure 3 4 5 Windows XP will automatically select the Program Folder Click Next to continue Figure 3 5 Figure 3 5 6 Windows XP will start the software installation This may...

Страница 12: ...allation as shown in Figure 3 7 This may take several minutes depending on your computer Figure 3 7 8 Windows XP will now load the software necessary for the StarConnect Satellite VPN The Install Wiza...

Страница 13: ...u select No the software will not be installed Figure 3 9 10 The software will automatically select which components to install on your computer Click Next to continue Figure 3 10 Do not change any of...

Страница 14: ...nnect Satellite VPN software into the appropriate locations on your computer Figure 3 12 Figure 3 12 13 Select Continue Anyway when reported that the StarConnect Satellite VPN software has not passed...

Страница 15: ...Figure 3 13 14 Once the StarConnect Satellite VPN software is installed click Next to continue Figure 3 14 Figure 3 14 15 Click Finish to complete the software installation Figure 3 15 15...

Страница 16: ...15 16 After the software installation is completed you must restart your computer for the software to take effect Remove the CD from the CD Rom Drive at this time and click Finish Figure 3 16 Figure...

Страница 17: ...ring these settings out of sequence or entering invalid data can disable your satellite connection and necessitate a software reinstall 1 Double left click your mouse button on the round satellite sig...

Страница 18: ...4 3 3 This will now open your Transponder Management window as shown in Figure 4 4 Figure 4 4 4 Now highlight the transponder in the Transponder window on the upper left then left click on Edit Figure...

Страница 19: ...e 4 6 Figure 4 6 6 If you have to make any changes this will highlight the Tune button Figure 4 7 If you didn t have to make any changes just retype the Transponder to highlight the Tune button Left c...

Страница 20: ...Figure 4 7 Figure 4 8 7 Now go back to the Edit Transponder window and left click on OK as shown in Figure 4 9 Figure 4 9 20...

Страница 21: ...te 1 has a value of 8000 in the box If any are different please change them at this time as shown in Figure 4 10 Figure 4 10 9 Now right click on the round satellite in the Task Bar next to the clock...

Страница 22: ...s shown in Figure 4 13 Figure 4 13 11 The Transponder Status window will open Left click your mouse button on the Down Arrow to the right of the Current Settings window upper left side of Transponder...

Страница 23: ...e Horizontal Left High as shown in Figure 4 15 Figure 4 15 13 After making the above changes the Tune button will light up Figure 4 16 If your settings are correct just retype the Transponder so that...

Страница 24: ...Information Figure 4 16 right click on the round signal either red or green in the Task Bar next to the clock Figure 4 17 Figure 4 17 15 This will open a menu as shown in Figure 4 18 Left click once o...

Страница 25: ...Figure 4 19 16 Now click Close on the Transponder Status window Figure 4 20 Figure 4 20 17 Now left click on Close to close the Setup4PC window Figure 4 21 Figure 4 21 25...

Страница 26: ...u pop up as in Figure 4 23 Left click on Edit Config Figure 4 23 3 Once your Edit Config window is open Notepad file you will be changing the seventh line from the bottom line with arrow Type your lin...

Страница 27: ...n the Start button hold your mouse over All Programs and let it expand out then hold your mouse over the StarConnect SAT VPN folder and let it expand out then highlight StarConnect SAT VPN configurati...

Страница 28: ...to you Please type everything in lowercase Also please double check your typing and spelling as this is critical for logging onto the satellite Figure 4 28 7 Now left click on File and then left clic...

Страница 29: ...Figure 4 30 2 This will open your Setup4PC window as shown in Figure 4 31 Figure 4 31 3 Left click you mouse on the Data Services button as shown in Figure 4 32 Figure 4 32 29...

Страница 30: ...Next you will type in your IP address which was provided to you when you first called in after receiving your equipment Please type it in carefully as this is critical for proper operation Finally yo...

Страница 31: ...tup Windows XP 1 To create a dial up connection in Windows XP begin by left clicking on Start and then highlight the Control Panel Figure 5 1 Left click on it This will open your Control Panel window...

Страница 32: ...t double left click on Internet Options Figure 5 3 Figure 5 3 3 Once your Internet Options window is open left click on the Connections Tab across the top Figure 5 4 This will open a window as shown i...

Страница 33: ...ny dial up connection s currently set up in the Dial up and Virtual Private Network Settings box you must remove it them all at this time To remove left click on the connection to highlight it then le...

Страница 34: ...e all removed click on the Add button to create a new dial up for NRBB as shown in Figure 5 7 Figure 5 7 34 6 The New Connection Wizard window will open Select Dial up to private network and then left...

Страница 35: ...umber provided to you local dial up number and then left click on Next as shown in Figure 5 9 Figure 5 9 8 The next window will open as shown in Figure 5 10 Hit the DELETE key to remove the dial up co...

Страница 36: ...onnection name in this box and then left click on Finish Figure 5 11 Figure 5 11 10 Check to make sure that no boxes are checked in this window If any boxes are checked please uncheck them at this tim...

Страница 37: ...Figure 5 12 11 Next select the radio button which states Never dial a connection as shown in Figure 5 13 Figure 5 13 37...

Страница 38: ...AN Settings as shown in Figure 5 14 Figure 5 14 13 Check to make sure that no boxes are checked in this window If any boxes are checked please uncheck them at this time Then left click on OK Figure 5...

Страница 39: ...Figure 5 16 Figure 5 16 15 On your Control Panel double left click on Network Connections as shown in Figure 5 17 Figure 5 17 16 Right click on the NRBB under Dial up in your Network Connections wind...

Страница 40: ...ting to your dial up service Editing Network Connections Settings 1 On the Network Connections window look for the Local Area Connection that corresponds to your TechniSat DVB PV TV Star USB connectio...

Страница 41: ...Figure 5 20 Figure 5 21 2 Next make sure that your boxes are checked as shown then highlight Internet Protocol TCP IP and left click on Properties as shown in Figure 5 22 41...

Страница 42: ...Figure 5 22 3 Check to make sure that your settings match EXACTLY those shown in Figure 5 23 If they do not match please change them accordingly at this time Then click OK Figure 5 23 42...

Страница 43: ...ons window look for the Local Area Connection that corresponds to your Tap Win32 Adapter V8 connection as shown in Figure 5 25 Hold your mouse over the Local Area Connection that corresponds to your T...

Страница 44: ...hen highlight Internet Protocol TCP IP and left click on Properties as shown in Figure 5 27 Figure 5 27 7 Check to make sure that your settings match EXACTLY those shown in Figure 5 28 If they do not...

Страница 45: ...window to close it Figure 5 29 Figure 5 29 9 On the Network Connections window look for the Dial up Connection as shown in Figure 5 30 Hold your mouse over the NRBB Connection and right click on it Th...

Страница 46: ...Figure 5 30 Figure 5 31 10 Next select Networking on the tabs across the top on the NRBB Properties window as shown in Figure 5 32 46...

Страница 47: ...hen highlight Internet Protocol TCP IP and left click on Properties as shown in Figure 5 33 Figure 5 33 12 Check to make sure that your settings match EXACTLY those shown in Figure 5 34 If they do not...

Страница 48: ...5 34 13 Click OK on the NRBB Properties window to close it Figure 5 29 Figure 5 35 Close your Network Connections window and your Control Panel window 48...

Страница 49: ...this user name and password for the following users Left click on Dial and wait for your modem to connect Figure 5 36 Once your modem is connected double left click on the double red computers in the...

Страница 50: ...Connect SAT VPN icon Fig 5 37 and select disconnect Then disconnect your dial up by either double clicking on your NRBB dialup short cut on the desktop and selecting disconnect or by right clicking th...

Отзывы: