background image

English   

- 10 -

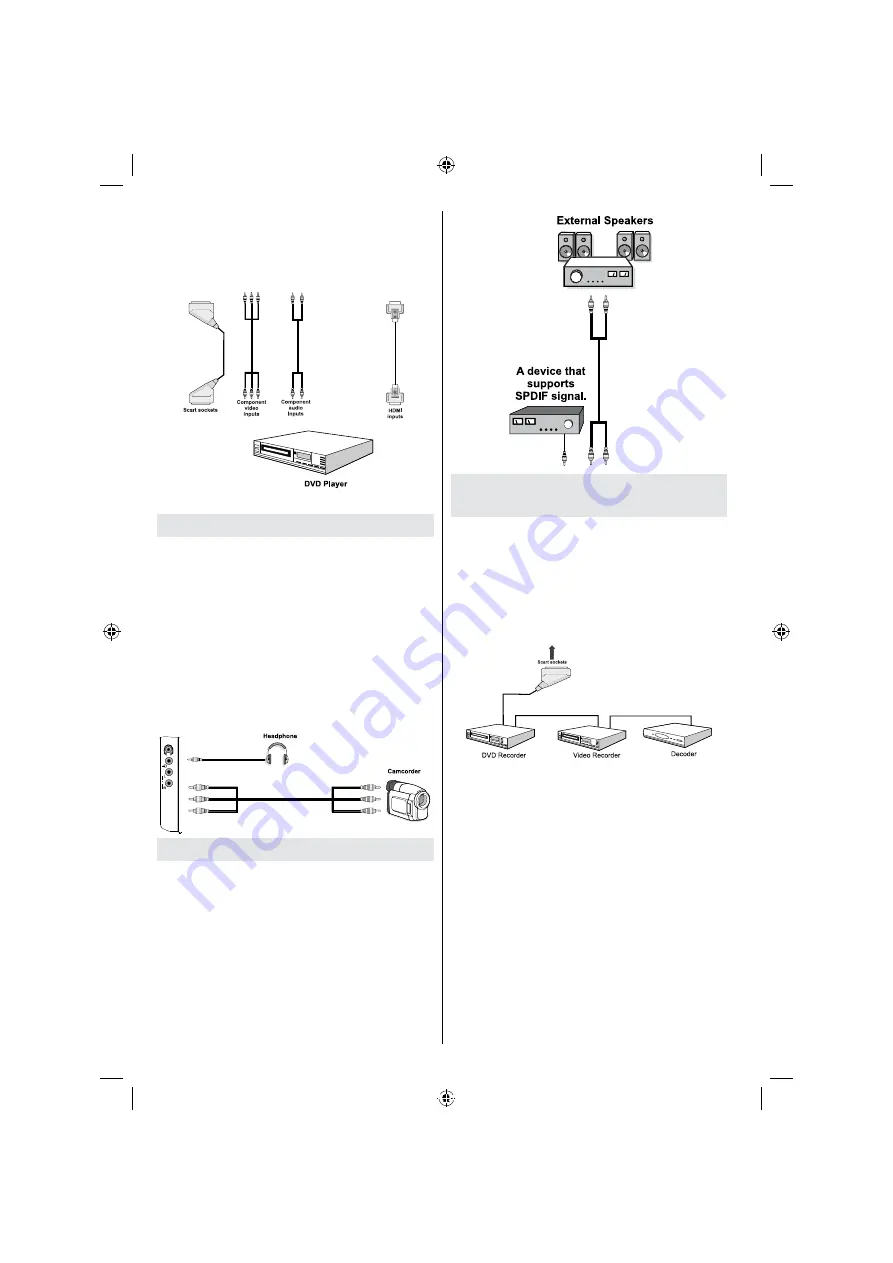
•  You  may  also  connect  through  the  SCART  1  or 

SCART 2. Use a SCART cable as shown below.


Note

 : These three methods of connection perform the 

same function but in different levels of quality. It is not 
necessary to connect by all three methods. 


 REAR VIEW  

  Using Side AV Connectors 

 You  can  connect  a  range  of  optional  equipment 
to  your  LCD  TV.  Possible  connections  are  shown 
below. Note that cables shown in the illustration are 
not supplied. 
 • For connecting a camcorder, connect to the VIDEO 

IN socket and the AUDIO SOCKETS.  Do not connect 
the camcoder to VIDEO IN socket at the same time 
since it can cause noise in the picture. For selecting 
the related source, see the section “Input selection” 
in the following parts.  

• To listen the TV sound from headphones, connect 

to the HEADPHONE jack of theTV. 


   Using Other Connectors

  You  can  connect  a  range  of  optional  equipment 
to  your  LCD  TV.  Possible  connections  are  shown 
below. Note that cables shown in the illustration are 
not supplied. 
 • To connect external speakers, use an audio cable. 

Do not reverse the AUDIO LEFT and AUDIO RIGHT 
jacks. Turn on the LCD TV and external speaker set 
after all connections are made. Refer to your speaker 
set’s manual for further queries.

• For connecting a to a device that has SPDIF support, 

use an appropriate SPDIF cable to enable sound 
connection. 


    Connecting Other Equipment via 
Scart

  Most  devices  support  SCART  connection. You  can 
connect a; DVD recorder, a VCR or a decoder to your 
LCD TV by using the SCART sockets. Note that cables 
shown in the illustration are not supplied. 
Power off both the TV and the devices before making 
any connections.
For  more  information,  refer  to  your  device’s  own 
instruction book. 


[GB]_MB35_COST_26857WS_1810UK_PANEUIDTV_SILVER1_TECHNIKA_10064934_50155702.indd   10

02.10.2009   09:31:39

Содержание LCD26-920

Страница 1: ...COLOUR TELEVISION WITH REMOTE CONTROL OPERATING INSTRUCTIONS For assistance please call our Tesco Electrical Helpline on 0845 4566767 LCD26 920...

Страница 2: ...11 Basic Operations 11 Operation with the Buttons on the TV 11 Operation with the Remote Control 12 Initial Settings 12 General Operation 13 Information Banner 13 Electronic Programme Guide EPG 13 Di...

Страница 3: ...signal is detected after 5 minutes the TV switches itself automatically to standby mode PLL Frequency Search PC input Plug Play for Windows 98 ME 2000 XP Vista Audio line out Game Mode optional Active...

Страница 4: ...open ame sources such as lighted candles are placed on top of the TV Batteries should not be exposed to excessive heat such as sunshine re or the like Lightning In case of storm and lightning or when...

Страница 5: ...as a xed blue green or red point Please note that this does not affect the performance of your product Warning Do not leave your TV in standby or operating mode when you leave your house Licence Noti...

Страница 6: ...e 15 Cursor right 16 OK Select Freeze picture Hold in TXT 17 mode Cursor down Page down in TXT mode 18 Menu on off 19 Cursor left Subpage in TXT mode 20 Previous Programme Swap 21 Picture mode selecti...

Страница 7: ...ls to a device that has S PDIF input 2 Subwoofer Out is for connecting an external active subwoofer to the set to give a much deeper bass effect Use an appropriate RCA cable to connect the set to a su...

Страница 8: ...output of your PC to enable PC audio Connect the audio cable between AUDIO INPUTS on the TV and audio outputs of your device to enable component audio 8 S PDIF Coaxial Out outputs digital audio signal...

Страница 9: ...used for connecting video signals of external 5 devices Connect the video cable between the VIDEO IN socket on the TV and the VIDEO OUT jack on your device Audio Inputs are used for connecting audio s...

Страница 10: ...o the USB player and especially the USB device itself SIDE VIEW USB MEMORY USB Memory Connection Plug your USB device to the USB input of the TV Note USB hard disk drives are not supported It is recom...

Страница 11: ...heTV Using Other Connectors You can connect a range of optional equipment to your LCD TV Possible connections are shown below Note that cables shown in the illustration are not supplied To connect ext...

Страница 12: ...s switched to standby mode standby LED can blink to indicate that features such as Standby Search Over Air Download or Timer is active Input Selection Once you have connected external systems to your...

Страница 13: ...ess OK button After then First time installation OSD will appear on the screen By pressing or buttons select the country you want to set and press OK button button for EU countries Note Country select...

Страница 14: ...ch a case Electronic Programme Guide EPG Some but not all channels send information about the current and next events Please note that event information is updated automatically If there is no event i...

Страница 15: ...same as the aspect ratio of the picture viewed previously When you press the TELETEXT button again the digital teletext screen will be displayed Analogue Teletext Use of teletext and its functions are...

Страница 16: ...by pressing or button Then highlight the Edit Name item by pressing or button as illustrated below Press the OK button to activate the rename feature Now pressing or button moves to the previous next...

Страница 17: ...arting date is entered via the Left Right or the numeric buttons Start Starting time is entered via the Left Right or the numeric buttons End Ending time is entered via the Left Right or the numeric b...

Страница 18: ...tons to set the AC3 Audio as On or Off If the channel that you are watching supports AC3 Audio turn this setting on Hard of Hearing for EU countries only Use or button to select Hard of Hearing and th...

Страница 19: ...ental Lock option Press OK button to enter the menu A dialog box asking for the lock key will be displayed The key is set to 0000 initially Enter PIN If it is incorrect Wrong Pin OSD will be displayed...

Страница 20: ...ch This setting is visible only when the Country option is set to Denmark Sweden Norway or Finland Use or button to select Standby Search and then press or button to set this setting as On or Off If y...

Страница 21: ...Language and Text language by using or and or buttons Press OK or RED button to continue To cancel press BLUE button The following menu will be displayed during the automatic tuning AfterAPS is naliz...

Страница 22: ...a message asking whether to search for analogue channels appears on the screen This process is same as described in Automatic Search section Media Browser To display Media Browser window press either...

Страница 23: ...utton Pause the video playback Rewind Cursor Left Goes backward Forward Cursor Right Goes forward Menu M button Sets subtitle Audio You can set subtitles by using OK button before starting the playbac...

Страница 24: ...n Use or buttons to change picture zoom to Auto 16 9 4 3 Panoramic 14 9 Cinema Subtitle or Zoom Reset Press or button to select Reset Press or or OK button to reset the picture modes to factory defaul...

Страница 25: ...elect Spdif Out Press or button to set the Spdif Out as On or Off Note If Spdif Out is set to On headphone will be disabled SRS TruSurr XT optional By pressing or select SRS TruSurr XT Press or button...

Страница 26: ...to Panoramic 16 9 4 3 or 14 9 by pressing or button Blue Background If the signal is weak or absent the TV will automatically change to a blue screen To enable this set Blue Background to On By press...

Страница 27: ...em is highlighted Store Press or button to select Store Press or OK button to store the settings Stored will be displayed on the screen Install Menu in AV Modes The following screen appears in the ins...

Страница 28: ...owing OSD will be displayed Whenever you press the BLUE button APS function stops and Program Table appears on the screen If you wait until the end of APS Program Table will be displayed with the prog...

Страница 29: ...umber Programme Name Sound Indicator and Zoom Mode information is displayed on the screen when a new programme is entered or INFO button is pressed Mute Function Press button to disable sound Mute ind...

Страница 30: ...he picture are slightly cut off 14 9 This zooms up the wide picture 14 9 aspect ratio to the upper and lower limits of the screen Cinema This zooms up the wide picture 16 9 aspect ratio to the full sc...

Страница 31: ...power cable and connection to the mains socket outlet Poor Picture Have you selected the correct TV system Is your TV set or house aerial located too close to a non earthed audio equipment or neon lig...

Страница 32: ...1280 768 60 47 7 VESA 28 1360 768 60 47 7 29 1280 768 75 60 2 VESA 30 1280 960 60 60 0 VESA 31 1280 960 75 75 0 VESA 32 1280 960 85 85 9 VESA 33 1280 1024 60 64 0 VESA 34 1280 1024 75 80 0 VESA 35 12...

Страница 33: ...GB FAV RGB HDMI1 HDMI2 HDMI3 HDMI4 YPbPr PC VGA RGB This indicates that selection is possible only if Scart 1 has a RGB signal Restrictions Scart 1 source must have RGB signal to perform PIP PAP with...

Страница 34: ...420 Grayscale gif GIF WxH 14592x12288 Up to 179 Mega pixel bmp bit map WxH 14592x12288 Up to 179 Mega pixel External Subtitles srt Support Text File Format but do not support Picture File Format smi s...

Страница 35: ...lation COFDM with 2K 8K FFT mode FEC all DVB modes Video MP ML PAL 4 3 16 9 Audio MPEG Layer I II 32 44 148kHz NUMBER OF PRESET CHANNELS 200 CHANNEL INDICATOR On Screen Display RF AERIAL INPUT 75 Ohm...

Страница 36: ...English 35 GB _MB35_COST_26857WS_1810UK_PANEUIDTV_SILVER1_TECHNIKA_10064934_50155702 indd 35 02 10 2009 09 31 55...

Страница 37: ...50155702...

Отзывы:

Похожие инструкции для LCD26-920