background image

16

2 SETUP

DMS-CTC-20140127-0004 v1.0

2.3  Connect your wired devices

Requirements

Both your network device (for example, a computer, a gaming console, etc.) and Gateway must have a free Ethernet port.

Your network device must be configured to obtain an IP address automatically. This is the default setting.

All Ethernet ports on the Gateway are Gigabit Ethernet ports and have a maximum speed of 1 Gbps (Gigabit per second).

Procedure

Proceed as follows:

1

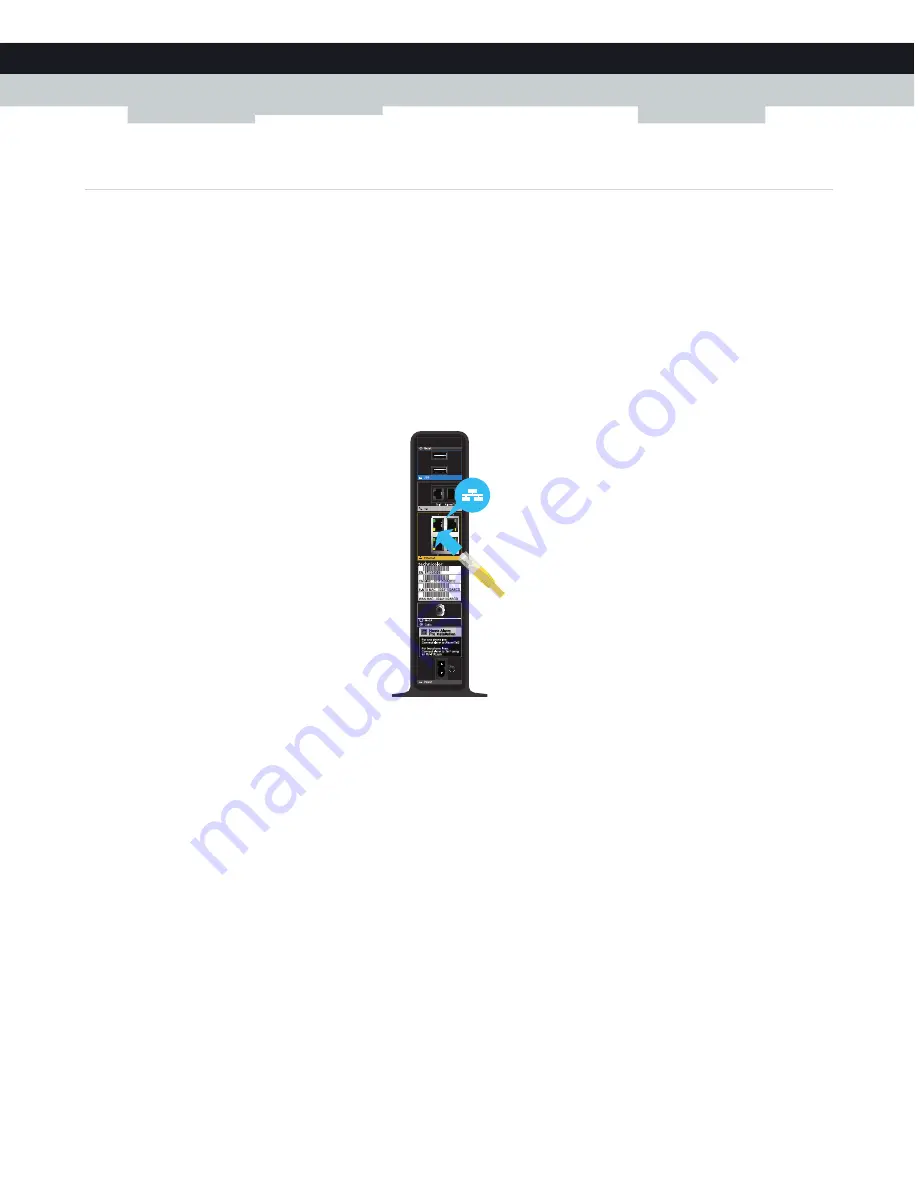
Take the yellow Ethernet cable that is included in your box.

2

Plug one end of the Ethernet cable into one of the 

yellow

 Ethernet ports on the back of the Gateway: 

3

Plug the other end of the Ethernet cable into the Ethernet port of your network device.

4

Your network device is now connected to your network. Use the same procedure to connect your other Ethernet devices 
(computers, network printers and so on).

Содержание MediaAccess TC8717T

Страница 1: ...SETUP AND USER GUIDE MediaAccess TC8717T ...

Страница 2: ......

Страница 3: ...SAFETY INSTRUCTIONS AND REGULATORY NOTICES Before you start installation or use of this product carefully read these instructions ...

Страница 4: ...of electrocution Regulatory information You must install and use this device in strict accordance with the manufacturer s instructions as described in the user documentation that is included with your product Before you start installation or use of this product carefully read the contents of this document for device specific constraints or rules that may apply in the country where you want to use ...

Страница 5: ...SETUP AND USER GUIDE MediaAccess TC8717T ...

Страница 6: ...roDOCSIS EuroPacketCable and PacketCable are trademarks of CableLabs Inc DECT is a trademark of ETSI DLNA is a registered trademark DLNA disc logo is a service mark and DLNA Certified is a trademark of the Digital Living Network Alli ance Digital Living Network Alliance is a service mark of the Digital Living Network Alliance Ethernet is a trademark of Xerox Corporation Microsoft MS DOS Windows Wi...

Страница 7: ...wireless client via WPS 18 2 4 2 How to manually connect your wireless client 20 3 Admin Tool 25 3 1 Components 26 3 2 How to change the default Admin Tool password 28 3 3 How to backup or restore a configuration 29 4 The Gateway wireless access point 31 4 1 How to configure the wireless settings 32 4 2 How to start a WPS session via the Admin Tool 34 4 3 Prevent devices from accessing your wirele...

Страница 8: ... applications and services 54 7 1 1 UPnP 56 7 1 2 Port forwarding 58 7 1 3 Port triggering 60 7 1 4 Configure a DMZ Host 62 7 2 Assigning a reserved IP to a device 63 8 Support 65 8 1 Wireless connection troubleshooting 66 8 2 Network diagnostic tools 68 8 3 Gateway reset and restore options 69 ...

Страница 9: ...te Example For more information visit us at www technicolor com This sample text indicates an internal link Example If you want to know more about guide see About this Setup and User Guide on page 1 This sample text indicates an important content related word Example To enter the network you must authenticate yourself This sample text indicates a GUI element commands on menus and buttons dialog bo...

Страница 10: ...2 ABOUT THIS SETUP AND USER GUIDE DMS CTC 20140127 0004 v1 0 ...

Страница 11: ... 0 1 Getting started Introduction This chapter gives you a brief overview of the main features and components of the Gateway After this chapter we will start with the installation Do not connect any cables to the Gateway until instructed to do so ...

Страница 12: ...trict access to specific websites services or your network For more information see 6 1 Parental control on page 44 The Gateway has an integrated firewall to protect you from malicious attacks For more information see 6 2 Firewall on page 52 Advanced network tools like port forwarding port triggering and DMZ For more information see 7 Advanced configuration on page 53 Local networking features MoC...

Страница 13: ...witch to the integrated rechargeable battery if you purchased a battery This guarantees that the following functions will not be impacted The connected phones or dial function for a connected alarm system All voice related features Easy configuration The Admin Tool allows you to configure your Gateway and network via your web browser For more information see 3 Admin Tool on page 25 For connecting ...

Страница 14: ... DMS CTC 20140127 0004 v1 0 1 2 Getting to know the Gateway This section introduces you to the different components of the Gateway Topic Page 1 2 1 Front panel 6 1 2 2 Top panel 8 1 2 3 Back panel 9 1 2 4 Bottom panel 11 ...

Страница 15: ...the state of the services offered by the Gateway Power LED US DS LED State Description Solid on The Gateway is powered on from the electrical outlet Blinking Power failure or running on battery Off The Gateway is powered off State Description Solid on Upstream and downstream channel locked Blinking Locking upstream or downstream channel Off The Gateway is powered off ...

Страница 16: ...e or more wireless clients connected to the 2 4 GHz access point wireless activity Off The 2 4 GHz access point is disabled State Description Solid on One or more wireless clients connected to the 5 GHz access point no wireless activity Blinking One or more wireless clients connected to the 5 GHz access point wireless activity Off The 5 GHz access point is disabled State Description Solid on The t...

Страница 17: ... The telephone connected to the Phone 2 port is off the hook or the home alarm is triggered Off No telephone connected to the Phone 2 port State Description Solid on Battery level is OK or recharging Blinking If the Power LED is Solid on bad battery Blinking low battery Off If the Power LED is Blinking the battery level is OK Off bad battery or no battery installed ...

Страница 18: ...tton allows you to add new wireless clients to your local network in a swift and easy way without the need to enter any of your wireless settings network name wireless network key encryption type For more information about WPS see 2 4 1 How to connect your wireless client via WPS on page 18 A ...

Страница 19: ...r For more information see 5 Sharing content on page 37 Power or charge a USB device Tel ports item C The Tel ports allows you to connect a traditional phone or DECT base station to your Gateway Single line customers can use the Tel 1 port to connect an auto dial alarm system For more information see 2 5 How to connect your phone on page 27 Ethernet switch item D The Ethernet switch allows you to ...

Страница 20: ...atus Description Top LED Green Solid on Connected to a Gigabit Ethernet device Blinking Connected to a Gigabit Ethernet device and sending receiving data Off Not connected to a Gigabit Ethernet device Bottom LED Amber Solid on Connected to a 100Mbps 10Mbps device Blinking Connected to a 100Mbps 10Mbps device and sending receiving data Off Not connected to a 100Mbps 10Mbps device State Description ...

Страница 21: ...e following services are not interrupted during power failure The connected phones or dial function for a connected alarm system Basic voice features A B For the network name two values are available SSID 1 Name 2 4Ghz is the network name of the 2 4 GHz access point and is of the following format TC8717TXX where X is an alphanumeric character SSID 2 Name 5Ghz is the network name for the 5 GHz acce...

Страница 22: ... a wireless connection your computer must be equipped with a Wi Fi Certified wireless client adapter Wired connection If you want to connect a computer using a wired connection your computer must be equipped with an Ethernet Network Interface Card NIC Start with the installation You are now ready to start with the installation of your Gateway proceed with 2 Setup on page 13 ...

Страница 23: ...d devices to the Gateway For more information see 2 3 Connect your wired devices on page 16 4 Connect your wireless devices to the Gateway For more information see 2 4 Connect your wireless devices on page 17 5 Connect your phones For more information see 2 5 How to connect your phone on page 27 Optional configuration After completing the setup procedure the Gateway is ready for use Optionally you...

Страница 24: ... network Introduction This section helps you to connect the Gateway to your service provider s network Connecting the cables Proceed as follows 1 Take one end of the coaxial cable and connect it to your cable splitter 2 Connect the other end to the MoCA Cable port of the Gateway MoCA Cable ...

Страница 25: ...1 Take the power cord that is included with your Gateway 2 Connect the small end of the power cord to the Power port on the back of the Gateway 3 Plug the other end of the power cord into an electrical outlet 4 Wait at least two minutes to allow the Gateway to complete the start up phase Power ...

Страница 26: ... Gateway are Gigabit Ethernet ports and have a maximum speed of 1 Gbps Gigabit per second Procedure Proceed as follows 1 Take the yellow Ethernet cable that is included in your box 2 Plug one end of the Ethernet cable into one of the yellow Ethernet ports on the back of the Gateway 3 Plug the other end of the Ethernet cable into the Ethernet port of your network device 4 Your network device is now...

Страница 27: ...less clients The 2 4 GHz 3x3 IEEE 802 11n access point allows you to connect IEEE802 11b g n wireless clients Use this access point for wireless clients that don t support 5 GHz Procedure To connect your device via Via WPS proceed with 2 4 1 How to connect your wireless client via WPS on page 18 By manually entering the settings proceed with 2 4 2 How to manually connect your wireless client on pa...

Страница 28: ...ollowing WPS methods are supported by your Gateway Push Button Configuration PBC You have to put both the wireless client and the Gateway in registration mode by pushing a hardware or software button PIN code entry on the wireless client You have to enter the Gateway s WPS PIN code on the wireless client For more information see Adding a wireless client using WPS PIN entry on the wireless client o...

Страница 29: ...wireless client via WPS this may be caused by one of the following reasons WPS can not be correctly executed Configure your wireless manually For more information see 2 4 2 How to manually connect your wireless client on page 20 Your wireless client is out of range If possible move your wireless client closer to your Gateway or use a wireless repeater to extend the range of your wireless network A...

Страница 30: ... your computer on Windows 7 on page 21 Windows Vista proceed with How to connect your computer on Windows Vista on page 22 Windows XP proceed with How to connect your computer on Windows XP on page 23 Mac OS X proceed with How to connect your computer on Mac OS X on page 24 On another operating system consult the help of your wireless client or operating system For the network name two values are ...

Страница 31: ... 4 Windows prompts you if it should turn on sharing Click Yes How to connect your computer on Windows 7 Proceed as follows 1 Click the wireless network icon in the notification area 2 A list of available wireless networks appears Double click the Gateway access point The Gateway is listed with the Network Name SSID1 and or SSID2 which is printed on the Gateway s bottom panel label For more informa...

Страница 32: ...rt and click Connect To 2 A list of available wireless networks appears 3 Double click the Gateway access point 4 Windows prompts you to enter the network security key Type the Network Key Password which is printed on the Gateway s bottom panel label in the Security key or passphrase box and click Connect The Gateway is listed with the Network Name SSID1 and or SSID2 which is printed on the Gatewa...

Страница 33: ...rks appears Double click the Gateway access point 3 Windows prompts you to enter the network security key Type the Network Key Password which is printed on the Gateway s bottom panel label in the Network key and Confirm network key box and click Connect 4 You are now connected to the Gateway The Gateway is listed with the Network Name SSID1 and or SSID2 which is printed on the Gateway s bottom pan...

Страница 34: ...iFi window prompts you to enter your WPA password In the Password box type the Network Key Password which is printed on the Gateway s bottom panel label and select the Remember this network box and click OK 4 You are now connected to the Gateway network The Gateway is listed with the Network Name SSID1 and or SSID2 which is printed on the Gateway s bottom panel label For more information see Produ...

Страница 35: ...nect the phones for single line customers If you have a two line setup or a setup involving a home alarm please contact your service provider This setup must be done by qualified technicians Procedure Connect your traditional phone external DECT base station or fax to the Tel1 port on the back panel of your Gateway ...

Страница 36: ...26 2 SETUP DMS CTC 20140127 0004 v1 0 ...

Страница 37: ... the Admin Tool Proceed as follows 1 Open your web browser and browse to http 192 168 0 1 2 The Gateway prompts you to enter the user name and password Enter your user name default admin and password default password and click OK 3 The Admin Tool appears On Windows it is also possible to access the Admin Tool using UPnP For more information see 7 1 1 UPnP on page 56 192 168 0 1 is the default IP a...

Страница 38: ...ows you to manage the access settings of the devices in your network Parental Control Allows you to manage the access rights for Internet access Advanced Allows you to configure more advanced Internet services Troubleshooting Allows you to perform some basic troubleshooting on the Gateway and network connections Each of these items contain a number of sub menu items More detailed information about...

Страница 39: ...ew of The battery level The status of the Internet interface The status of the wireless interface The status of the MoCA interface The selected firewall level Tips section item D The tips section provides helpful information about the settings displayed on the current page To expand the tip click more Content panel item E The content pane displays the actual configuration page Move your mouse poin...

Страница 40: ...ord page appears 4 In the Current Password box type your current password 5 In the New Password and Re enter New Password box type your new password 6 Click Save 7 The Gateway prompts you to login with your new password The default user name is admin and the default password is password The default password is password Your new password must be at least 8 characters long It may include letters or ...

Страница 41: ...the backup file Save your file to a location of your choice Restoring a previously saved configuration Proceed as follows 1 Browse to the Admin Tool http 192 168 0 1 For more information see Accessing the Admin Tool on page 25 2 The At a Glance page appears Click Restore Saved Configuration and then open your backup file 3 The Gateway prompts you that it will restore the configuration and reboot C...

Страница 42: ...30 3 ADMIN TOOL DMS CTC 20140127 0004 v1 0 ...

Страница 43: ...E802 11a n ac wireless clients A 2 4 GHz 3x3 IEEE 802 11n access point that allows you to connect IEEE802 11b g n wireless clients Use this access point for wireless clients that don t support 5 GHz Wireless client The wireless client allows you to connect a wireless client to a wireless access point Both built in and external for example via USB wireless clients are available Check the documentat...

Страница 44: ...your network must use this network name SSID Mode The standards that are allowed for wireless communication Only devices that support one of the selected modes can connect to the Gateway Security Mode The encryption type used to secure your wireless communication We recommend using WPAWPA2 PSK TKIP AES as it is compatible with most of the Wi Fi devices and offers an excellent level of security Ope...

Страница 45: ...n detect the presence of your network and inform the users that this network is available 5 Click Save Settings Enabling SSID broadcast does not mean that everyone can connect to your network They still need the correct wireless network key password to connect to the Gateway network It only informs them that your network is present SSID broadcasting is required for WPS ...

Страница 46: ...ears click Add Wifi Protected Setup WPS Client 5 The Add WiFi Client page appears 6 Click Pair 7 Within two minutes press the pair button of your wireless client Adding a wireless client using WPS PIN entry on the wireless client 1 Browse to the Admin Tool http 192 168 0 1 For more information see Accessing the Admin Tool on page 25 2 On the Gateway menu click Connection and then click WiFi 3 The ...

Страница 47: ... wireless client 2 Browse to the Admin Tool http 192 168 0 1 For more information see Accessing the Admin Tool on page 25 3 On the Gateway menu click Connection and then click WiFi 4 Click Add Wifi Protected Setup WPS Client 5 The Add WiFi Client page appears 6 In the WPS Pin Method list click Enabled 7 In the Connection Options list select Pin Number 8 Enter the PIN from your wireless client in t...

Страница 48: ...st under Mac Filter Setting select the access point for which you want to set up the Mac filter 4 In the MAC Filtering Mode list click Allow All to allow all wireless clients The Wireless Control List will not be used Allow to block wireless clients by default except if they are listed in the Wireless Control List Deny to allow wireless clients by default except if they are listed in the Wireless ...

Страница 49: ...ontent The following table gives a you a brief overview of the main functions Network file server UPnP AV media server Function Store and access your data on your local network Make media files available for UPnP AV capable devices like Media players Set Top boxes from your local network Access Read and write Read only Accessible from Local network Local network Type of content shared All files fr...

Страница 50: ...CONTENT DMS CTC 20140127 0004 v1 0 Configuration All servers are enabled by default The only thing that you need to do is to plug your USB memory stick or external hard disk in one of the USB port s of your Gateway ...

Страница 51: ...rs These devices have read and write access to this USB device s Accessing the shared content on Windows Proceed as follows 1 On the Windows Start menu click Computer 2 An Explorer window appears In the panel click Network 3 If Explorer prompts you that network discovery and or file sharing are turned off click on the message and turn it on 4 Explorer displays a list of detected devices Double cli...

Страница 52: ...C 20140127 0004 v1 0 5 The following window appears Double click the storage folder 6 Your connected USB devices are now displayed as a folders Double click one of the folders to access the content files stored on the USB device ...

Страница 53: ...network consists of the following components The UPnP AV server is directly connected to your media files and makes them available on the network In your network the Gateway will fulfil this role The UPnP AV client is a software application or hardware device that allows you to play or view the media files provided by your UPnP AV media server Accessing your media files via UPnP AV The UPnP AV med...

Страница 54: ...detected devices Double click BRCM DMS this is the Gateway s UPnP AV media server 5 Windows Media Player starts up Your Gateway s UPnP AV media server is listed as BRCM DMS in the left panel This entry allows you to browse to the media files provided by your UPnP AV media server ...

Страница 55: ...ternet security Overview The Gateway offers various options to secure your Internet connection Topic Page 6 1 Parental control 44 6 1 1 Manage sites 45 6 1 2 Manage services 47 6 1 3 Manage devices 49 6 1 4 View parental control reports 51 6 2 Firewall 52 ...

Страница 56: ...to specific website based on the URL or keywords For more information see 6 1 1 Manage sites on page 45 Prevents access to specific application or services for example FTP For more information see 6 1 2 Manage services on page 47 Prevents devices from accessing your network For more information see 6 1 3 Manage devices on page 49 ...

Страница 57: ...nable How to block a specific website Proceed as follows from the Managed Sites page 1 Under Blocked Sites click Add 2 The Add Blocked Domain page appears 3 In the URL field type the address of the website for example facebook com 4 If you want this rule only to be applied at specific time frames click No in the Always Block list and define when to apply the rule a Under Set Block Time enter a sta...

Страница 58: ...me enter a start time and end time b Under Set Block Days select the days for which the selected block time should be applied 5 Click Save Mark computers as trusted for all websites When a device is marked as trusted all Managed Sites rules will be ignored Proceed as follows 1 Under Trusted Computers look for your device and click Yes in the Trusted column 2 The device is now able to access all we...

Страница 59: ...he Start Port box type the start port of the port range for example 21 In the End Port box type the end port of the port range If the service only uses one port enter the same value as in the Start Port box for example 21 8 If you want this rule only to be applied at specific time frames click No in the Always Block list and define when to apply the rule a Under Set Block Time enter a start time a...

Страница 60: ...n a device is marked as trusted all managed services rules will be ignored Proceed as follows 1 Under Trusted Computers look for your device and click Yes in the Trusted column 2 The device is now able to use all web services unless prevented by other parental control functions that you configured ...

Страница 61: ...der Custom Device 4 If you want this rule only to be applied at specific time frames click No in the Always Allow list and define when to apply the rule a Under Set Allow Time enter a start time and end time b Under Set Allow Days select the days for which the selected block time should be applied 5 Click Save Adding blocked devices If you selected Allow All in the Access Type list proceed as foll...

Страница 62: ...d block time should be applied 5 Click Save If you want to have different time schedules depending on the day you have to group them in separate rules One rule for weekdays for example block the device from 8 00 PM until 10 00 PM One rule for the weekend for example block the device from 8 00 AM until 10 00 PM ...

Страница 63: ...wse to the Admin Tool http 192 168 0 1 For more information see Accessing the Admin Tool on page 25 2 On the Parental Control menu click Reports 3 The Report page appears Under Report Filters select a report type and time frame and click Generate Report 4 The Generated report table now lists all log entries 5 Optionally you can Click Print to print the log entries Click Download to save the log en...

Страница 64: ...lowed but you are able to block specific applications For IPv6 traffic Typical Security this is the default configuration of the IPv6 firewall Allows all traffic from home network to internet and blocks all unrelated traffic from internet to home network Custom Security Enables the Intrusion Detection System IDS and allows all traffic passing through the Gateway from and to the Internet is allowed...

Страница 65: ...tion This chapters covers the more advanced features The following topic are available Topic Page 7 1 Port configuration for applications and services 54 7 1 1 UPnP 56 7 1 2 Port forwarding 58 7 1 3 Port triggering 60 7 1 4 Configure a DMZ Host 62 7 2 Assigning a reserved IP to a device 63 ...

Страница 66: ...onse to an outgoing message originating from one of your computers the Gateway sends the incoming message to this computer But the Gateway will not be able to resolve the destination if The incoming message arrives on a different port as the outgoing message Then the Gateway will not know that the two messages are related There is no outgoing message Solutions To avoid this problem the Gateway off...

Страница 67: ...4 v1 0 The Gateway allows you to define a number of trigger ports When a device sends data over one of these ports the Gateway will automatically assign a number of related ports to the device For more information see 7 1 3 Port triggering on page 60 ...

Страница 68: ...PnP enabled games and applications will do this for you If the application is UPnP enabled UPnP will create these entries automatically You can access the Admin Tool without having to remember the address of the Gateway Enable UPnP on the Gateway 1 Browse to the Admin Tool http 192 168 0 1 For more information see Accessing the Admin Tool on page 25 2 On the Advanced menu click Device Discovery 3 ...

Страница 69: ...ff click on the message and turn it on 4 Right click Technicolor TC8717T and click View device web page 5 The Admin Tool appears How to use UPnP to access your Gateway on Windows XP If you computer runs Windows XP 1 Go to My Network Places 2 The My Network Places window appears 3 Double click Technicolor TC8717T 4 The Admin Tool appears ...

Страница 70: ...1 Browse to the Admin Tool http 192 168 0 1 For more information see Accessing the Admin Tool on page 25 2 On the left menu click Advanced 3 The Port Forwarding page appears In the Enable Port Forwarding list click Enabled In the Port Forwarding table click Add Service 4 The Add Service page appears 5 In the Common Services list click the service you want to run on the computer or click Other if t...

Страница 71: ...0004 v1 0 7 Click Add 8 Your service is now listed in the Port Forwarding table All incoming requests for the selected service will now be directed to the selected device The Gateway also automatically configures its firewall to allow this service ...

Страница 72: ... to translate the port numbers This means that the incoming port can differ from the target port Procedure 1 Browse to the Admin Tool http 192 168 0 1 For more information see Accessing the Admin Tool on page 25 2 On the Advanced menu click Port Triggering 3 The Port Triggering page appears In the Enable Port Forwarding list click Enabled In the Port Triggering table click Add Port Trigger 4 The A...

Страница 73: ...nge If you only want to specify one port use the same number as in the Target Port From box 5 Click Add 6 Your service is now listed in the Port Triggering table All incoming requests for the selected service will now be directed to the selected device The Gateway also automatically configures its firewall to allow this service ...

Страница 74: ...d IP address for the DMZ host Make sure that your DMZ host uses a fixed IP address If not the device might get a new IP address after some time through DHCP and the port forwarding rule will no longer be applied to the device and another device may suddenly be acting as DMZ host For more information see 7 2 Assigning a reserved IP to a device How to configure a device as DMZ host 1 Browse to the A...

Страница 75: ...server network printer it is advised to assign a reserved IP to the device This way the device will always be reachable on the same IP address and there is no risk that you are accessing the wrong device How to assign a reserved IP Proceed as follows to do so 1 Browse to the Admin Tool http 192 168 0 1 For more information see Accessing the Admin Tool on page 25 2 On the left menu click Connected ...

Страница 76: ...ONFIGURATION DMS CTC 20140127 0004 v1 0 If your device is not listed proceed as follows 1 On the Device click Add Device With Reserved IP 2 The Add Device page appears 3 Enter the settings of your choice 4 Click Save ...

Страница 77: ...ing configuring or using your Gateway If the suggestions do not resolve the problem look at the support pages on www technicolor com or contact your service provider Topics This chapter describes the following topics Topic Page 8 1 Wireless connection troubleshooting 66 8 2 Network diagnostic tools 68 8 3 Gateway reset and restore options 69 ...

Страница 78: ...ation see Make sure that the wireless access point is enabled on page 67 Poor wireless connectivity or range Try the following Check the signal strength indicated by the wireless client manager If the signal is low try to reposition the Gateway If you are connected to the 5 GHz access point try connecting to the 2 4 GHz access point instead Change the wireless channel Use WPAWPA2 PSK TKIP AES as e...

Страница 79: ...ation see Accessing the Admin Tool on page 25 2 Under Gateway click Connection and then click WiFi 3 The WiFi page appears Click the Edit button next to the access point that you want to modify 4 The Edit page appears 5 In the Wireless Network list click Enabled 6 Click Save Settings Cannot connect via WPS If you are having trouble connecting your wireless client via WPS try to configure it manual...

Страница 80: ... How to access the network diagnostics tools 1 Browse to the Admin Tool http 192 168 0 1 For more information see Accessing the Admin Tool on page 25 2 On the Troubleshooting menu click Diagnostic Tools 3 The Network Diagnostic Tools page appears The following tools are available Test Connectivity Results Check for IPv4 Address Results Check for IPv6 Address Results ...

Страница 81: ...ay 3 The Reset Reboot Gateway page appears Click Reset to restart the Gateway Reset WiFi Module to restart just the wireless module only Reset WiFi Router to restart the wireless and router modules Restore WiFi Settings to activate the Gateway default settings for wireless only All changes to the default wireless settings will be undone Restore Factory Settings to activate all Gateway default sett...

Страница 82: ...set button on the back panel of the Gateway for approximately 5 seconds and then release it Restore the factory default settings of the Gateway use a pen or an unfolded paperclip to push the recessed Reset button on the back panel of the Gateway for at least 15 seconds and then release it 3 The Gateway restarts Reset ...

Страница 83: ......

Страница 84: ...nced are service marks trademarks or registered trademarks of their respective companies Specifications subject to change without notice DMS CTC 20140127 0004 v1 0 TECHNICOLOR WORLDWIDE HEADQUARTERS 1 rue Jeanne d Arc 92443 Issy les Moulineaux France www technicolor com ...

Отзывы: