background image

User’

s Manua


11 


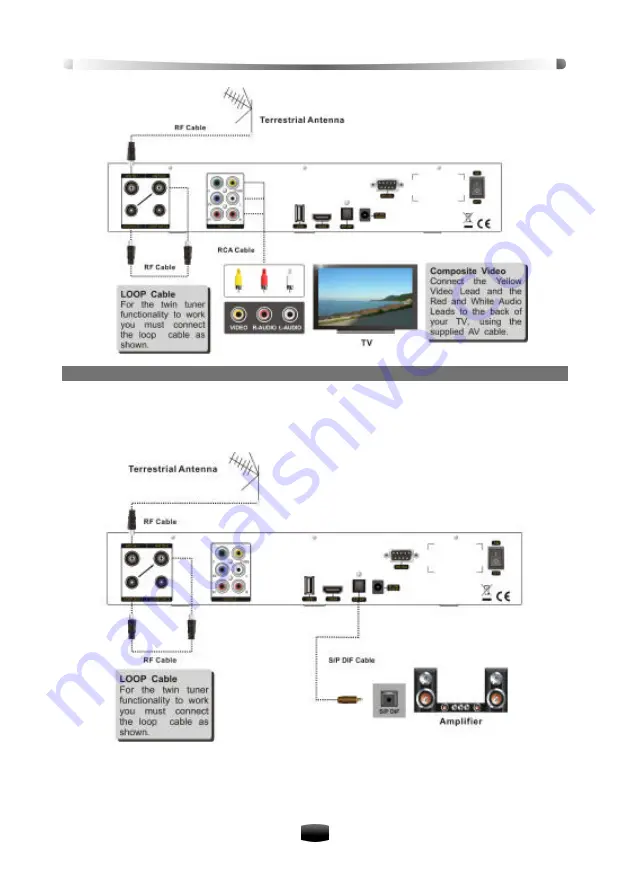
4. To use S/P DIF connection 

If you want to enjoy Dolby digital audio, your TV or audio system must be able to decode Dolby 
digital audio. Plug one end of the optical S/P DIF cable into the 

S/P DIF

 socket on the unit, and 

plug the other end into the matching socket on your audio system. 


2.2 Inserting batteries in RCU 

Remove the battery cover from the remote control. Insert 2 x AAA size batteries inside the 
battery compartment. Please take note of the battery’

s polarity which is indicated inside the 

battery compartment. 

Содержание HDR2700T

Страница 1: ......

Страница 2: ......

Страница 3: ...p Boxes Module 1 Year No In Home Service VCR 1 Year No In Home Service DVD Module 1 Year No In Home Service DVD Recorder PVR Module 1 Year No In Home Service Audio Systems 1 Year No In Home Service 3 In Home Service Pick up will only be provided as part of this warranty if all the following conditions are met a The product as indicated in the Warranty Period Table b The product is within the warra...

Страница 4: ... of and do not extend to and exclude any damage or loss occurring by reason of during associated with or related to such installation de installation re installation or transit 7 Normal customer maintenance as described in the owner s manual is not covered by this warranty such as cleaning VCR heads etc 8 Service will be provided only during normal business hours and under safety con ditions and c...

Страница 5: ...thorised Service Centre 3 Please have your purchase receipt as your proof of purchase and the following details completed for a valid Warranty Owner s Name Owner s Address Postcode Model Name No Serial No Dealer s Name Dealer s Address Postcode 4 Please ensure that your product is packed appropriately upon return to the service centre If you have any other queries regarding service or warranty ple...

Страница 6: ...icate hazardous situations v Warning Alert user to the operation which could result in device damage or data loss and the presence of a hazardous situation which could result in serious injury v Note Remind user of presence of possible problems and information of any importance to help understand use and maintain the installation Note The information in this user s manual is subject to change with...

Страница 7: ...isk of fire or electric shock do not expose this unit to rain splashing and do not place objects filled with liquid on this unit v Do not cover vents of this unit with newspaper table cloth curtain etc v Do not put heavy objects on this unit v Unplug power adapter of this unit from wall outlet before cleaning To reduce damage clean this unit with dry cloth Do not let liquid and spray flow into thi...

Страница 8: ...th power supply Switch it to o related equipment will disconnect with power supply completely v Only use accessories specified by the manufacturer as other unsupported accessories may cause damage to the unit v Never open the digital unit casing under any circumstances otherwise the warranty will be void v Refer all servicing to a qualified service technician ...

Страница 9: ...ion 14 3 8 Picture in Picture PIP 15 4 Electronic Program Guide EPG 15 4 1 View EPG Information 16 4 2 Schedule Program using EPG 16 4 3 View Detailed Program Information 17 5 Personal Video Recording PVR 17 5 1 Set Storage Device 17 5 2 Set Recording Parameter 18 5 3 Quick Recording 18 5 4 Schedule Recording 20 5 5 Playback File 21 5 6 Edit Recorded File 23 5 7 Time Shift 25 5 8 Shortcut Key of P...

Страница 10: ... Modify Password 31 9 3 PG parental Lock 31 9 4 Resume Default 31 10 Software Upgrade 32 11 Information 32 11 1 Channel Information 32 11 2 System Information 32 12 Appendix 33 12 1 Trouble Shooting 33 12 2 Specification 34 12 3 Acronym 35 ...

Страница 11: ... playing and photo browsing Ø Teletext and closed caption supported Ø EPG supported Ø Memory space up to 5000 channels Ø Support automatic manual search Ø Powerful channel edit function Ø Favorite channel group Ø PAL NTSC supported Ø Software upgrade supported Ø HDMI output support 1080i 1080P 720p Ø YPbPr output support 1080i 1080P 720p Ø S P DIF audio supported Ø USB 2 0 interface supported 1 2 ...

Страница 12: ... the volume change values for menu options or move cursor left right 3 7 CH Switch to next or previous channel or move cursor down up 4 USB Connect USB devices like a memory stick or an external hard disk drive 5 OK Display channel list or confirm operation RCA cable 1 RF male to RF female loop cable ...

Страница 13: ... a channel number for changing channels or to specify values for menu options 6 TEXT P Display teletext information or down pages 7 CC P Switch on off closed caption or up pages 8 LAST Switches between the current channel and the previously viewed channel 9 INFO Press once to display current and follow ing program Press twice for detailed information on current program 10 14 CH Switch to previous ...

Страница 14: ...e live television or playback of a recorded file 30 STOP Stop playback or recording and return to live television 31 REW Start reverse playback in fast motion Subsequent presses increase the rewind speed x2 x4 x8 x16 x32 32 TIMER RECORD Display schedule window see 5 4 Schedule Recording 33 FF Start forward playback in fast motion Subsequent presses increase the playback speed x2 x4 x8 x16 x32 34 S...

Страница 15: ...ey the indicator light be gins to flash slowly 3 Aim the TV RCU at receiving window of the HDR2700T RCU and press the corresponding key on the TV RCU such as POWER key to be learnt The indicator light will begin to flash quickly then remain brightly illuminated indicating the learning process has been successful 4 Repeat step 2 and 3 to set other learning keys in the same way 5 After setting press...

Страница 16: ...reo audio signal to TV or amplifier 5 USB Connect to specific USB device 6 HDMI Output high definition video and audio signal to TV 7 S P DIF Optical output socket for Dolby digital output digital audio signal to amplifier 8 DC power supply 9 ANT IN1 Terrestrial broadcasting signal input socket for the first tuner 10 ANT IN2 Terrestrial broadcasting signal input socket for the second tuner 11 CVBS...

Страница 17: ...other unit connect it from LOOP OUT 2 connector v If you want to receive analogue channels on your TV connect the antenna cable from the TV to LOOP OUT 2 connector 2 1 2 Connecting to your TV set Between all the following connectors of the digital unit we recommend you to use the HDMI connection to get best picture quality If your TV does not have the matching connector then use the next connectio...

Страница 18: ...e unit and plug the other end into the matching sockets on your TV or audio system 3 To use CVBS composite video and audio connectors Note You cannot view high definition video with the composite video connector 1 Plug one end of the composite video cable into CVBS yellow socket on the unit and plug the other end into the matching socket on your TV 2 Plug one end of the audio cable into the AUDIO ...

Страница 19: ...of the optical S P DIF cable into the S P DIF socket on the unit and plug the other end into the matching socket on your audio system 2 2 Inserting batteries in RCU Remove the battery cover from the remote control Insert 2 x AAA size batteries inside the battery compartment Please take note of the battery s polarity which is indicated inside the battery compartment ...

Страница 20: ...ally and the channel number is shown on front panel DISPLAY 2 If there is no channel stored in the unit after initialization system will search channels automatically Refer to 7 2 Search Type for more search details 2 5 Active Standby Passive Standby The unit supports two standby modes v ACTIVE Standby v PASSIVE Standby To turn off unit press STB POWER key on the remote control or front panel ther...

Страница 21: ...Switch You can switch channels using the following methods v Press keys to switch channel v Input channel number with number keys v Press LAST key to switch to the previously viewed channel v Select channel in channel list Refer to 3 4 Channel List for detailed operation 3 2 Volume Control v Press keys to adjust volume level of your unit v Press MUTE key to mute restore sound 3 3 Program Informati...

Страница 22: ...y to display favorite channel list 3 5 Audio Selection Some programs provide more than one audio track with one or more languages In addition you can enjoy audio tracks in three sound modes Stereo Left or Right 1 Press AUDIO key to display audio selection window 2 Press keys to select audio language and press keys to select audio mode 3 Press EXIT key to save and exit Note Subject to availability ...

Страница 23: ...een such as channel list detailed information etc The modified setting only takes effect after restarting the receiver There will be no video output through RCA if PIP function is activated In this case connect the unit to HDTV with YPbPr or HDMI cable and modify the setting to OFF The audio in main screen will be available 2 Display hide PIP Window Press PIP key to display hide PIP window 3 Swap ...

Страница 24: ...urrent program in red in full screen or pop up a drop down list that consists of Detail and Book program in white 4 2 Schedule Program using EPG 1 Press keys to select a future program 2 Press OK key to pop up a drop down list 3 Select Book program and press OK key to pop up EPG schedule window 4 Set schedule type and mode For detailed op erations please refer to 5 4 1 Add Schedule 5 Press OK key ...

Страница 25: ...disk is insufficient recording will stop automatically Uninstall USB device before unplugging it from the unit Refer to 5 9 2 Storage Uninstall for detailed operations This unit supports recording programs of two channels simultaneously Warnings We cannot guarantee compatibility operation and or bus power with all USB mass storage devices and assume no responsibility for any loss of data that may ...

Страница 26: ...Sec 120 Sec or OFF v PVR Icon Time out Once recording has started a symbol with recording time recording channel and duration is shown on the screen You can change the display time of the symbol Press keys to select Always 5 Sec 10 Sec 30 Sec or 60 Sec If Always is selected PVR icon is displayed on the screen throughout the recording v Default Recording Duration Set default recording duration of q...

Страница 27: ...e to the recording file and USB storage device 2 Current Recording Information Switch to a channel you are currently recording and press RECORD key to enter recording information window or select Main Menu PVR Recording Info and press OK key to enter v Index Press keys to select recording index R1 or R2 v Mode Display recording mode Quick or Schedule v Channel Name Display channel name v File Name...

Страница 28: ...cord channel at the specific time automatically Schedule Start Time Press OK key to display calendar window You can select a specific date using the arrow keys then press the FAV key to enter a starting time using the number keys The recording will be started at the specific time Press OK key to save and re enter the schedule window Schedule End Time Press number keys to input end time Schedule Mo...

Страница 29: ... back you must not disconnect it from the unit Arbitrary disconnecting may cause damage to the recorded file Select Main Menu REC Files and press OK key to enter or press LIST key to enter directly in non menu mode The instructions on how to play a recorded file are as follows If there are several storage devices connected to your receiver at the same time or you have created favorite groups you c...

Страница 30: ... following steps during playback v Add Bookmark 1 Press INFO key to display the process bar 2 Press Green key to add a bookmark at a desired scene then you will see a small triangle appear on the progress bar as per the picture on the right v Go to Bookmark 1 Press INFO key to display the process bar 2 Press Yellow key to jump to the next bookmark on progress bar The file will be played from the b...

Страница 31: ...to select a file you want to delete 2 Press OK key to pop up a drop down list 3 Select Delete and press OK key to confirm The file is marked with If you want to cancel the setting press OK key again to pop up the drop down list Select Cancel Delete and press OK key to confirm 4 After pressing EXIT key a confirmation message is displayed on the screen for confirma tion Select OK to delete the selec...

Страница 32: ...wn list 3 Select Rename and press OK key to display an on screen keyboard You can move the cursor horizontally with keys and vertically with keys Press OK key on a button to enter its character on the input line To delete all characters on the input line select Clear and press OK key To switch between upper and lowercase select Caps On and press OK key To delete last character on the input line se...

Страница 33: ...Parameter 1 Using Time Shift After starting time shift the unit records current program on embedded HDD in the background temporarily You can playback it as if playback a recorded file You can perform pause play fast backward forward etc Refer to 5 5 Playback File for detailed operations You can also press INFO key to display playback progress bar It displays current channel information playback p...

Страница 34: ...atted HDD This unit only supports Consumer Electronics CE HDD specially made for PVR video recording 2 Storage Uninstall Warning Uninstall storage device before unplugging it from the receiver Otherwise device may be damaged or system abnormal Select Main Menu PVR Storage Uninstall and press OK key to enter 1 Select a desired storage device 2 Select OK and press OK key to pop up a warning box for ...

Страница 35: ...dom Play 3 Press EXIT key to stop play and exit 6 2 Digital Photo Select Main Menu Multimedia Digital photo and press OK key to display photo list 1 Press keys to select a photo 2 Press OK key to display it in full screen and you can operate as follows keys Display previous next photo key Pop up photo setting window to select slide show 3 Press EXIT key to exit 7 Channel Search This will guide you...

Страница 36: ...ey to pop up a drop down list 3 Select Delete and press OK key to delete it 7 2 Search Type 1 Manual Search You may choose to search for channels on a specific frequency since more than one channel is available via each frequency You can set the parameters manually and scan for channels at the set frequency Select Main Menu Channel Manual Search and press OK key to enter 1 Set parameters as follow...

Страница 37: ...ress keys to select a channel 2 Press key to pop up a drop down list 3 Highlight Favorite and press OK key to mark this channel with If you want to cancel this setting press OK key again to pop up the drop down list and select Cancel Favorite and press OK key to confirm 8 2 Lock Channel 1 Press keys to select a channel 2 Press key to pop up a drop down list 3 Highlight Lock and press OK key to mar...

Страница 38: ... be reduced to fit to the width of the normal screen Resolution The unit supports various video resolutions 1080P 1080i 720p or 576p The resolution of 720p 1080P and 1080i are con sidered high definition The higher resolution the better quality you can enjoy However if your TV set does not support high definition you cannot enjoy high definition quality picture You can set the option to the highes...

Страница 39: ...nus such as Channel Edit Software Update Resume Default etc The password is set to 0000 by default You can change this password if necessary Select Main Menu Setting Modify Password and press OK key to enter The password is needed to activate the setting 1 Press number keys to input new password 2 Press number keys to input new password again for confirmation 3 Press EXIT key to save and exit Note...

Страница 40: ...e to your USB memory stick 3 Turn on the unit 4 Insert the USB storage device into the USB port on the unit 5 Select Main Menu Setting Software Up date 6 Enter the password default 0000 Software Upgrade menu 7 Press keys to select the software and press OK key to upgrade During this process an upgrade progress bar is displayed on screen 8 After upgrade a message will be displayed on the screen and...

Страница 41: ...set incorrectly Set a proper audio parameter No picture 1 Video cable is disconnected or incorrectly connected Connect video cable correctly 2 The unit is in radio mode Switch it to TV mode if you need Video and audio mismatch or abnormal sound Audio parameter has been set incorrectly Select a proper audio parameter Poor quality picture Weak signal Connect signal cable securely RCU doesn t work 1 ...

Страница 42: ...ion 1920 1080i Max Audio Decoding Standard ISO IEC 13818 3 and TR101154 Decoding MPEG 1 layer I and II AC3 Audio Mode Left Right Stereo Audio Sampling Frequency 32 44 1 48KHz High Definition Output Output Format 1080i 1080P 720p Output Connector HDMI YPbPr Memory Flash Memory 8MB DDR 192MB Front Panel IR Receiver 38KHz 5 Keys VOL CH OK Rear Panel ANT IN 2 LOOP OUT 2 HDMI YPbPr CVBS AUDIO L R S P D...

Страница 43: ...type MP3 Picture file type JPEG 12 3 Acronym DVB Digital Video Broadcasting EPG Electronic Program Guide FTA Free to Air HDD Hard Disk Drive HDMI High Definition Multimedia Interface MUX Multiplexer OSD On Screen Display PVR Personal Video Recording RCA Radio Corporation of America RCU Remote Control Unit S P DIF Sony Philips Digital Interface Format USB Universal Serial Bus ...

Страница 44: ......

Отзывы: