background image

408-8678 

Rev

 F


of 11


7.


INSPECTING THE CRIMP HEIGHT 

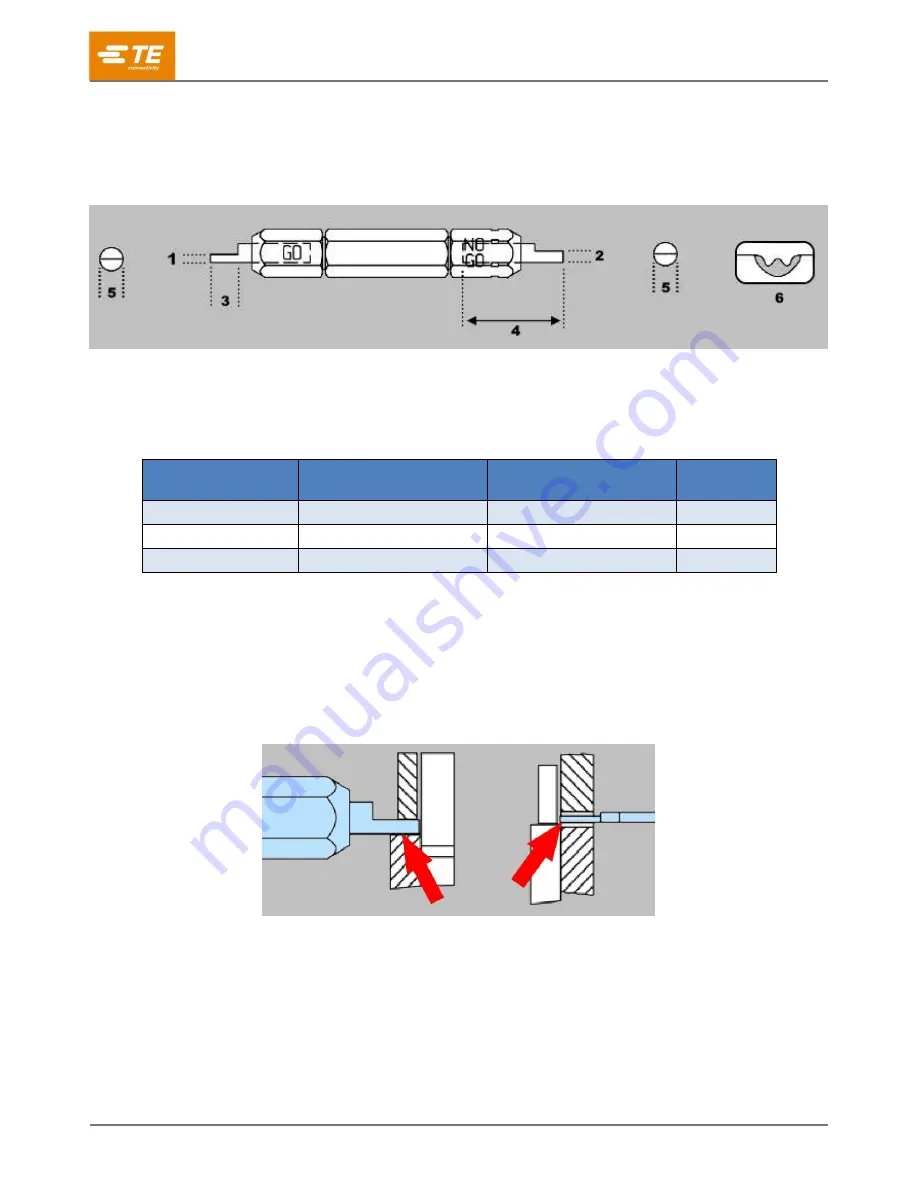
This inspection requires the use of plug gages conforming to the dimensions provided in Figure 8 and Table 2. 
TE Connectivity does not manufacture or market these gages.  

Figure 8: Recommended plug gage design 


GO dimension 

4


50.8 [2.00] minimum (typical) 

NO-GO dimension 

5

  Radius (see Table 2) 

12.7 [.50] minimum (typical) 

6

  Die closure configuration 

Table 2: Gage element dimensions 

Crimping chamber 

(die marking) 

GO element


NO-GO element


Radius


22-16 

1.143-1.151 [.0450-.0453]  1.344-1.346 [.0529-.0530] 

1.57 [.062] 

16-14 

1.346-1.354 [.0530-.0533]  1.547-1.549 [.0609-.0610] 

1.98 [.078] 

12-10 

1.905-1.913 [.0750-.0753]  2.106-1.108 [.0829-.0830] 

2.77 [.109] 

To gage the crimping chamber, complete the following steps: 

1.  Remove traces of oil or dirt from the crimping chamber and plug gages. 

2.  Close the tool handles until the crimping dies have bottomed. Do 

not

 force dies beyond initial contact. 

3.  Align the GO element with the crimping chamber. Gently push the element straight into the crimping 

chamber. The GO element must pass completely through the crimping chamber (Figure 9). 

Figure 9: GO element  


Содержание 58545-1

Страница 1: ...III Hand Crimping Tool Assembly 58546 1 with Die Assembly 58545 1 1 Die set 58545 1 7 Ratchet adjustment wheel 2 Crimper upper die 8 Ratchet adjustment screw 3 Anvil lower die 9 Pivot pin 4 Stationar...

Страница 2: ...gure 12 for specific relationships NOTE Dimensions in this instruction sheet are in millimeters with inches in brackets Figures are for reference only and are not drawn to scale Read these instruction...

Страница 3: ...ame engages sufficiently to hold the dies in place 7 Tighten both die retaining screws 4 REMOVING THE DIE ASSEMBLY 1 Open the tool handles until the ratchet releases 2 Remove the two die retaining scr...

Страница 4: ...Figure 5 If the brazed seam on the terminal or splice is visible orient it toward the indenter Figure 3 Crimping a splice Figure 4 Crimping a parallel splice 1 Wire barrel centered on anvil of lower d...

Страница 5: ...place fully cycle the tool until the ratchet releases and allows the handle to open 9 To crimp the other half of a splice reposition the uncrimped wire barrel in the crimping chamber and repeat steps...

Страница 6: ...el 8 Wire size matches wire range or size stamped under tongue 9 Bare wire ends are flush with or extend slightly beyond end of wire barrel 10 Wire size matches wire range or size stamped on splice Fi...

Страница 7: ...rking GO element NO GO element Radius 22 16 1 143 1 151 0450 0453 1 344 1 346 0529 0530 1 57 062 16 14 1 346 1 354 0530 0533 1 547 1 549 0609 0610 1 98 078 12 10 1 905 1 913 0750 0753 2 106 1 108 0829...

Страница 8: ...mber Figure 10 Figure 10 NO GO element If the crimping chamber conforms to the gage inspection the tool is considered dimensionally correct Lubricate it with a thin coat of any good SAE 20 motor oil I...

Страница 9: ...h a screwdriver adjust the ratchet wheel from the front side of the tool If the crimp height is larger than recommended rotate the adjustment wheel counter clockwise to a higher setting If the crimp h...

Страница 10: ...ed worn or broken areas If damage or abnormal wear is evident replace the tool or dies Refer to section 10 REPLACEMENT AND REPAIR 10 REPLACEMENT AND REPAIR Customer replaceable parts are shown in Figu...

Страница 11: ...ool 9 1478240 0 instruction sheet 408 8851 Die Assembly 58545 3 for SDE Bench Terminator 1490076 2 customer manual 409 10052 Die Assembly 58545 4 for 626 Adapter 679304 1 instruction sheet 408 4070 Di...

Отзывы: