background image

409-35003 

Rev B 

of 9 

4.


DIE INSTALLATION AND REMOVAL 

CAUTION 

Do not operate the tool without the C-Head Adapter installed - damage to the ram or seals can result. 


CAUTION 

Do not operate the tool without a die set installed. Damage to the adapter can result.


C-Head Adapter Battery Powered Crimp Tool Kit 2844990-[ ] comes with the C-Head already installed on the 
Battery-powered hand tool. The only installation required is the installation of the dies. 
 

DANGER 

To avoid personal injury, be sure to exercise extreme caution when handling the crimp tool. Remove the battery before 
installing or removing the dies. 

4.1.


Die Set Installation

 (Figure 5)


If dies to be installed in the tool require insulation adjustment, refer to the instruction sheet packaged with the 
dies for adjustment, then proceed as follows: 
 
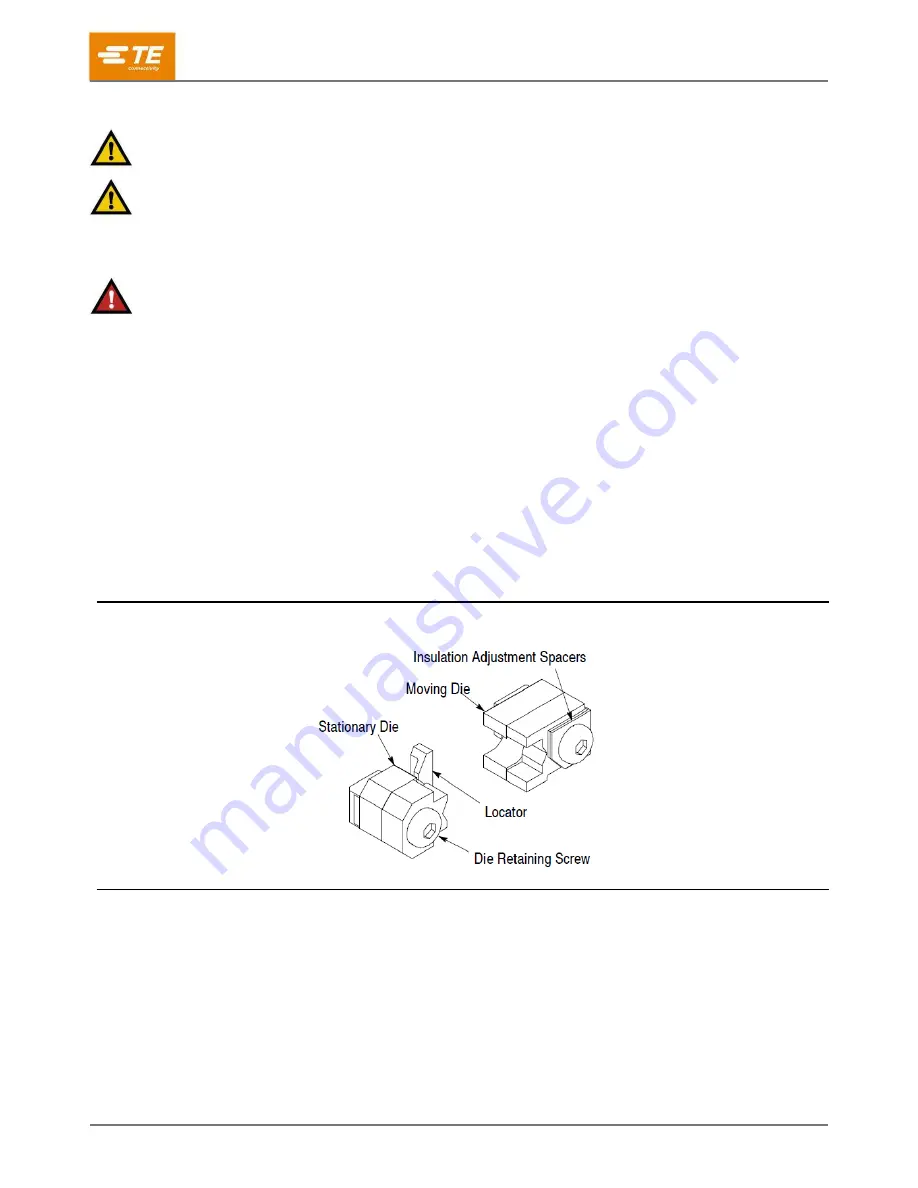
Each set of dies consists of a moving die and a stationary die. Most moving dies have square corners and the 
stationary dies have chamfered corners. Exceptions to this feature will be shown on instruction sheets covering 
the use of the particular dies. 

1.  Remove the battery from the tool. 

2.  Position the stationary die in the stationary die holder. Turn the die retaining screw sufficiently to hold 

the die in place. Do not tighten the screw. 

3.  Position the moving die in the moving die holder. Turn the die retaining screw sufficiently to hold the 

die in place. Do not tighten the screw. 


Figure 5 


4.  Replace the battery and check the alignment by pulsing the trigger to (slowly) close the dies, making 

sure the anvil and indenter are properly aligned. 

5.  With the dies closed, tighten the die retaining screws. 

4.2.


Die Set Removal 

To remove or change the dies, simply loosen the die retaining screws and remove the dies. 


Typical Dies 

Содержание 2844990-1

Страница 1: ...2 SAFETY PRECAUTIONS AVOID INJURY READ THIS FIRST 3 1 INTRODUCTION 4 2 RECEIVING AND INSPECTION 5 3 USER INTERFACE INFORMATION PRE OPERATION TESTING 5 3 1 LED Indicators 5 3 2 Pressure Sensor 5 4 DIE...

Страница 2: ...nearby personnel Failure to observe this warning could result in severe injury or death CAUTION Do not place the tool in a vise The crimping tool is designed for hand held operation Protect the crimpi...

Страница 3: ...t Never wear loose clothing or jewelry that may catch in moving parts of the equipment Never alter modify or misuse the equipment SUPPORT CENTER CALL TOLL FREE 1 800 522 6752 CONTINENTAL UNITED STATES...

Страница 4: ...powered crimping tool may have a release switch to retract the ram Crimping Tool Kit Region Of Use Battery Charger Battery Charger Voltage Ram Retract Switch 2844990 1 North America 2217331 1 110V Yes...

Страница 5: ...RMATION PRE OPERATION TESTING 3 1 LED Indicators White LED Work Light The LED automatically turns on when the trigger is pulled The indicator remains lit for ten seconds after the trigger is released...

Страница 6: ...for adjustment then proceed as follows Each set of dies consists of a moving die and a stationary die Most moving dies have square corners and the stationary dies have chamfered corners Exceptions to...

Страница 7: ...n the crimping head DANGER To avoid personal injury keep fingers clear of the crimping area To operate the C Head Adapter Battery Powered Crimp Tool PN 2844990 1 Insert the terminal into the dies 2 De...

Страница 8: ...ing tool battery contacts damaged Reform the contacts Tool components are worn or damaged Return tool to TE for evaluation Jaws stop during operation Oil level is low Return tool to TE for evaluation...

Страница 9: ...N ON HAZARDOUS SUBSTANCES RoHS INFORMATION Information on the presence and location of any substances subject to RoHS can be found at http www te com usa en utilities product compliance html 1 Click C...

Отзывы: