TCS Goldcard N-100 Скачать руководство пользователя страница 13

I Think Customer’s Success 


13

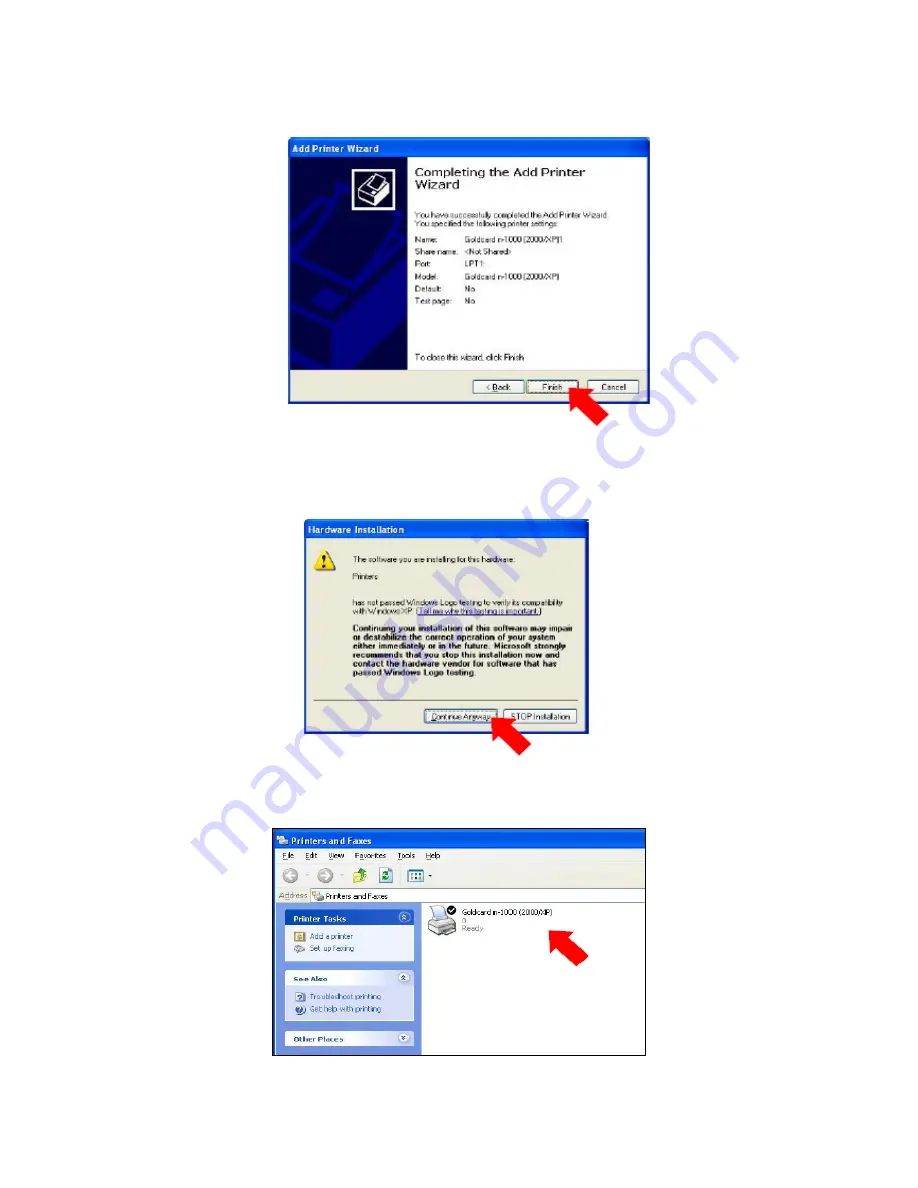
(14) Make sure the selection you’ve done, and then press the [Finish] button. 


(15) During the file coping process, press the [Continue Anyway] button on the 

question of continuing the installation or not. (If you press the [STOP Installation] 

button, the installation should be canceled.) 


(16) After copying the related files, a Goldcard n-1000 icon is added in the Printers 

and Faxes window. Now, the driver installation is finished on Windows XP. 


Содержание Goldcard N-100

Страница 1: ...Goldcard N 1000 Printer User s Guide Copyright 2005 ITCS Co Ltd...

Страница 2: ...Functional Description INSTALLATION 6 page 1 Computer Environments Setting 2 Driver Installation on Window 2000 XP 3 Installation of printer 1 Installation of Parallel Port and Power Cable 2 Ribbon Se...

Страница 3: ...ser and Ribbon Roller Cleaning 4 Cleaning Others SUPPORT 24 page 1 Control Panel 1 Descriptions 2 Error Display 2 Customer Service 1 After Sales Service Policy 2 Procedure for ASS 3 Etc inquiries 3 Qu...

Страница 4: ...differentiated images to add value on your business The compact desktop card printer offers an easy to use application that enables the user to print out cards in just seconds from your personal comp...

Страница 5: ...Goldcard N 1000 1 Printer and Basic Accessories The follow elements are supplied with Goldcard N 1000 printer Printer cable Power supply GoldcCrd N 1000 CD Driver Documentation Cleaning kits Goldcard...

Страница 6: ...l roller to hold ribbon Card passes for printing 3 Top cover Part Picture 2 Top Cover Picture 2 A with thermal head ribbon motor and cleaner Printer cover to pull ribbons and printing 4 Card out put P...

Страница 7: ...key instead in some different computers 2 Select Integrated Peripherals menu Select Peripherals or Advance instead in some different computers 3 Check if Onboard Parallel Mode is set as ECP EPP option...

Страница 8: ...0 xp 1 Insert a Driver CD into your CD ROM and select Printers and Faxes in the Start menu 2 Double click Add Printer icon on the left menu in the Printer window to start the Add Printer Wizard 3 In t...

Страница 9: ...e Local printer attached to this computer option uncheck the Automatically detect and install my Plug and Play printer option and then press the Next button 5 Make sure that LPT1 is selected as the po...

Страница 10: ...tton 7 In the Install From Disk page press the Browse button 8 Select Windows XP Driver Folder of your CD ROM drive and select Goldcard n 1000 inf again in the file list After file selection press the...

Страница 11: ...k page again press the OK button 10 Make sure that a Goldcard n 1000 2000 XP is selected and then press the Next button 11 Write Printer Name choose to set a Goldcard n 1000 as the default printer and...

Страница 12: ...I Think Customer s Success 12 12 Choose if or not to share the printer and then press the Next button Do Not Share recommended 13 Set printing a test page as No and then press the Next button...

Страница 13: ...process press the Continue Anyway button on the question of continuing the installation or not If you press the STOP Installation button the installation should be canceled 16 After copying the relat...

Страница 14: ...le options These options is set in the Printer Property dialog box 18 Press the Goldcard n 1000 icon with the right button of the mouse in the Printers and Faxes and then select the Property menu on t...

Страница 15: ...I Think Customer s Success 15 20 Set Layout as Landscape and then click Options tab in the upper tabs 21 Change the value of Contrast to 80 and then press the OK button...

Страница 16: ...and driver will work only with Window 98 2000 XP 22 Press the OK button in the previous page 23 Now all you need to do for using a Goldcard n 1000 printer on Windows XP is finished 3 Installation of P...

Страница 17: ...r The ribbon must be correctly installed for the printer to work 3 Install ribbon on ribbon supporter Refer to A B 4 Close the printer cover Caution Only authorized ribbons to be used Defaults caused...

Страница 18: ...t with card face to be printed Do not use folded damaged cards Keep cards clean Shake cards to be printed before loading to secure separation of cards from static electricity or humidity 3 Card Loadin...

Страница 19: ...talled PRINTING 1 Design Install Corel Draw or Illustrator design programs 1 Layer Layer enables permanent file storing minimizing defaults in operation and detection of ribbon replacement timing to p...

Страница 20: ...ways either by Setting or Printer and Fax in Windows XP First 1 Open the setting or printer and fax 2 Select Registration Info of N 1000 or Properties menu 3 Move to Options tab in dialog box or to D...

Страница 21: ...be made per forms for thermal printing 1 Forms with dense data with wide image 80 contrast printing 60 78 2 in case of general text form 80 default printing 2 Contrast adjustment for Gold Silver ribb...

Страница 22: ...1 Head cleaning 1 Open top cover 2 Scrubbing head with alcoholized cloth 2 Roller cleaning Click Control panel 1 Remove ribbon after opening top cover 2 Push clear button left Three rolling rollers ar...

Страница 23: ...er to clean wrinkle robber roller 4 cleaning others Picture 1 Picture 2 1 Open top cover and remove ribbon 2 Clean arrow area in Picture 2 Remarks Do cleaning as instructed to maintain best printing e...

Страница 24: ...as under Warning sign as under Control panel Clicking Pause button to interrupt the printing The PSE sign will appear Click Clear button to cancel the printing and to return to default status Click Pa...

Страница 25: ...under 1 Guaranteed period will be one year from the delivery date 2 Defects accruing to user s mistake and or unobserved regulations given by ITCS are not subject to the after sales service even withi...

Страница 26: ...uro Dong Guro Gu Seoul Korea 3 etc inquiries I I T TC CS S H Ho om me ep pa ag ge e Following informations are available in ITCS homepage at www i tcs co kr printer printer driver Consumables includin...

Страница 27: ...ng Error in data transfer Rebooting of P C and or Printer Opened Top Cover Close the top cover firmly Ref Picture 4 4 Open OPN signal in display No ribbon or wrongly installed ribbon Supply or reinsta...

Страница 28: ...ccess 28 Picture 1 Adjustment of dispenser bolt Picture 2 After removing cards clean the robber roller inside of the dispenser Picture 3 Picture 6 Cleaning roller and sensor Picture 4 Tightly closed t...

Страница 29: ...I Think Customer s Success 29 Picture 5 Connecting the broken ribbon...

Страница 30: ...x 245mm H Printer Weight 8kg Tray Capacity Up to 350 sheets Interface Parallel ECP ECP EPP Power DC 24V 3A Adapter 100 240V 50 60Hz O S Win 98 2000 XP MAC Environment Operating Temp 15 30 Humidity 20...

Отзывы: