3
1.
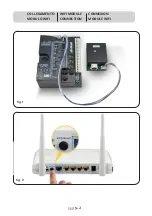
Collegare il modulo T-CONNECT per la TAUOPEN 2.0 alla centrale di comando tramite gli appo-
siti cavi. Collegarlo su connettore J4 delle centrali serie Diamond. (fig. 1)
N.B: Il modulo T-CONNECT per la TAUOPEN 2.0
funziona solo con centrali con firmware a
partire dalla serie 7.00 (Controllare sull’etichetta del microprocessore)
2.
La connessione del modulo T-CONNECT alla rete domestica può avvenire in due modi:
- Via cavo di rete ETHERNET mediante la presa LAN RJ45.
Oppure:
- Configurando il modulo con la rete wifi di casa.
ESEMPIO CON RETE WIFI:
- Attendere che sul T-CONNECT il led rosso e il verde lampeggino simultaneamente dopo circa
30 secondi.
- Premere il tasto WPS del router wifi di casa (fig. 2)
- Subito dopo (se si aspetta troppo tempo il T-CONNECT uscirà dalla procedura), premere il
tastino rosso del modulo T-CONNECT per 1 s, dopodichè i due led si riaccenderanno fissi. Suc
-
cessivamente il led verde inizierà a lampeggiare una volta ogni 2 s. per conferma di avvenuta
connessione.
POSSIBILI ERRORI E RIMEDI
ERRORE
DESCRIZIONE
RIMEDIO
Errore di connessione
Se il led verde è acceso e il led rosso lampeggia è un errore di
connessione.
Rimedio: controllare la portata e il segnale del Wi-Fi e ritentare la
connessione (vedi punto 2).
1. Connect the T-CONNECT module for TAUOPEN 2.0 to the control unit using the appropriate
cables. Connect it to connector J4 of the Diamond series control units. (fig. 1)
N.B: The T-CONNECT module for TAUOPEN 2.0 works only with control units with firmware
starting from the 7.00 series (Check on the microprocessor label)
2. Connecting the T-CONNECT module to the home network can be done in two ways:
- Via ETHERNET network cable with the RJ45 LAN socket.
Or:
- By configuring the module with the home wifi network.
EXAMPLE WITH WIFI NETWORK:
- - Wait for the red and green LEDs to flash simultaneously on the T-CONNECT after about 30
seconds.
- Press the WPS button on the home wifi router (fig. 2)
- Immediately afterwards (if you wait too long, the T-CONNECT will exit the procedure) press
the red button of the T-CONNECT module for 1 second, after which the two LEDs will turn on
steadily. Subsequently the green led will start flashing once every 2 seconds confirming the
successful connection.
POSSIBLE ERRORS AND REMEDIES
ERROR
ERROR DESCR
REMEDY
Connection error
If the green led is on and the red led is flashing it is a connection
error.
Remedy: check the range and the Wi-Fi signal and try the connection
again (see point 2).
Содержание 250T-CONNECT TAUOPEN 2.0
Страница 2: ...2 COLLEGAMENTO MODULO WIFI WIFI MODULE CONNECTION CONNEXION MODULE WIFI fig 1 fig 2...
Страница 10: ...10...
Страница 11: ...11...


