


1 – Introduction
TASCAM CC-222
MK
IV
11
2 – Features of the CC-222
@%^
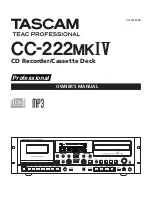
Front panel
This section provides a brief reminder of the functions
provided by these controls.
1
Power switch
(POWER)
Turns the unit on and off.
2
Cassette holder
Open this holder using the
EJECT
key. Insert cassettes tape side downwards, and close the
holder by hand.
3
Tape EJECT key
Opens the cassette holder.
4
RESET key
Resets the tape counter to zero.
5
REC MUTE key
When recording to cassette and this
key is pressed, the sound is muted for about four sec-
onds, and then the unit enters record standby mode.
6
RTZ key
Returns the tape to the zero position.
7
INPUT (cassette) control
This rotary control affects
the level fed to the cassette. Note that it has no effect
during automatic disc-to-tape dubbing if the menu item
bypassing the volume during dubbing is set to “through”.
8
INPUT 2 SEL key
Repeated presses of this key cycles
between the different sources available for the cassette
recorder:
LINE2
and
DISC
.
9
DUB 2 TAPE
<
CD-RW key
Starts the process of auto-
matic recording from the disc to a cassette.
0
Display
Provides information on the status of the cas-
sette and disc transport and the selected input sources, etc.
q
DUB 1 TAPE
>
CD-RW key
Starts the process of auto-
matic recording from the cassette to a recordable disc.
w
INPUT 1 SEL key
Repeated presses of this key cycles
through the different sources available for the CD drive:
OPTICAL
,
COAXIAL
,
LINE 1
,
PHONO
, and
TAPE
.
e
INPUT (CD) control
This rotary control affects the
level fed to the disc. Note that it has no effect during
automatic tape-to-disc dubbing if the menu item bypass-
ing the volume during dubbing is set to “through”.
r
PHONO key
Starts recording from the phono source to
the cassette or disc recorder, depending on the selection
made in the menu system. See the appropriate sections
on recording to either tape or disc.
t
Disc OPEN/CLOSE key
Opens and closes the disc tray.
y
DISPLAY key
Changes the time display for the disc
recording and playback.
u
FINALIZE key
Used when finalizing recordable discs.
i
ERASE key
Used when erasing data from CD-RW
discs.
o
SYNC REC key
Turns synchronized recording of the
disc recorder on and off.
p
MENU key
Repeated presses of this key cycles through
the different menu options.
a
Disc tray
Open and close this tray with the
OPEN/
CLOSE
key to load and unload discs.
s
MULTI DIAL
Used to select and confirm menu settings
etc. (turn to make the setting, push to confirm), and also
as a track search key when playing back discs.
d
REMOTE SENSOR window
Receives the infrared
signals from the remote control unit. Do not block this
window if you are using the remote control unit.
f
REW
key
Rewinds the tape moving fast in the right-to-
left direction.
g
FFWD key
Forwards the tape moving fast in the left-to-
right direction.z
h
Tape STOP key
Stops the current tape transport operation.
j
Tape PLAY key (
˙
)
Starts or resumes tape playback or
recording, from right to left.
k
Tape PLAY key (
¥
)
Starts or resumes tape playback or
recording, from left to right.
l
Tape PAUSE key
Stands by for tape playback or record-
ing. Pressing this key again resumes the operation.


